Guides
Embed a donate button on your website#
A campaign can be embedded directly on your organization's own website — a button, a card, or an inline form. Clicking it always sends the visitor to your Experience Cloud donation page to enter payment details; no card data ever touches the external site.
Watch it first#
The whole embed path, filmed end to end: the origin allow-list first, then the snippet wizard, then the same snippet running on a plain external page. The allow-list is the step people skip, and the clip shows it failing first on purpose: without the origin listed, the widget renders nothing at all — no error on the page, nothing in your org's logs.
Before you start#
Four things have to be true, in Salesforce, before an embed will work on an external site. Skipping any one of them is the most common cause of "the widget doesn't show up."
- Your Experience Cloud donation site is published — not "Under Construction." See Set up your Experience Cloud site.
- Embedding is turned on — Settings → Experience Cloud → Site & Domain, the embed widget master switch. On by default.
- The campaign is Active and has a Public URL — the same requirement as sharing a direct donation link.
- The external site's domain is allowlisted — Settings → Experience Cloud → Site & Domain,
the Allowed Embed Origins list. Add the exact domain that will host the widget (e.g.
https://www.yourorg.org). This is the step people forget — without it, the widget fails to load with a CORS error on that domain.
1. Get the embed code#
Open the Campaign record and find the Embed & Share panel.
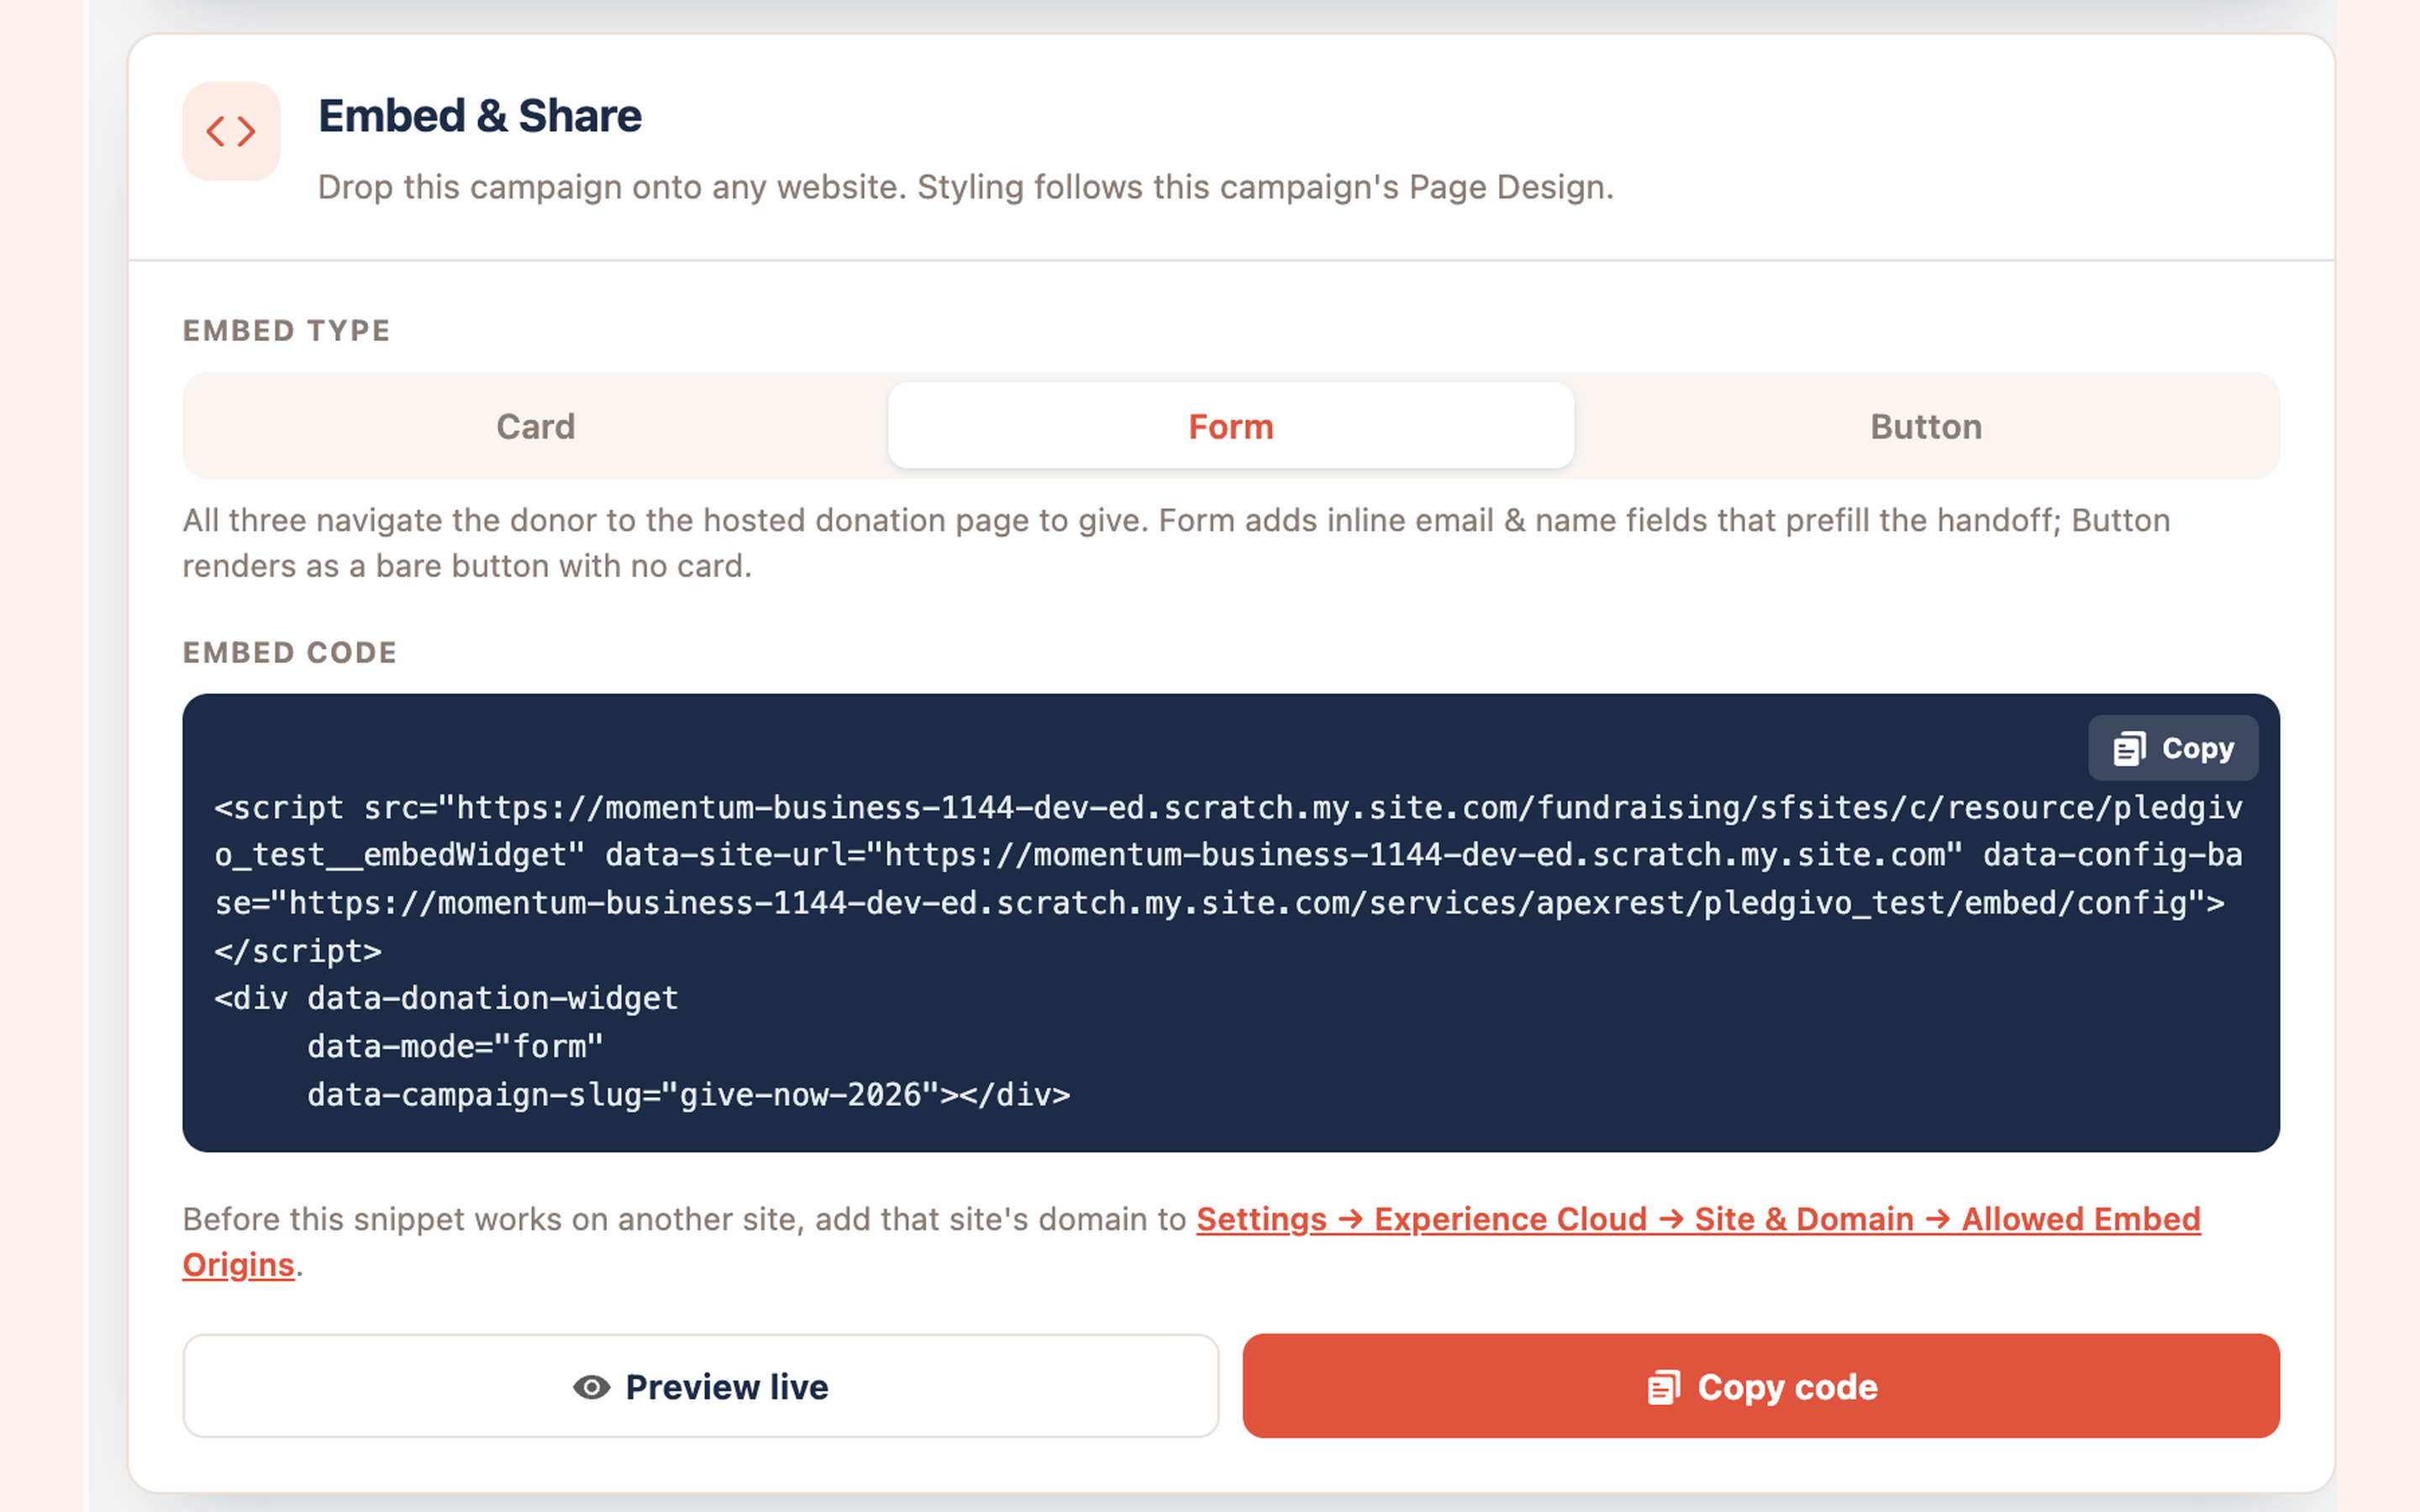
What it shows. The panel with Form selected. The snippet is two pieces and you need both: a <script> that loads the widget from your own Experience site, and a <div data-donation-widget> carrying the mode and the campaign slug. Change the mode toggle and the snippet below it rewrites itself — the only difference between the three is data-mode. The line under the code block links straight to the allowlist screen you have to visit before any of it works, and Preview live opens the real hosted page in a new tab so you can check the campaign before you paste anything anywhere.
Choose an embed type:
| Type | What it shows | Best for |
|---|---|---|
| Card | Logo, the campaign's form heading, donation-amount picker — plus a raised-of-goal progress bar on campaigns that show one (see below) | Sidebar, footer, dedicated "Give" section |
| Form | Everything Card shows, plus inline name/email fields | A landing page built specifically to collect gifts |
| Button | A single compact "Donate" button, customizable label | A nav bar, a blog post, anywhere space is tight |
Which campaigns show a progress bar
The raised-of-goal bar is a goal-driven affordance, so it needs a Goal Amount on the campaign — without one, nothing draws a bar anywhere, which is why an Ongoing fundraiser never has one. A Crowdfunding campaign carries a goal and shows the bar; an Event campaign shows a tier picker instead. Switching Show Progress Bar off on the campaign's Page Design removes it.
One rule, three surfaces: whatever that rule decides applies identically to the hero banner on the hosted page, the donation form's own progress readout, and the embedded card. If you see a bar in one place you will see it in all of them.
The heading on the Card and Form embeds is the campaign's name. An embed sits on someone else's page, where nothing else says which appeal the visitor is giving to — so the widget names it. Set Form Title Override on the campaign to say something else instead; an override always wins over the name.
The hosted donation page is deliberately different: it keeps the form title (default "Make your gift"), because the campaign's name is already on the page around the form.
Click Copy code — it copies a small HTML snippet (a <script> tag plus a widget element).
2. Place it on the external site#
Paste the snippet wherever the campaign should appear. It's plain HTML, so it works with a
Custom HTML block/element in WordPress, Squarespace, Webflow, Wix, Shopify, or a
traditional HTML/CSS site. Avoid "visual" editors that strip <script> tags — use the
platform's Custom HTML / Code / Embed block instead.
More than one campaign can go on the same page — each gets its own snippet.
What it looks like on a real site#
Below is the widget running on a plain static page with no Salesforce libraries of its own — the fixture used to prove the binding end to end during the fresh-install audit.
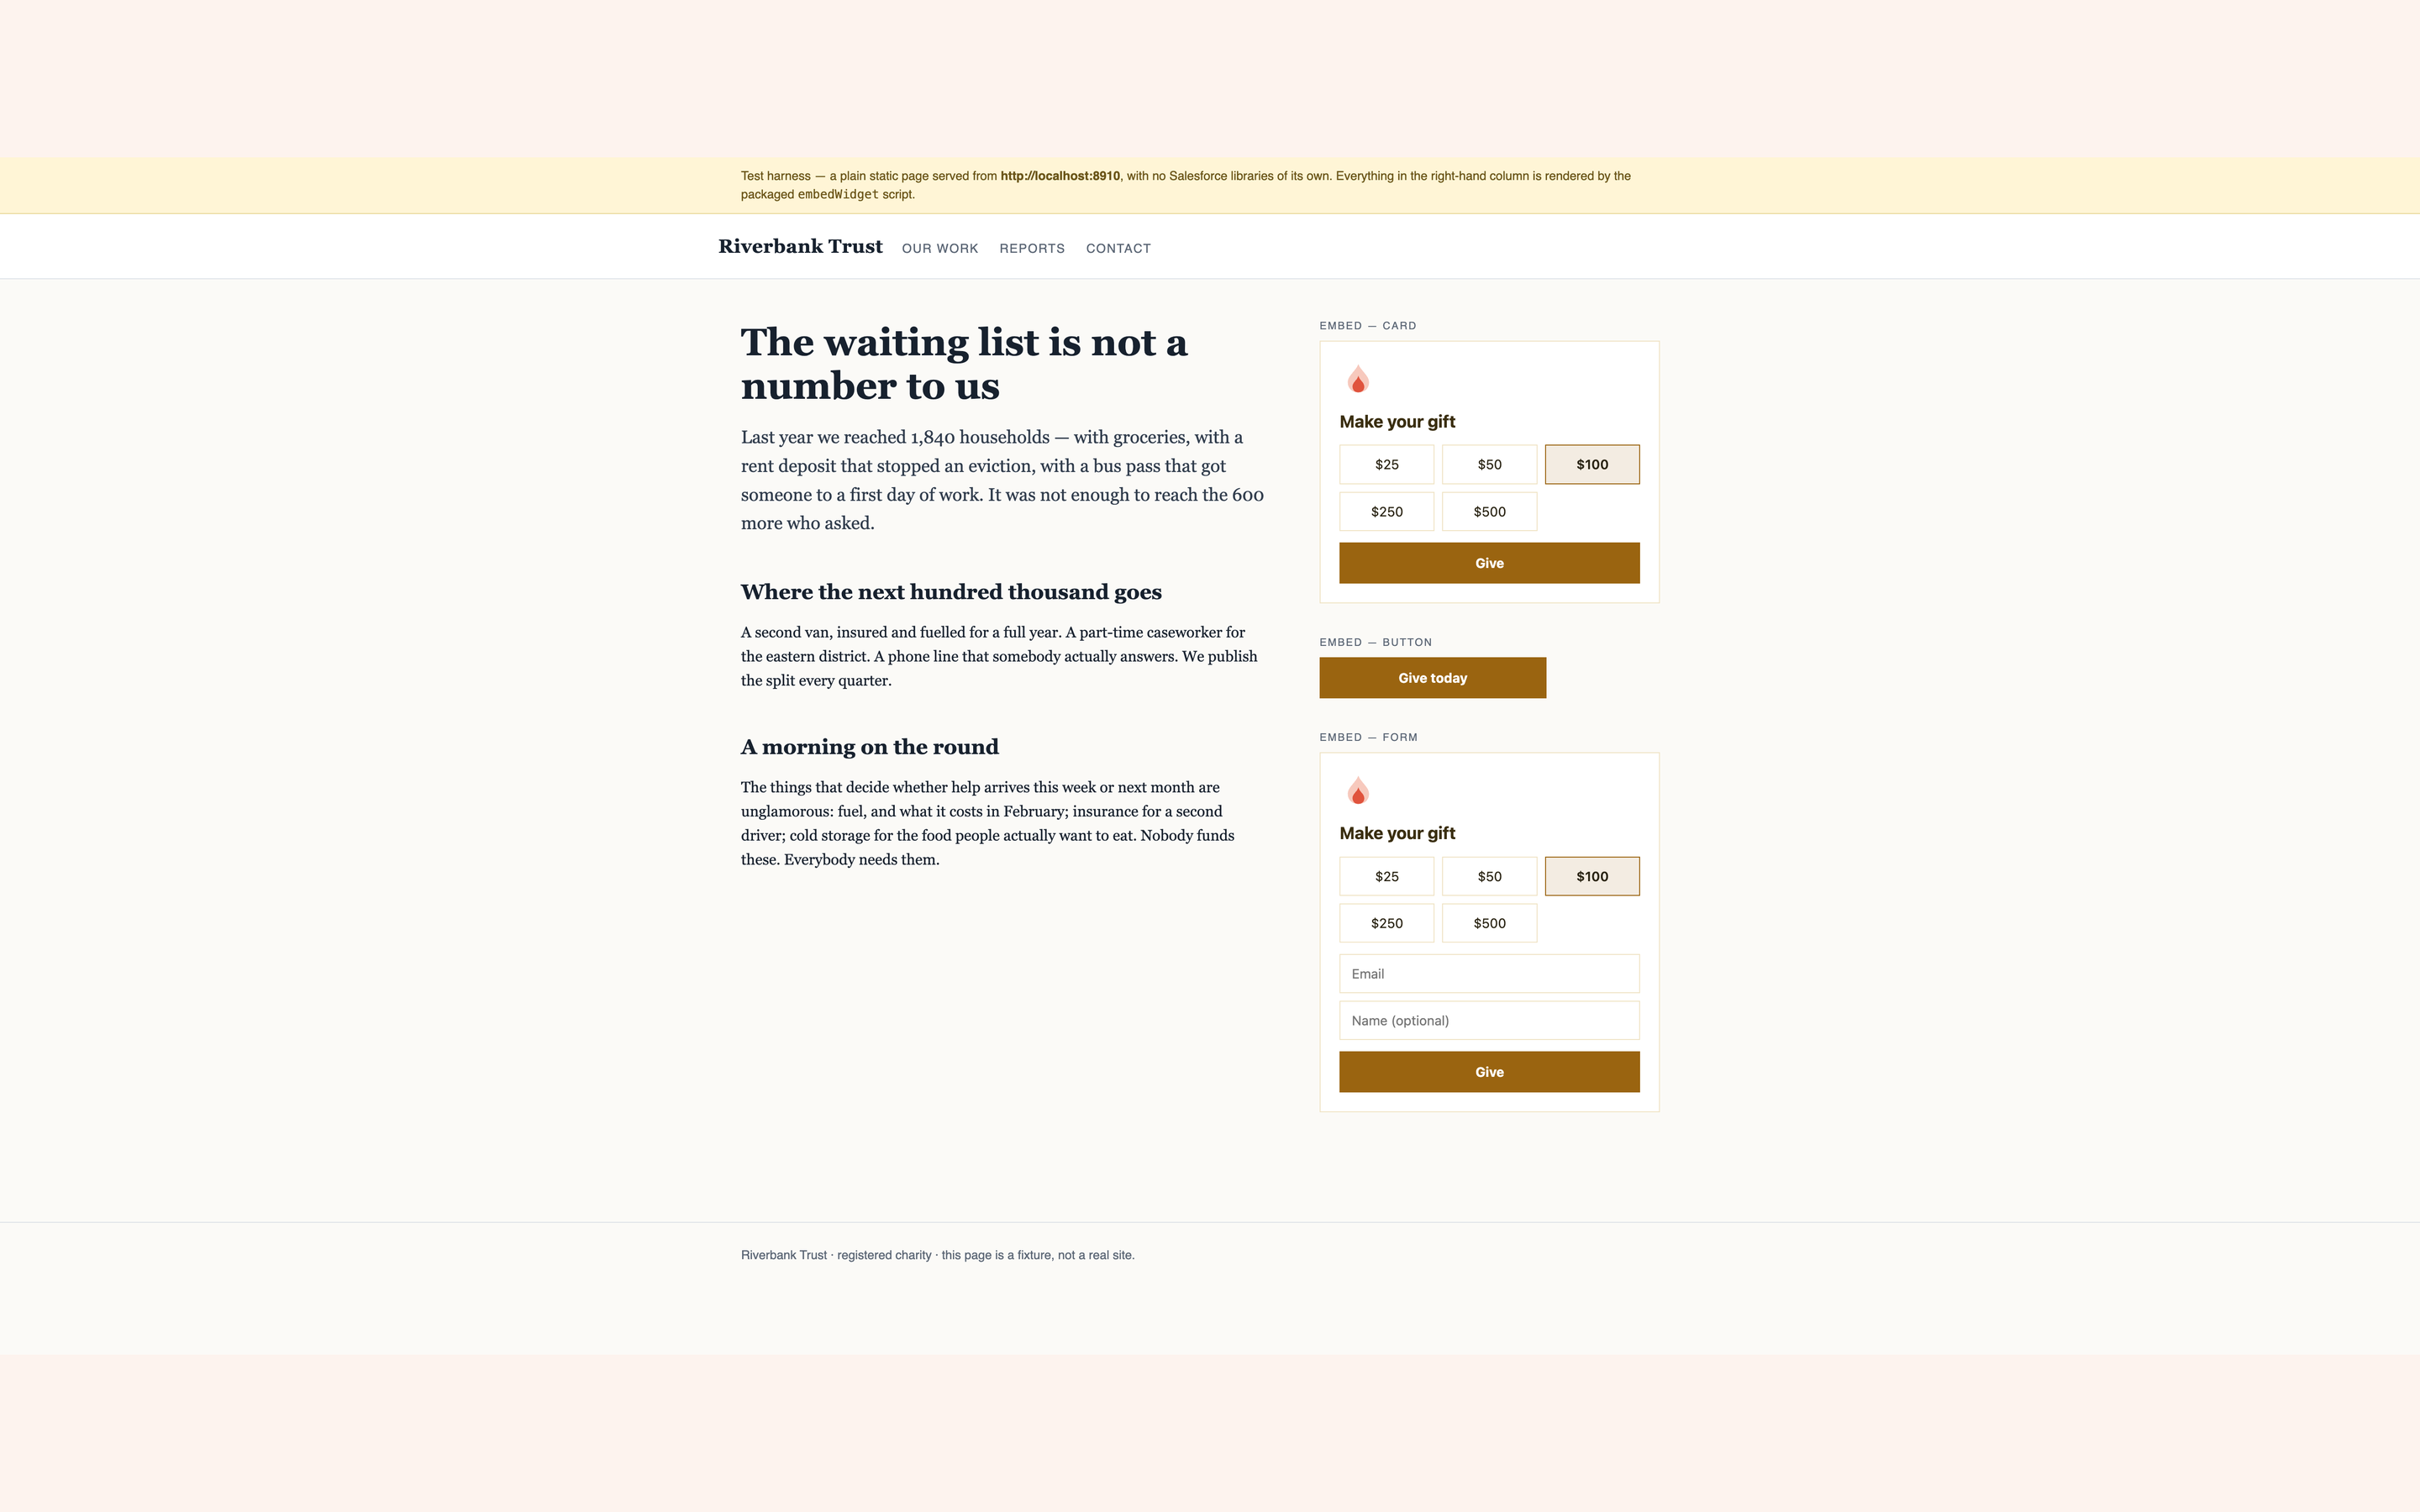
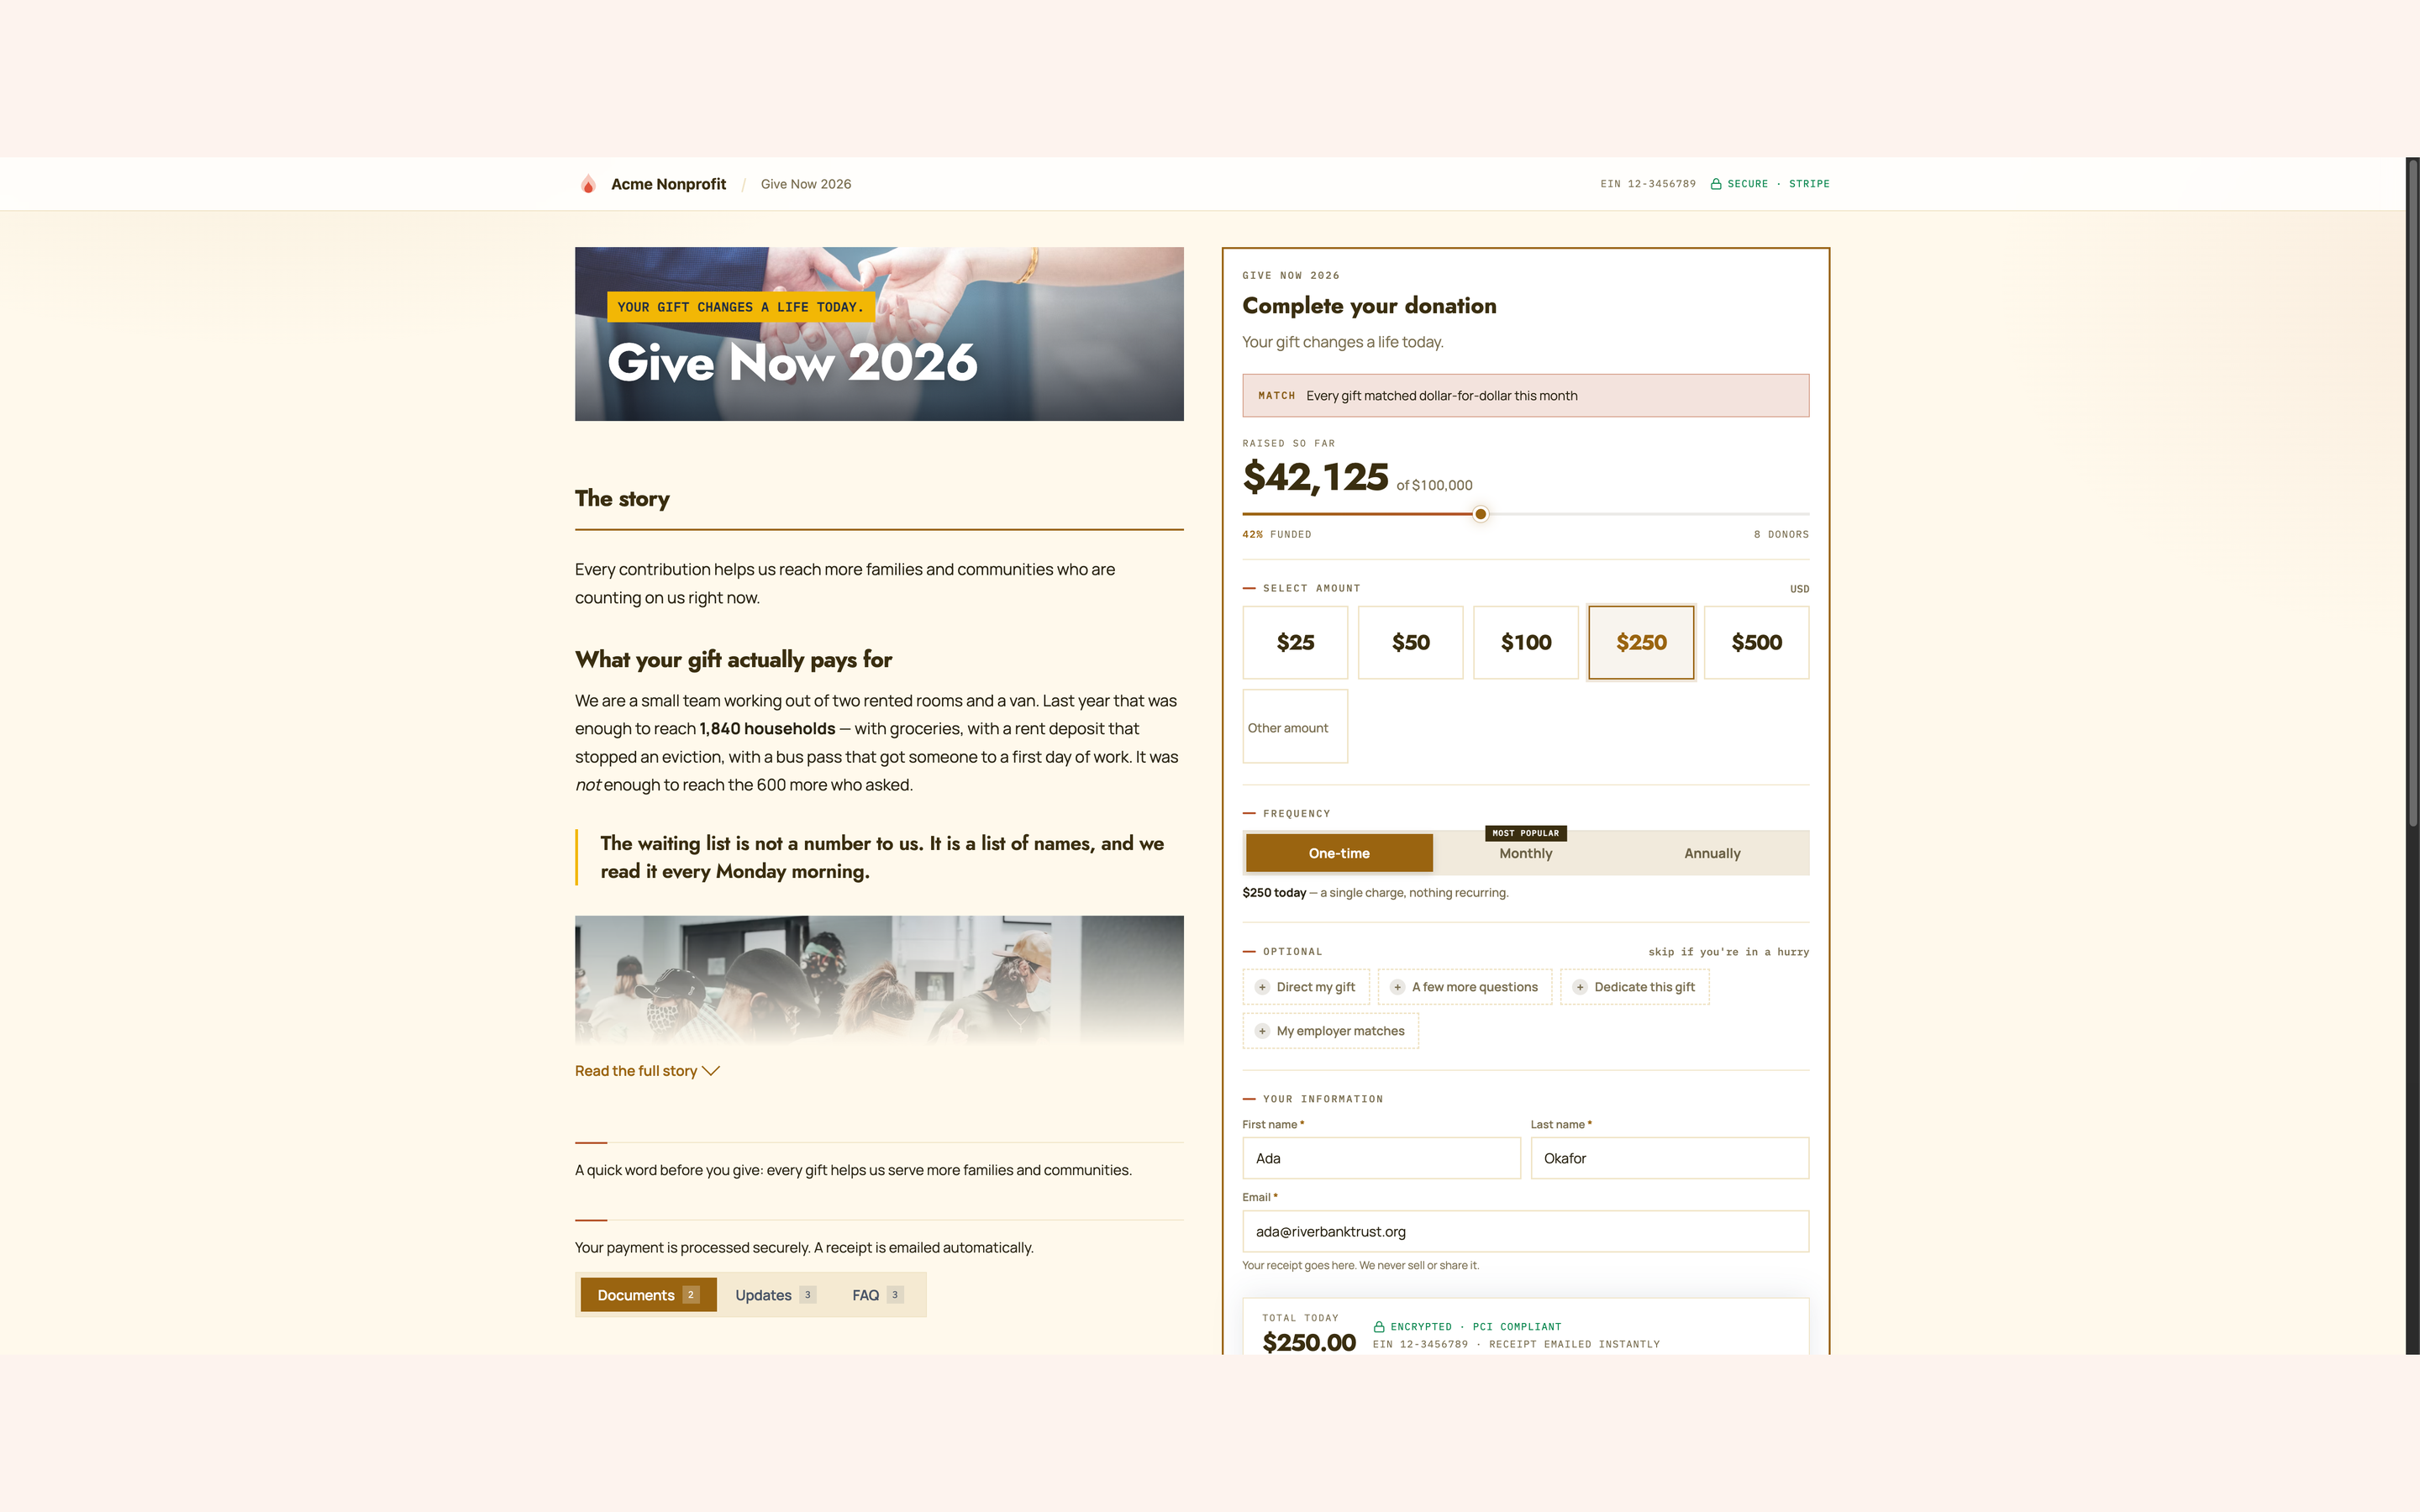
What they show. 1 — all three modes on one external
page. They are not styled by that site: the campaign's Marigold page design crossed the
origin boundary intact, so the ochre, the cream and the square corners are the campaign's own
tokens, applied on someone else's website with no CSS to copy. The Button's label is
Give today, set from data-label in the snippet. Two things in this capture
are older than the current widget. The Card and Form headings read Make your gift — the
org default; since 2026-08-18 an embed leads with the campaign's name unless a Form Title
Override is set, so the same page today reads Give Now 2026. And no
progress bar renders: it
predates the 2026-08-18 change that brought open-ended appeals into the progress-bar rule, and
this campaign carries a $100,000 goal — the same widget today draws
the raised-of-goal bar the hosted page draws. 2 — what happens after a visitor types into the Form-mode
widget and presses Give: the hosted donation page opens with $250 already selected and
Ada / Okafor / the email address already filled in. The single name field is split
into first and last correctly, and any utm_ parameters that were on the host page's
own URL are carried across too.
The widget mounts inside a shadow root
If you go looking for the widget in the browser's element inspector and the container
<div> appears to have no children, nothing is wrong — the widget calls
attachShadow, so its markup lives in a shadow root rather than the page's own
DOM. This also means your site's stylesheet cannot accidentally restyle it, and the widget
cannot leak styles into your site.
What visitors experience#
- The button/card renders styled to match the campaign's Page Design automatically — no separate styling step.
- Clicking it navigates the visitor to the hosted donation page to complete the gift — a full page navigation, not a pop-up or an embedded payment form. In Form mode, whatever the visitor already typed (name, email) carries over and pre-fills the donation page.
- Event campaigns show a tier picker with a quantity stepper instead of an amount picker; sold-out or not-yet-on-sale tiers appear disabled with a state label. Button mode shows a single "Get Tickets" link-out with no inline tier selection.
- A design/branding change in Salesforce updates the embedded widget automatically — no re-copying the snippet. Re-copy only if you switch embed type, change a button's label, or point it at a different campaign.
- Deactivating the campaign (or turning off the org-wide embedding switch) shows a brief "no longer available" message in place of the widget — no need to touch the website's code either way.
Marketing tags carry over from the host page
If someone lands on the embedding page with tracking parameters on the URL
(?utm_source=newsletter&utm_campaign=spring), the widget forwards them to the donation
page, so the resulting gift is attributed to that source. You don't need to add anything to
the snippet — tag the landing-page links you already share and the attribution follows the
donor through. See Donations and payments.
No payment data on the external site
The widget only fetches and displays public campaign data (heading, logo, progress, suggested amounts). Card entry and payment processing always happen on the Experience Cloud donation page — never on the embedding site.
Troubleshooting: widget isn't showing up#
Almost always one of two things:
- The domain isn't allowlisted. Open the browser console on the external site (right-click → Inspect → Console) — a CORS error confirms this. Add the exact domain under Settings → Experience Cloud → Site & Domain → Allowed Embed Origins.
- The snippet is incomplete. Some visual/WYSIWYG editors strip the
<script>tag — confirm both the script line and the widget element were pasted, using a Custom HTML/Code block rather than a rich-text field.
If neither applies, confirm the campaign is still Active and that the org-wide embedding switch hasn't been turned off.
Related#
-
Set up your first campaign
Where a campaign's Public URL and Page Design come from.
-
Set up your Experience Cloud site
The site the embedded widget links out to.
-
Events & ticketing
How the embed widget's tier picker behaves for ticketed campaigns.