Getting Started
After you install#
The install seeds everything it is allowed to seed. Seven things are left, and five of them can only be done by a human in Salesforce Setup. This page is the written version of the Get Started panel inside the app — every screenshot below was taken while completing the setup by hand in a brand-new org, in the order you will hit them.
You were probably sent here automatically
Salesforce redirects you to this page as soon as the package finishes installing or upgrading. Nothing is broken — this is the handover.
Watch it first#
What it is. The complete install, filmed. Twenty-five minutes, from the Get Started checklist to a real card payment landing as a Closed Won gift with a receipt number — recorded while a fresh subscriber org was configured step by step through the real Salesforce UI, not staged and not re-enacted. Every screen runs at the speed the org actually responded at, and the banner underneath names the action and where in Salesforce you are standing. Captions are in the player’s subtitles menu; the chapter list jumps straight to a step. Each part is also published on its own, on the page that covers it: the Get Started checklist, the donation site, the payment account, the first campaign and gift, and the rest of the console.
The seven steps#
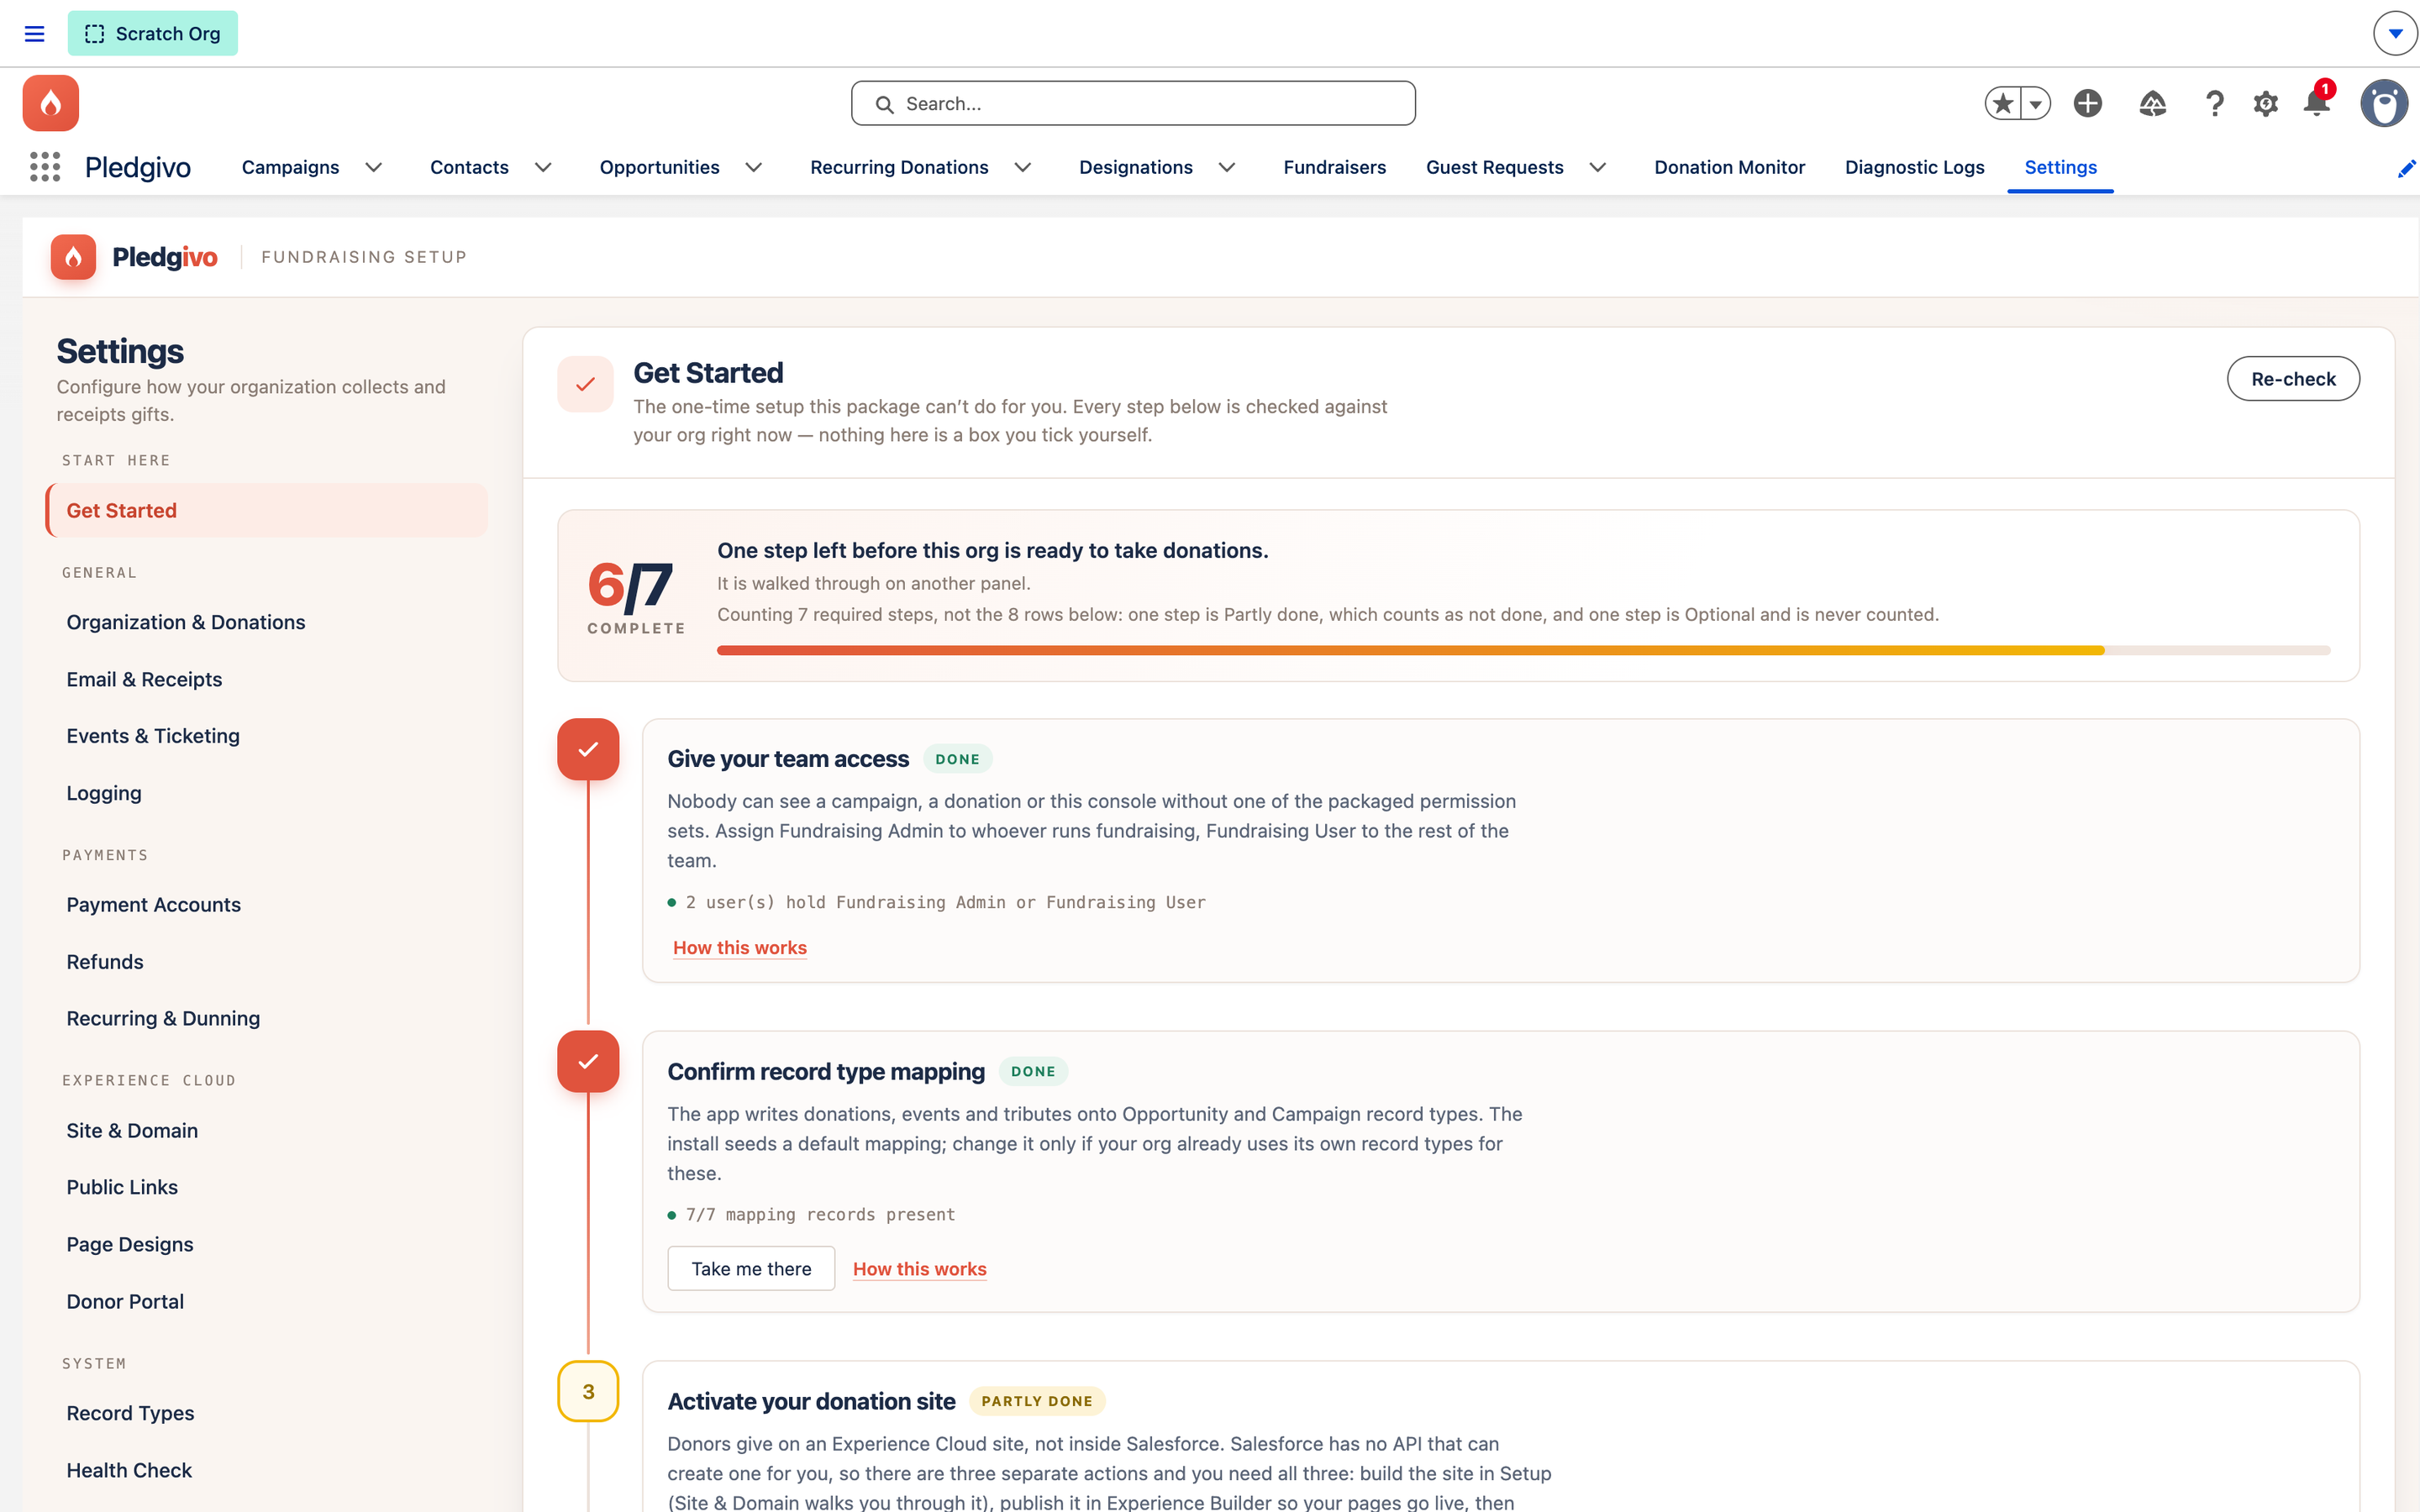
The Get Started panel (App Launcher → Pledgivo → Settings) is the same checklist, checked against your org live. A step there is never a box you tick — it reports what your org actually looks like right now, so if someone later deactivates the last payment account or aborts the scheduled jobs, the step reopens on its own.
| # | Get Started step | Where the work happens | On this page |
|---|---|---|---|
| 1 | Give your team access | Salesforce Setup | 1. Give your team access |
| 2 | Confirm record type mapping | Already done by the install | 2. Confirm record type mapping |
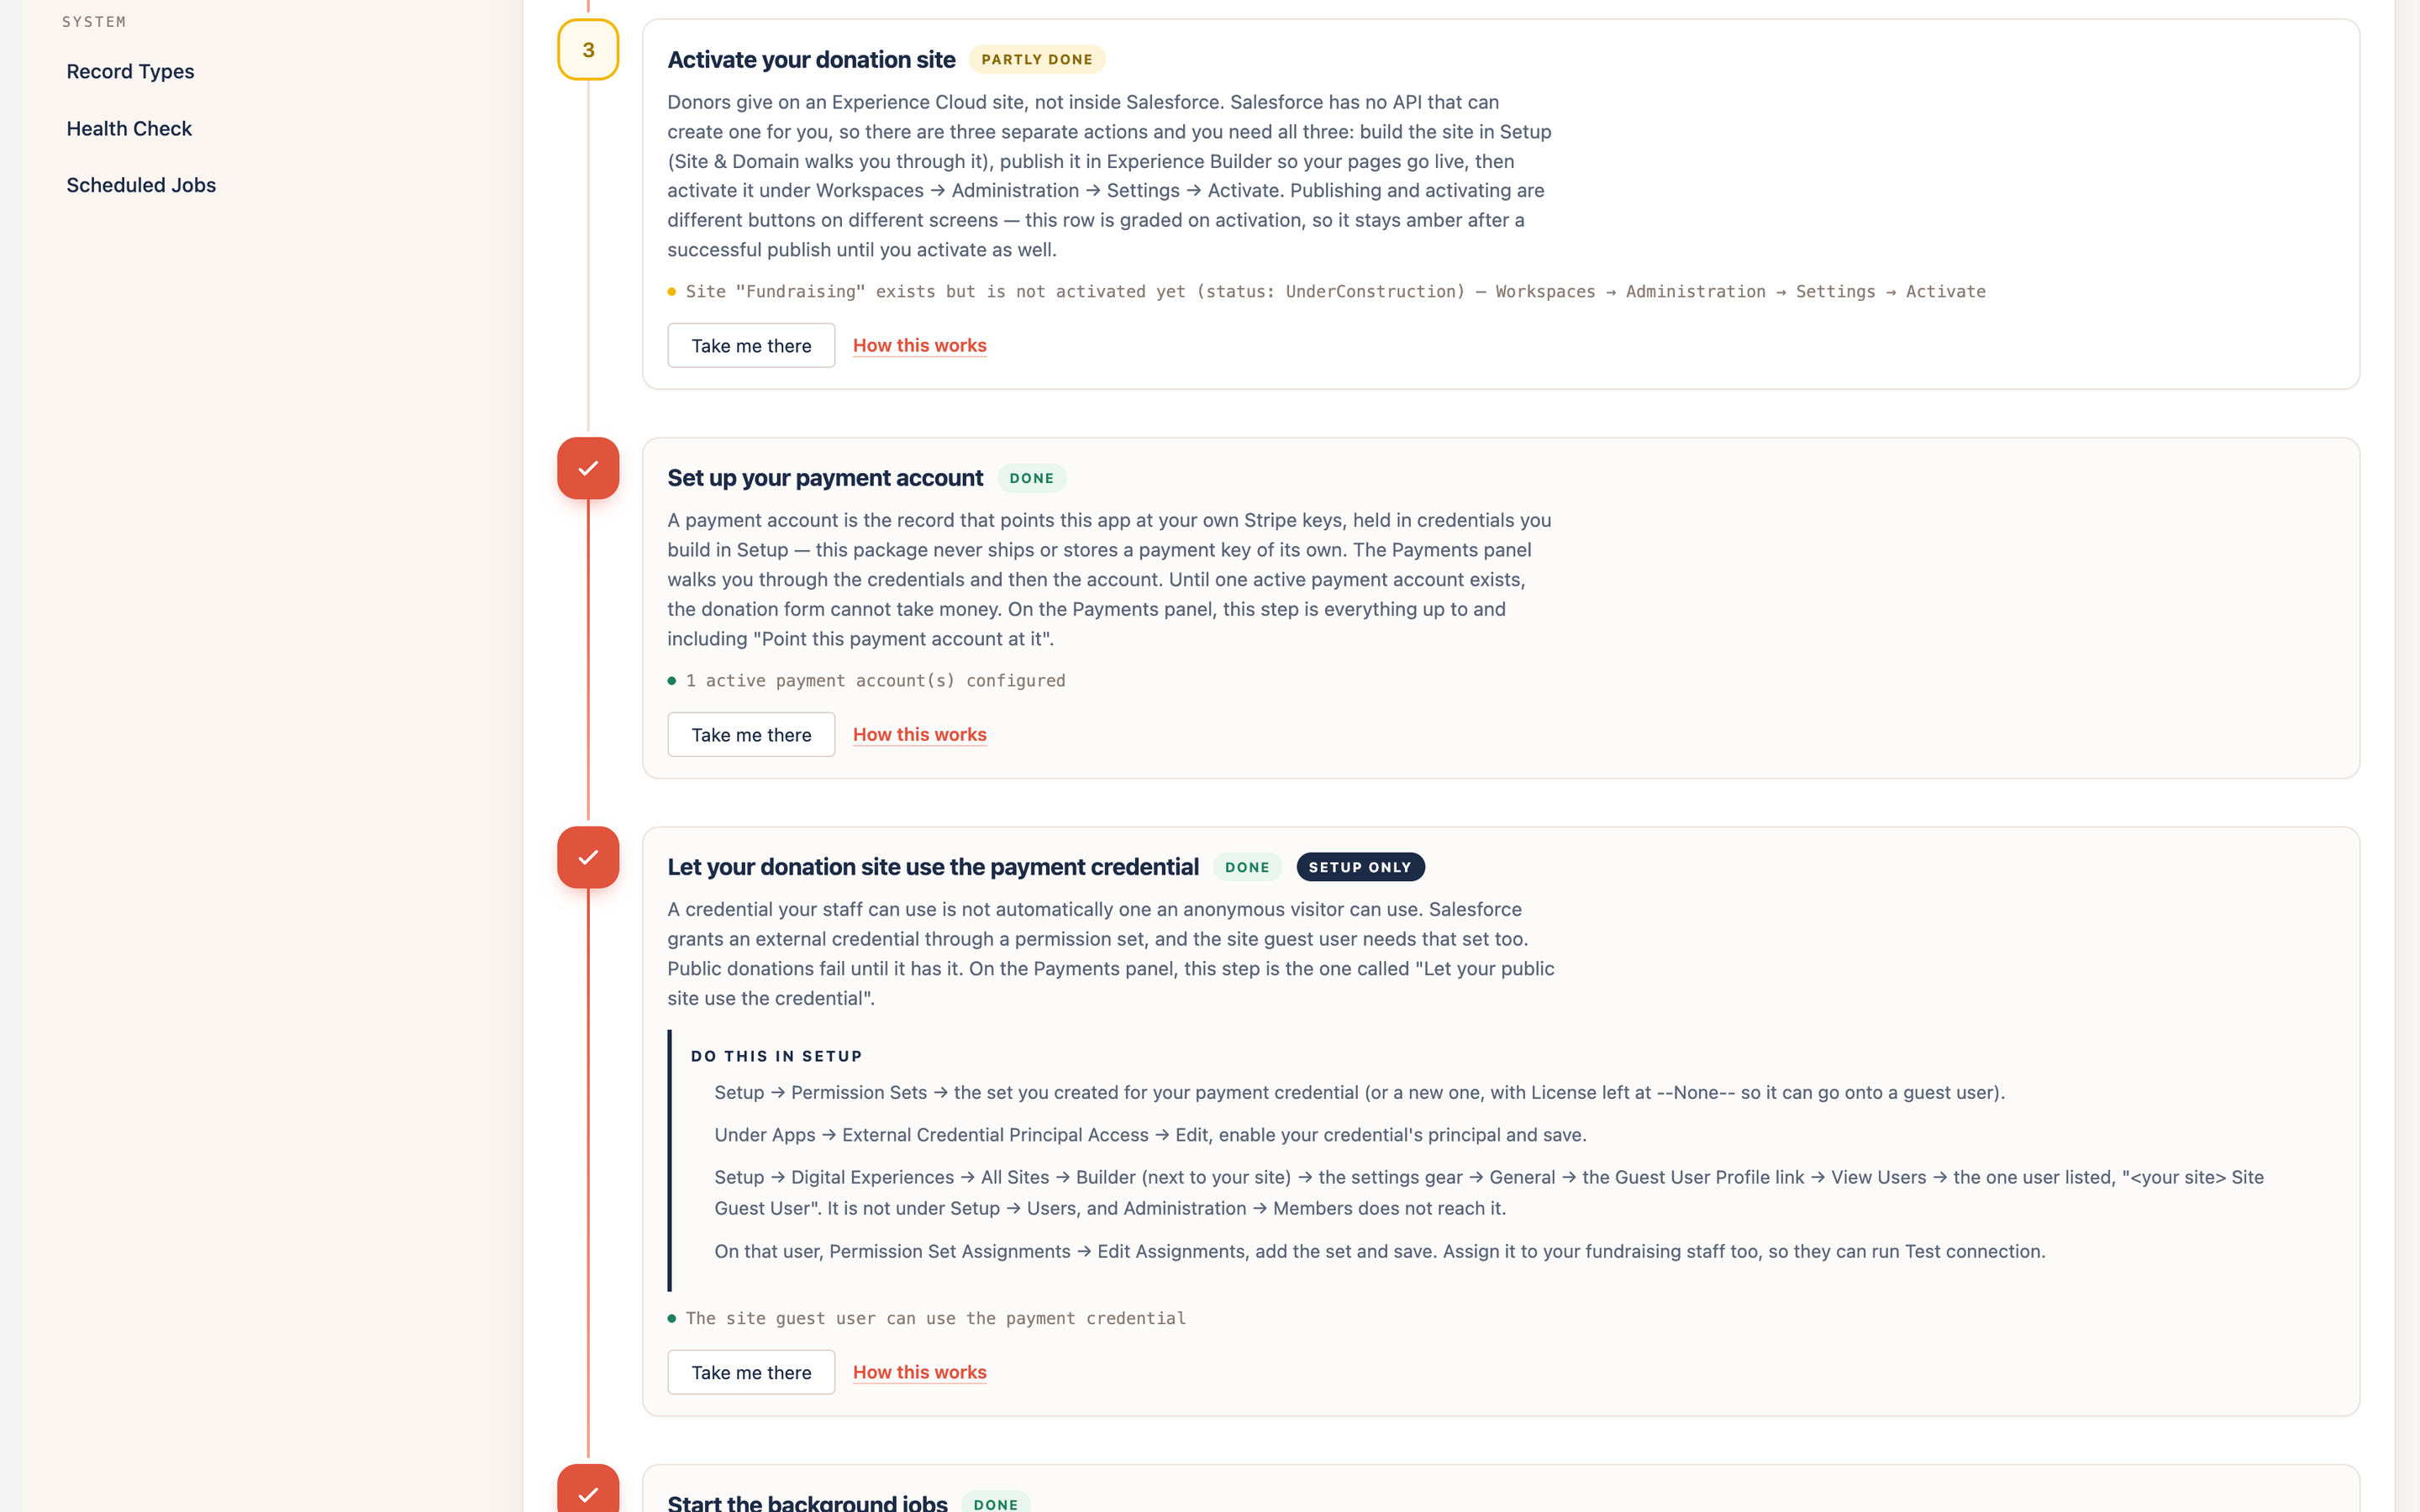
| 3 | Activate your donation site | Setup → Experience Builder → Workspaces | 3, 4 and 10 |
| 4 | Set up your payment account | Salesforce Setup, then the console | 5 and 7 |
| 5 | Let your donation site use the payment credential | Salesforce Setup | 6. Grant the credential |
| 6 | Start the background jobs | The console, once — the install alone is not enough | 8. Background jobs |
| 7 | Set your organization name and logo | Settings console | 9. Organization name and logo |
Two more items are listed after the seven but never count against them, because neither is needed to take a donation:
- Add the two grants the permission sets cannot give reports how many of your fundraising staff hold Create Public Links and Manage Recurring Gifts, read live from your org. See Two things the permission sets cannot give.
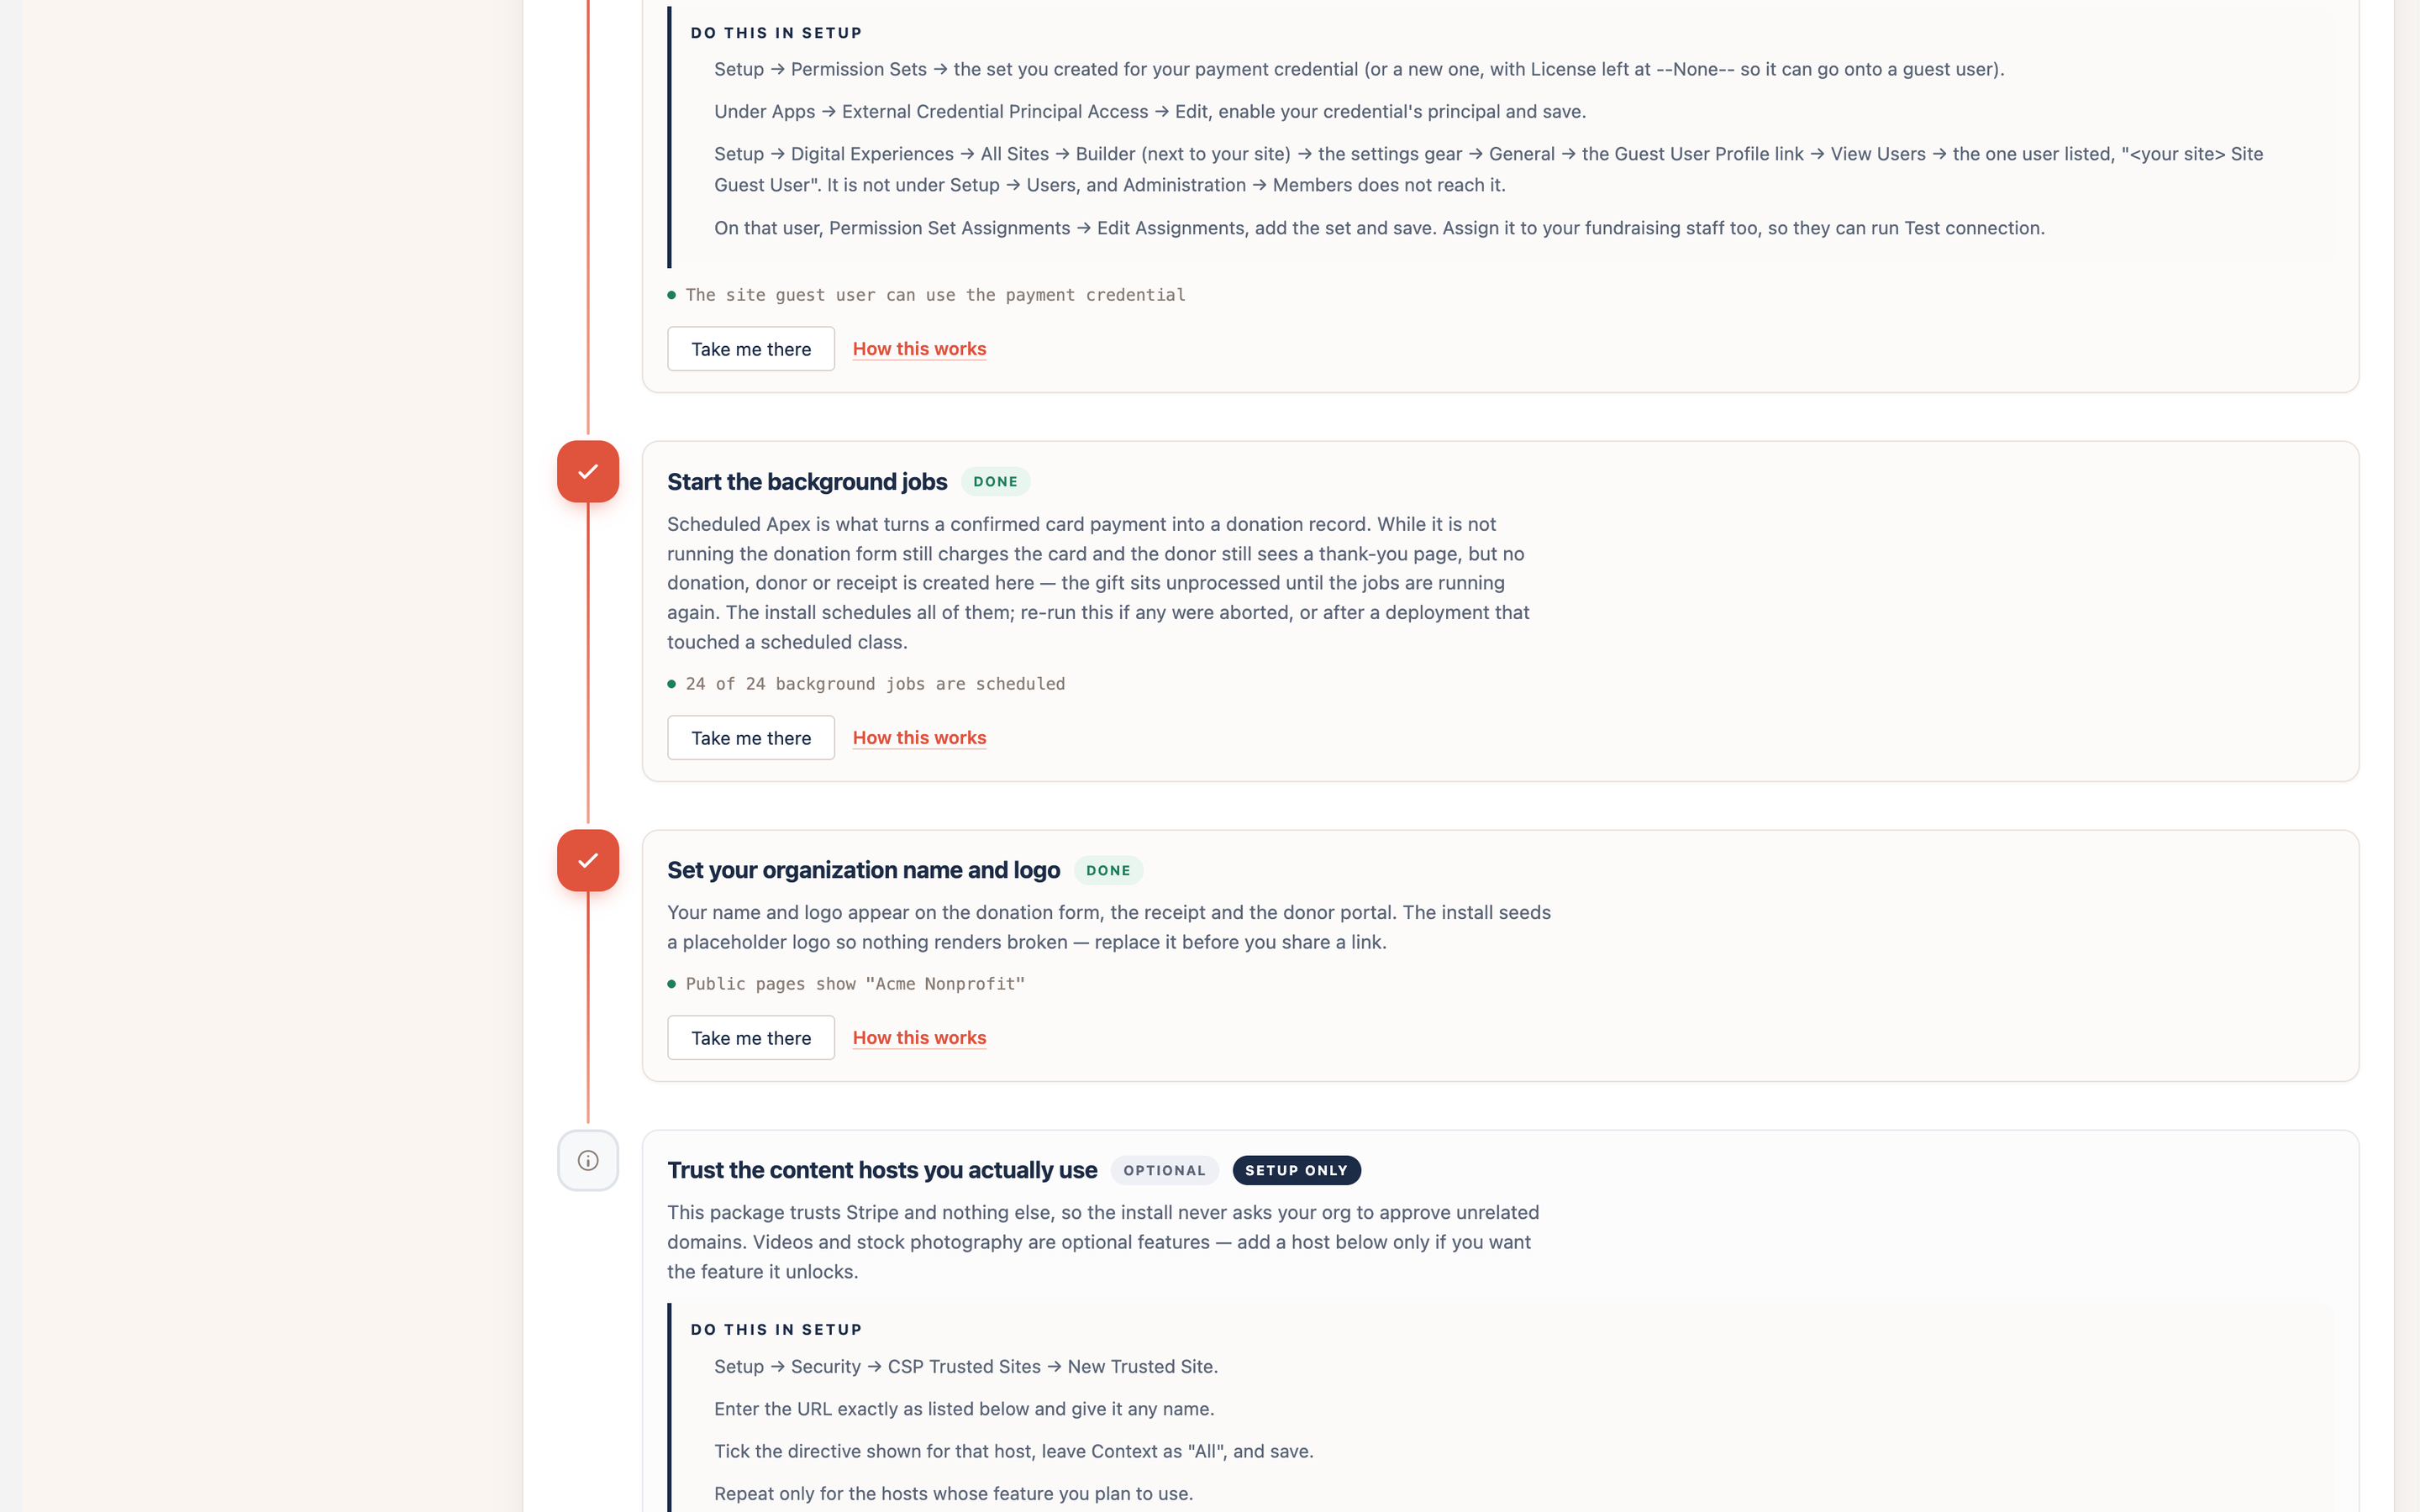
- Trust the content hosts you actually use lists the optional video and stock-photo hosts. See Third-party content.
Two of the seven steps span more than one section here, because the checklist counts outcomes and this page follows work order. Step 3 is created early and activated last, on purpose: you publish a site while you are building it and activate it once everything behind it works. Step 4 splits because its credential pair is built in Setup before the console can grade any of it — that dependency is spelled out in section 5.
The screenshots step themselves
Every run of screens below is one panel showing a single screenshot at a time, with its explanation underneath. Click the screenshot — or the arrows — to move to the next step, or use the numbered row to jump anywhere. Leave it alone and it advances by itself while it is on screen; hovering pauses it, and touching any control hands it back to you for good.
1. Give your team access#
Nobody can see a campaign, a donation, or the Settings console without one of the packaged permission sets. The install cannot assign them for you — Salesforce gives a post-install script no way to know who on your team does what.
| Permission set | Give it to |
|---|---|
Fundraising_Admin |
Whoever runs fundraising. Full CRUD on every object, plus the Settings console. |
Fundraising_User |
The rest of the fundraising team. Day-to-day record access, no setup. |
Fundraising_ReadOnly |
Anyone who needs to see gifts but never change them — finance, leadership. |
Fundraising_GuestDonor |
Not a person. Assign to your Experience Cloud site's guest user only. Least-privilege grants for the public donation flow. See section 4. |
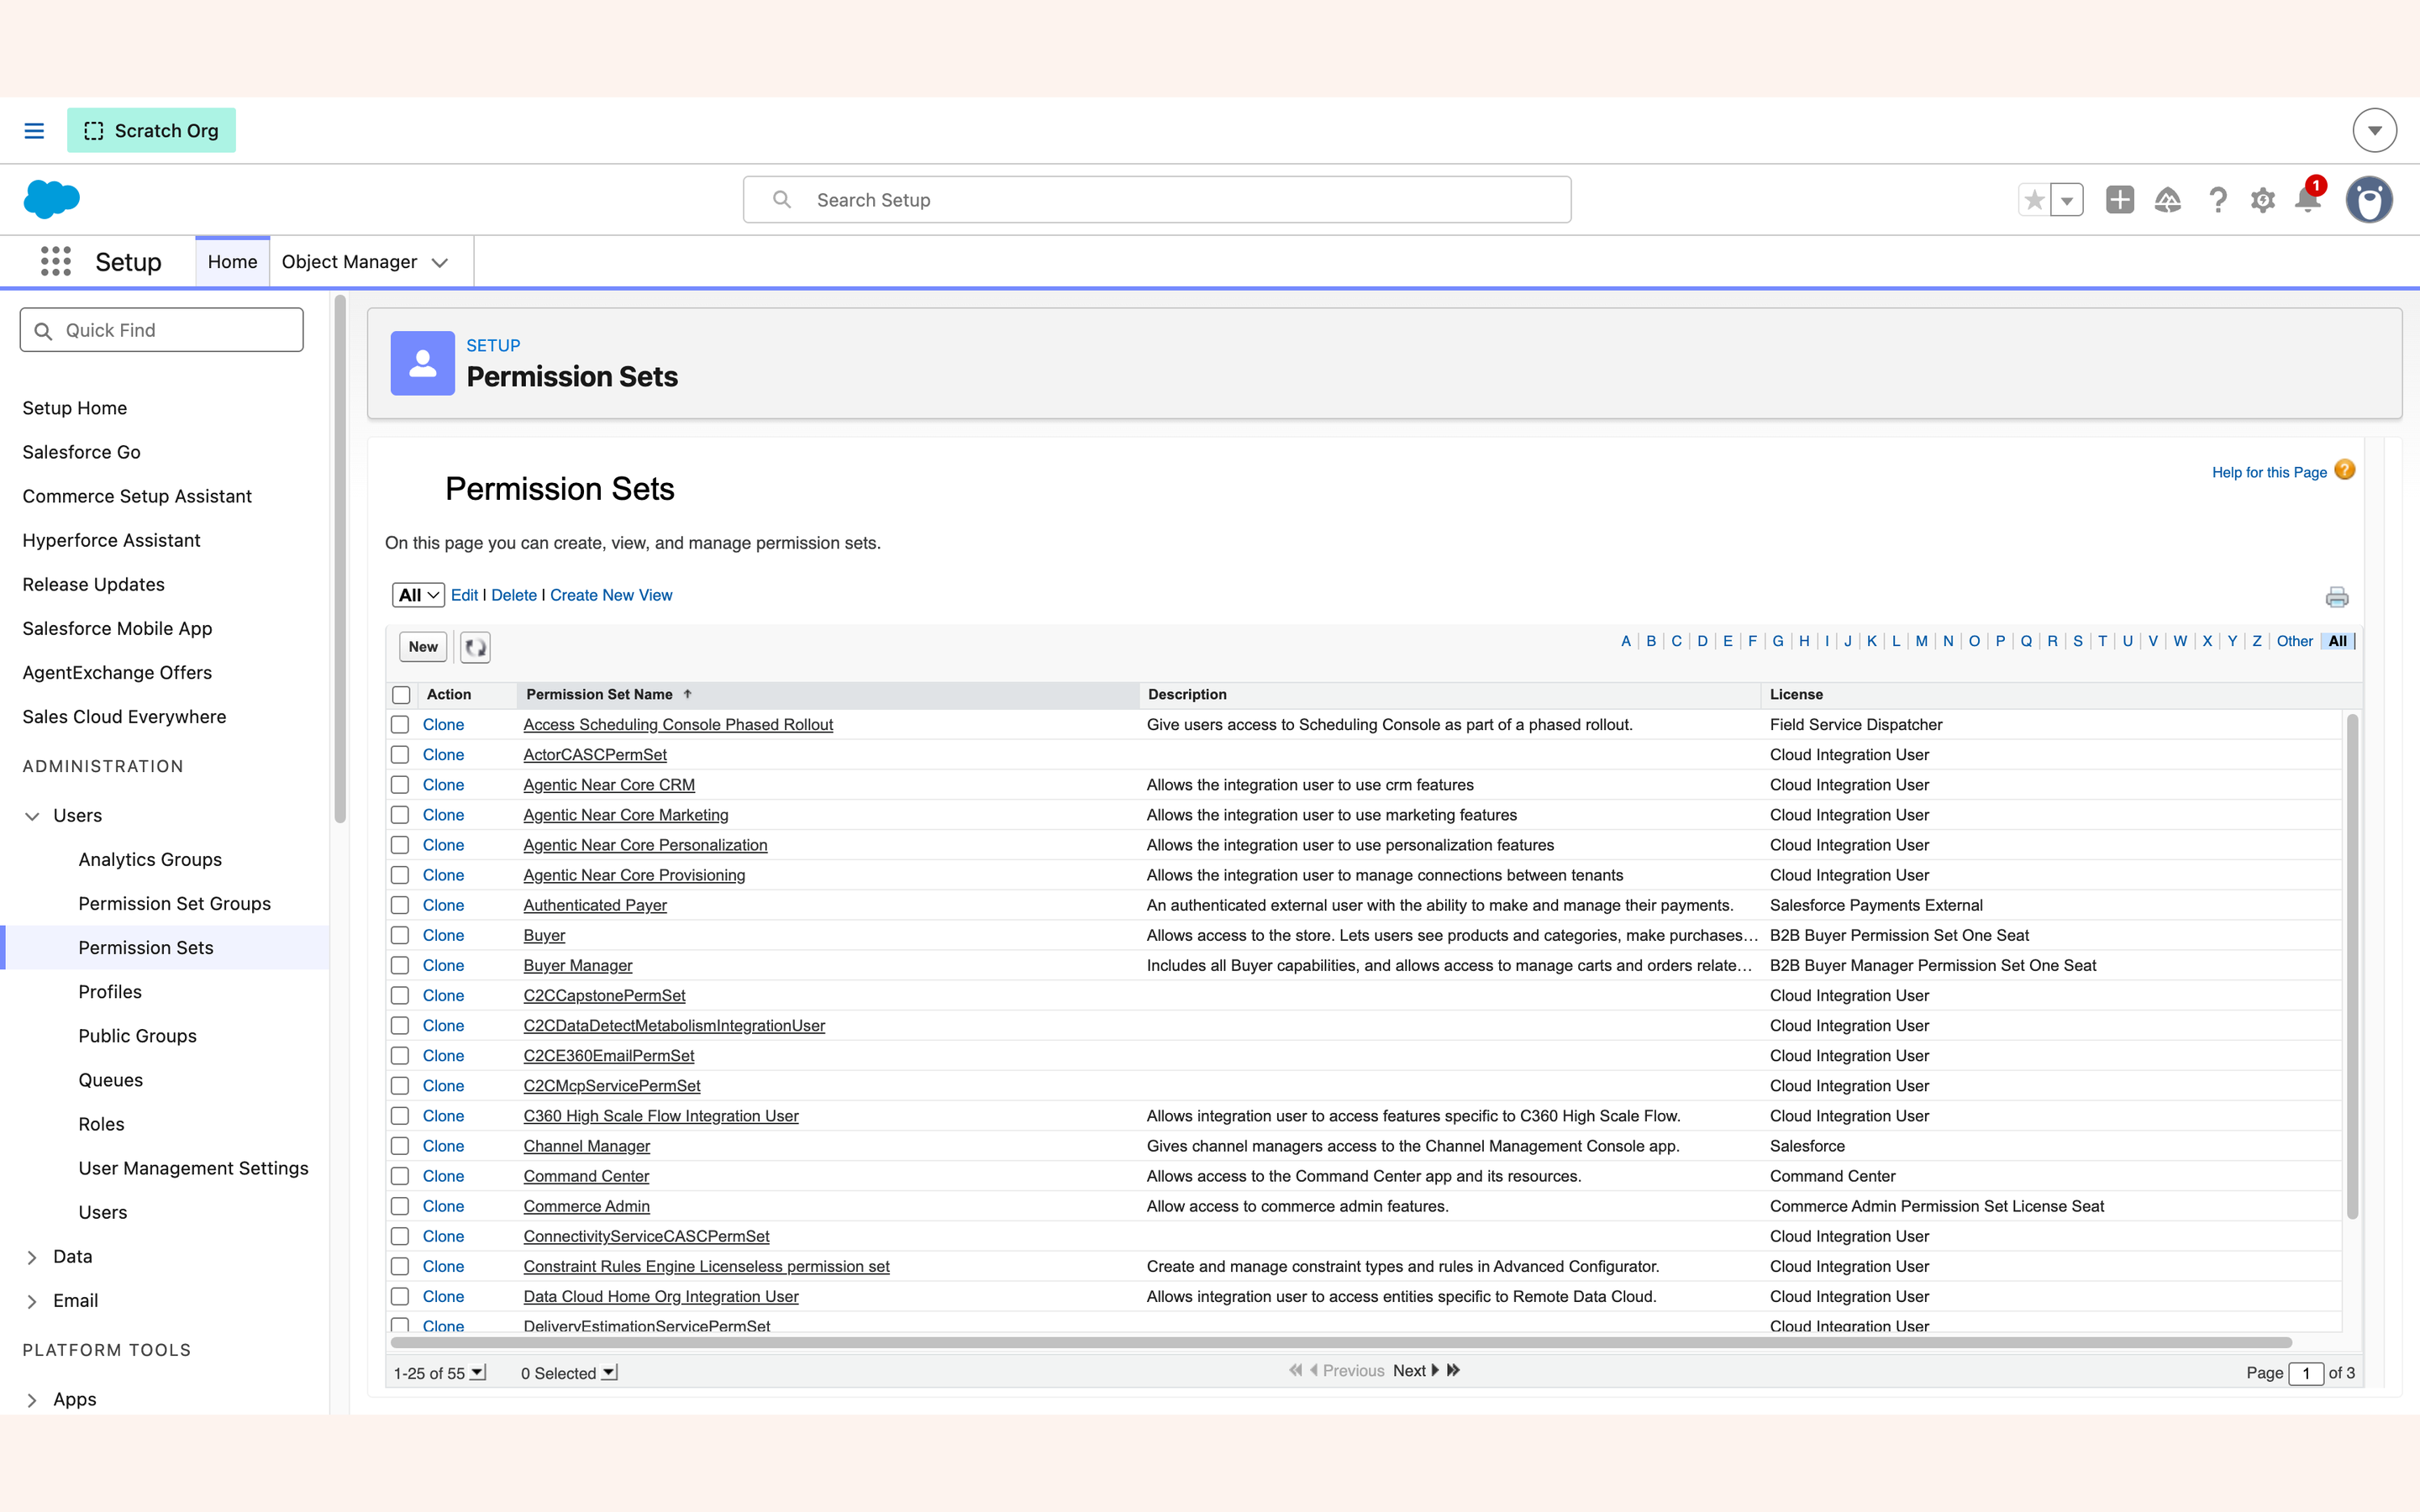
The route that always works is from the user, not from the permission set:
- Setup → Users → Users → click the person's name.
- Scroll to the Permission Set Assignments related list.
- Edit Assignments.
- Move the set from Available Permission Sets to Enabled Permission Sets → Save.
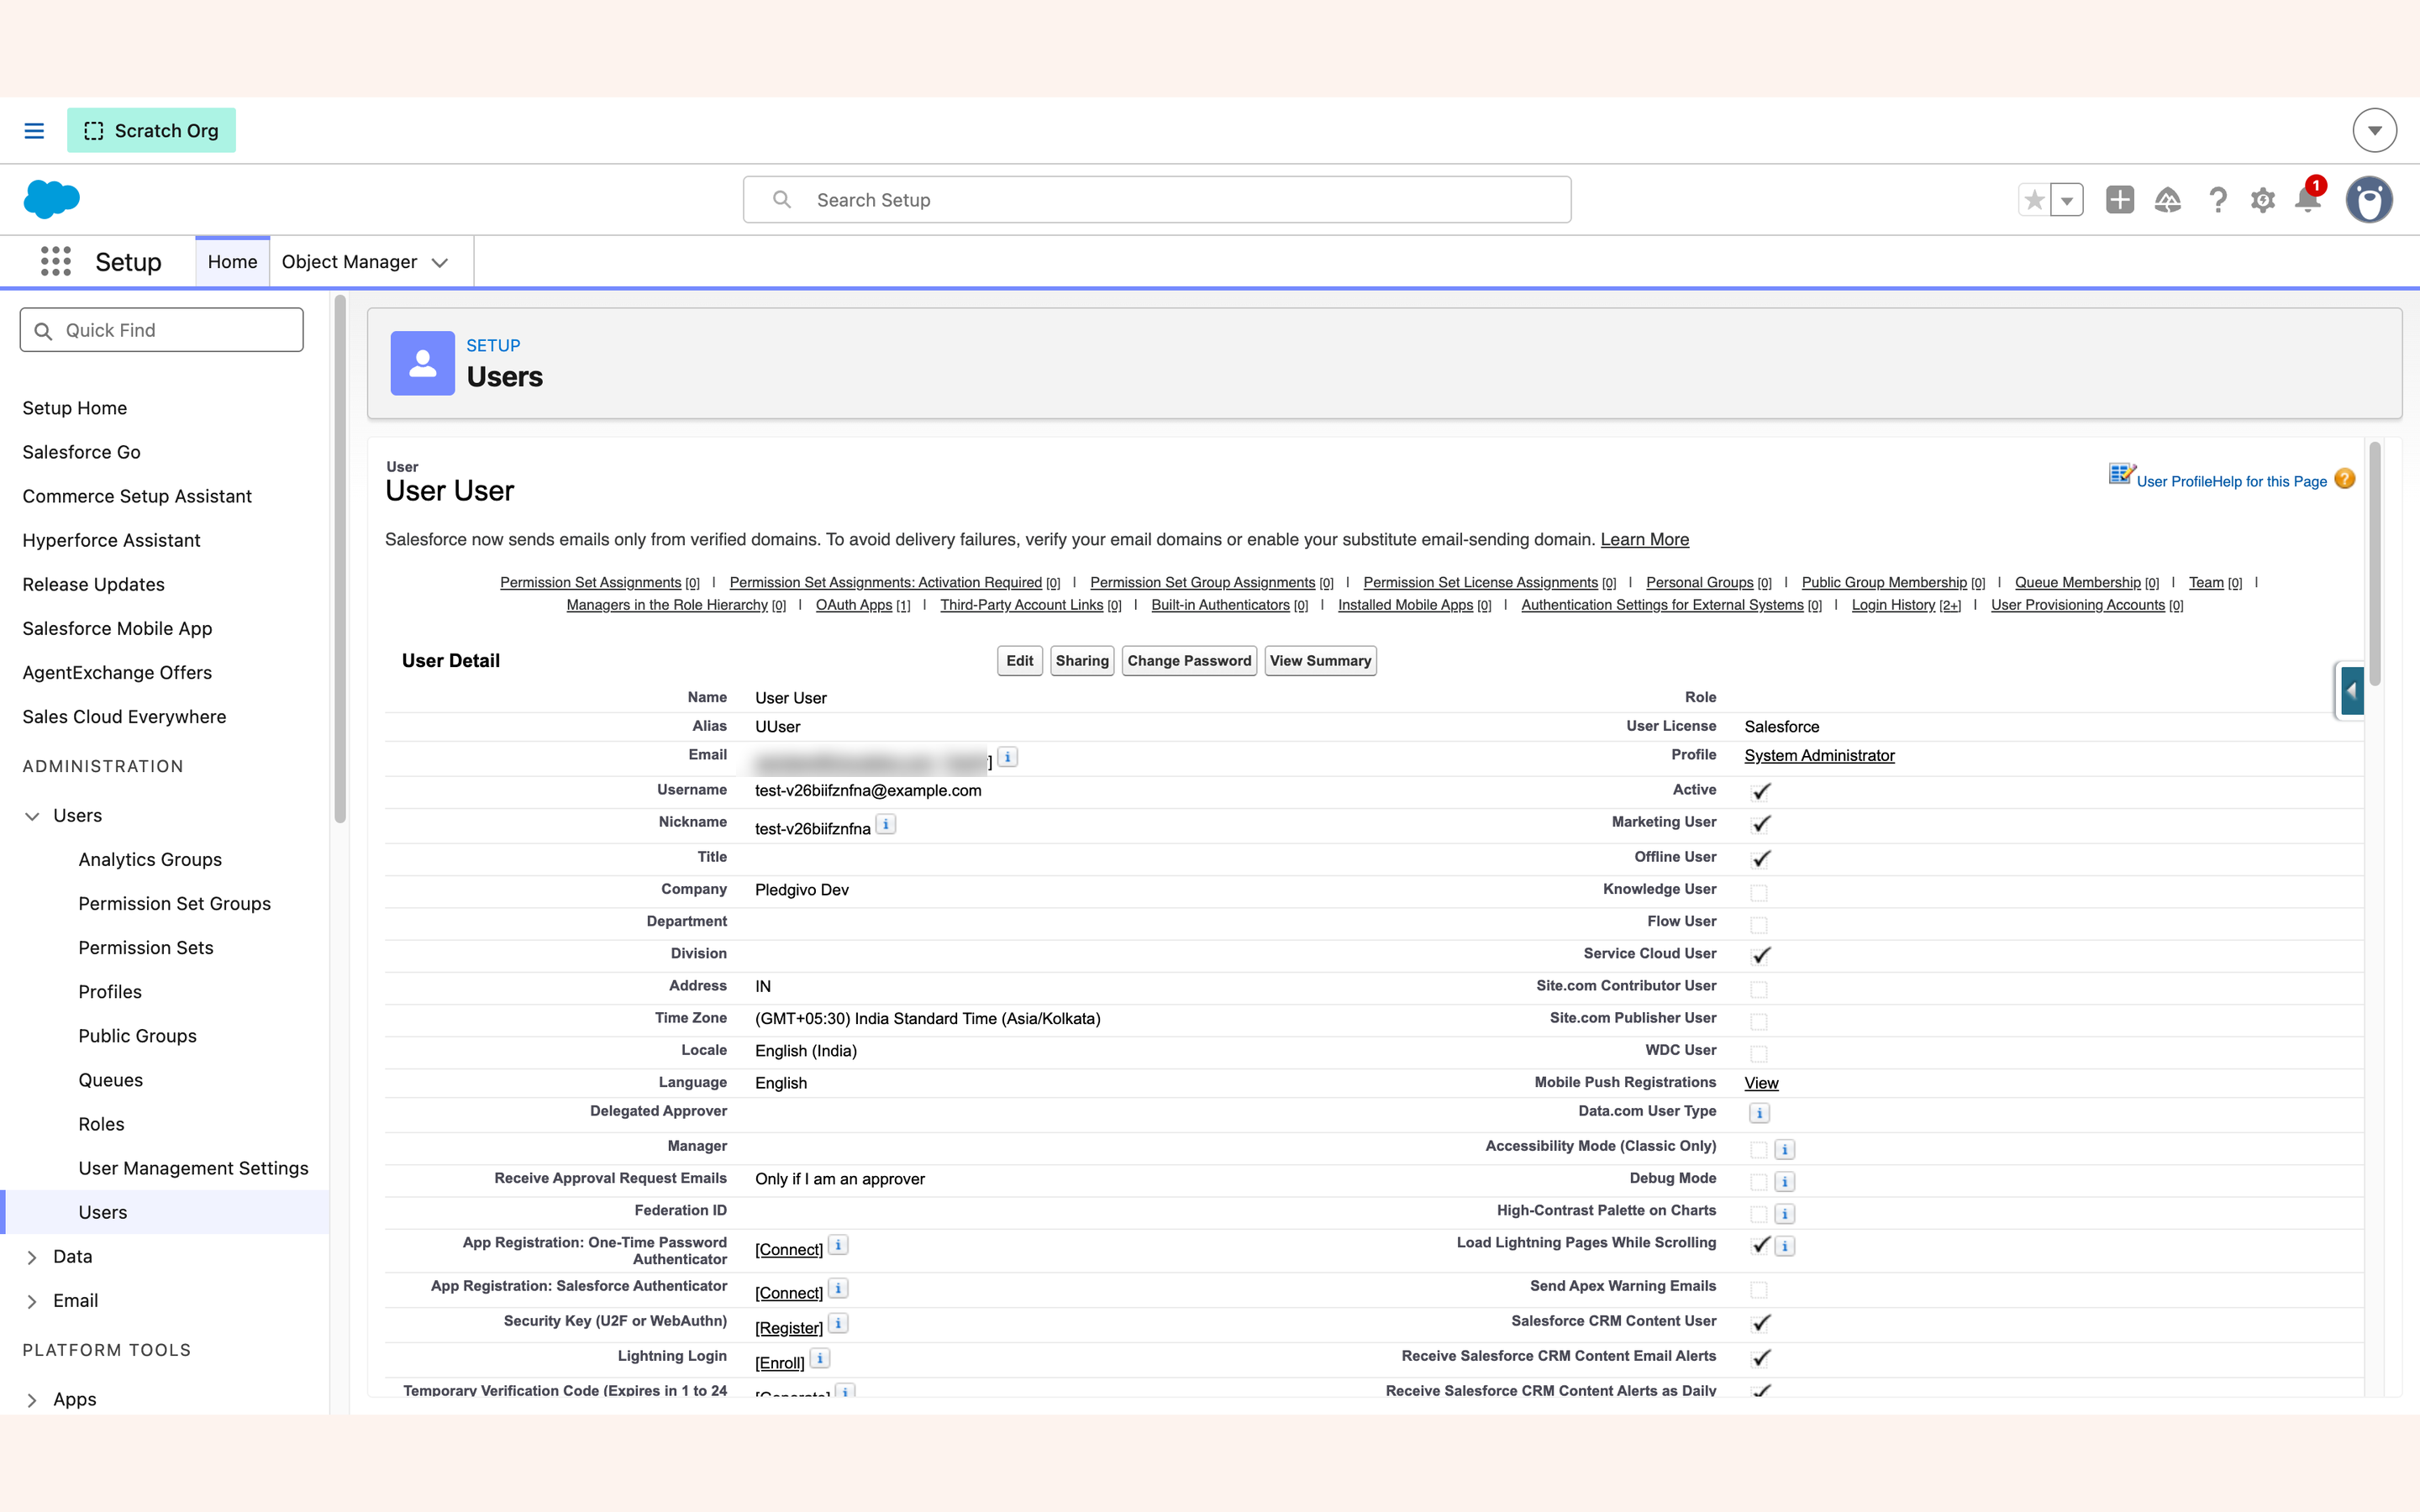
The Settings console is Fundraising_Admin only. A Fundraising_User cannot open it, and
cannot change what it configures by another route either: payment accounts, page designs, and
every app setting are read-only for that set. They still see those records — picking a design
or a payment account for a campaign keeps working — they just cannot edit them from a record page,
the API, or Data Loader. If someone on your team needs to configure payments, designs, or org
settings, give them Fundraising_Admin; there is no middle tier.
Saving anything in the Settings console also needs the Manage Fundraising Settings custom
permission, which Fundraising_Admin carries. It only matters if you build an admin permission set
of your own instead of assigning the packaged one: add Custom Permissions → Manage Fundraising
Settings to it, or every save in the console is refused with "You are not authorized to change
fundraising settings."
Two things the permission sets cannot give#
The packaged sets cover the package's own objects and screens. Two jobs also need a permission the sets do not carry, so check them for the people who will do those jobs. The Get Started panel's optional step Add the two grants the permission sets cannot give counts, live, how many of your fundraising staff already hold each one:
| Job | What they also need | Where to add it |
|---|---|---|
| Publish a file on a campaign's Documents panel | The Salesforce system permission Create Public Links. It is a platform permission, and a package permission set cannot carry it. The Standard User, Marketing User and System Administrator profiles already include it; Minimum Access does not. | The user's profile, or a permission set of your own → System Permissions → Create Public Links. Who can publish a file |
| Pause, resume, change, or stop a donor's recurring gift | The Manage Recurring Gifts custom permission. Fundraising_Admin includes it; Fundraising_User does not. Without it the recurring-gift panel is read-only and Stop Recurring Donation refuses with "You are not authorized to cancel recurring gifts." |
A permission set of your own → Custom Permissions → Manage Recurring Gifts, assigned to the fundraisers you trust with billing changes. Who can use it |
Changing a fundraiser needs Campaign edit, which takes the Marketing User checkbox and an object permission. Salesforce lets a user create or edit campaigns only when they have both the Marketing User checkbox on their user record and Create and Edit on the Campaign object. Neither can come from the packaged sets: the checkbox lives on the user record, and Salesforce removes standard-object grants from a managed package's permission sets. System Administrators already have the object permission but still need the checkbox. Staff on the Standard User profile, which only reads campaigns, need both. Every change made in the Fundraisers console needs it: creating a fundraiser, editing it, switching it live or pausing it, the Story tab, ticket tiers, the FAQ and question selections, and showing or hiding the Updates and Documents panels. A staff user without it can still open and read every fundraiser, but each save is refused with "You don't have edit access to this campaign." (or "You don't have permission to create campaigns." for a new one). To give it: Setup → Users → Users → Edit next to the person → tick Marketing User → Save; then, unless their profile already grants it, create a permission set of your own with Object Settings → Campaigns → Read, Create, Edit and assign it to them. Your campaign sharing must also give them edit access to the fundraiser itself.
Edits and deletes follow your org's sharing. A staff user can edit or delete a campaign post,
or edit a shared FAQ or question template, only when your sharing gives them edit access to that
record. Fundraising_ReadOnly cannot edit either. Checking an event seat in is the exception:
Fundraising_User and Fundraising_Admin carry Modify All on Event Attendee, so anyone holding
either set can check in any seat (checking in).
2. Confirm record type mapping#
The app writes donations, events, and tributes onto Opportunity and Campaign record types. The install seeds a default mapping of eight records pointing at the record types it ships, so this step arrives green — the evidence line on Get Started reads "8 of 8 mapping records present".
Open Settings → System → Record Types only if your org already uses its own record types for gifts and you want the app to write to those instead.
Change this before you take gifts, not after
Remapping later does not move donations that were already written under the old record type. Decide now if you are going to.
Assign the Offline Donation layout#
Setup only — one minute, and only if you record gifts that arrive outside the payment gateway.
The app ships a record type called Offline Donation for cheques, cash at an event, and wires reconciled by hand, together with an Offline Donation Layout that omits every gateway field and the Refund action — a gift that was never charged through a processor has no payment account, no PaymentIntent, and nothing to refund, so showing those fields invites staff to fill in numbers that mean nothing.
The package can ship the layout but cannot assign it to your profiles. Which layout a profile sees for a record type is stored on the Profile, and Profiles are not a packageable component in a second-generation managed package — so on a fresh install the Offline Donation record type falls back to whatever Opportunity layout your profile already had, and the gateway fields reappear. Nothing breaks; the form is just wrong for the job.
To fix it, in Salesforce Setup → Object Manager → Opportunity → Page Layouts → Page Layout Assignment → Edit Assignment: find the Offline Donation column, select the cells for the profiles your fundraising staff use, and set them to Offline Donation Layout. Save. Do the same for Donation Layout and Grant Layout in their columns if those are not already assigned. Packaged layouts appear with the namespace prefix in that list, so look for the one whose name ends in Offline Donation Layout rather than an exact string match.
Why the record type exists at all
Anything saved on the Donation record type must name a payment account — the app rejects the save otherwise, because a gift recorded without one cannot be refunded, receipted from the processor, or reconciled against a payout. An offline gift never had an account to name. The separate record type is what lets that rule stay strict without making genuinely offline gifts unrecordable, and it follows your record-type mapping rather than a fixed name, so it still guards the right record type if you point the Donation slot at one of your own. Offline gifts are receipt-numbered on the same series as gateway gifts — the year-end statement shows no gaps.
The record pages, and the part of them that is yours#
Read once — nothing to do today, but it explains a surprise that otherwise arrives with your first upgrade.
The package ships ten Lightning record pages — for Campaign, Contact, Account, Opportunity and its own objects — and assigns each one as the Pledgivo app's default for that object. That scoping is deliberate: a Contact opened inside the Pledgivo app gets the donor page with lifetime giving and recurring schedules, and the same Contact opened in Sales or Service still gets whatever page your org already showed there. Nothing you had is replaced.
The pages themselves are managed. You cannot edit them, and each upgrade updates them for you. If you would rather use your own page, assign it — your assignment always wins over the package's, and an upgrade never takes it back. The trade is that you then own it: components added in a later version land on the packaged page, not on yours.
Page layouts do not upgrade — new fields will not appear on their own
Every one of these pages renders the record's fields through the standard Details section, and that section reads your page layout, not the Lightning page. Page layouts install unmanaged: they are yours to edit from day one, and for exactly that reason Salesforce never upgrades them. So when a later version adds a field, the field is installed and the app writes to it — but it is invisible until someone adds it to the layout in Setup → Object Manager → object → Page Layouts. Release notes name new fields for this reason; treat that list as a short layout to-do, not just news.
These pages are assigned for desktop. In the Salesforce mobile app, records open on whatever page your org already uses for them — the app's consoles and record-page components are built for a full-width screen, and a phone-sized version is not part of this release.
3. Create the donation site#
Get Started step 3, part one
Donors give on an Experience Cloud site, not inside Salesforce. Internal-only use — staff recording gifts taken over the phone — does not need one; anything public does.
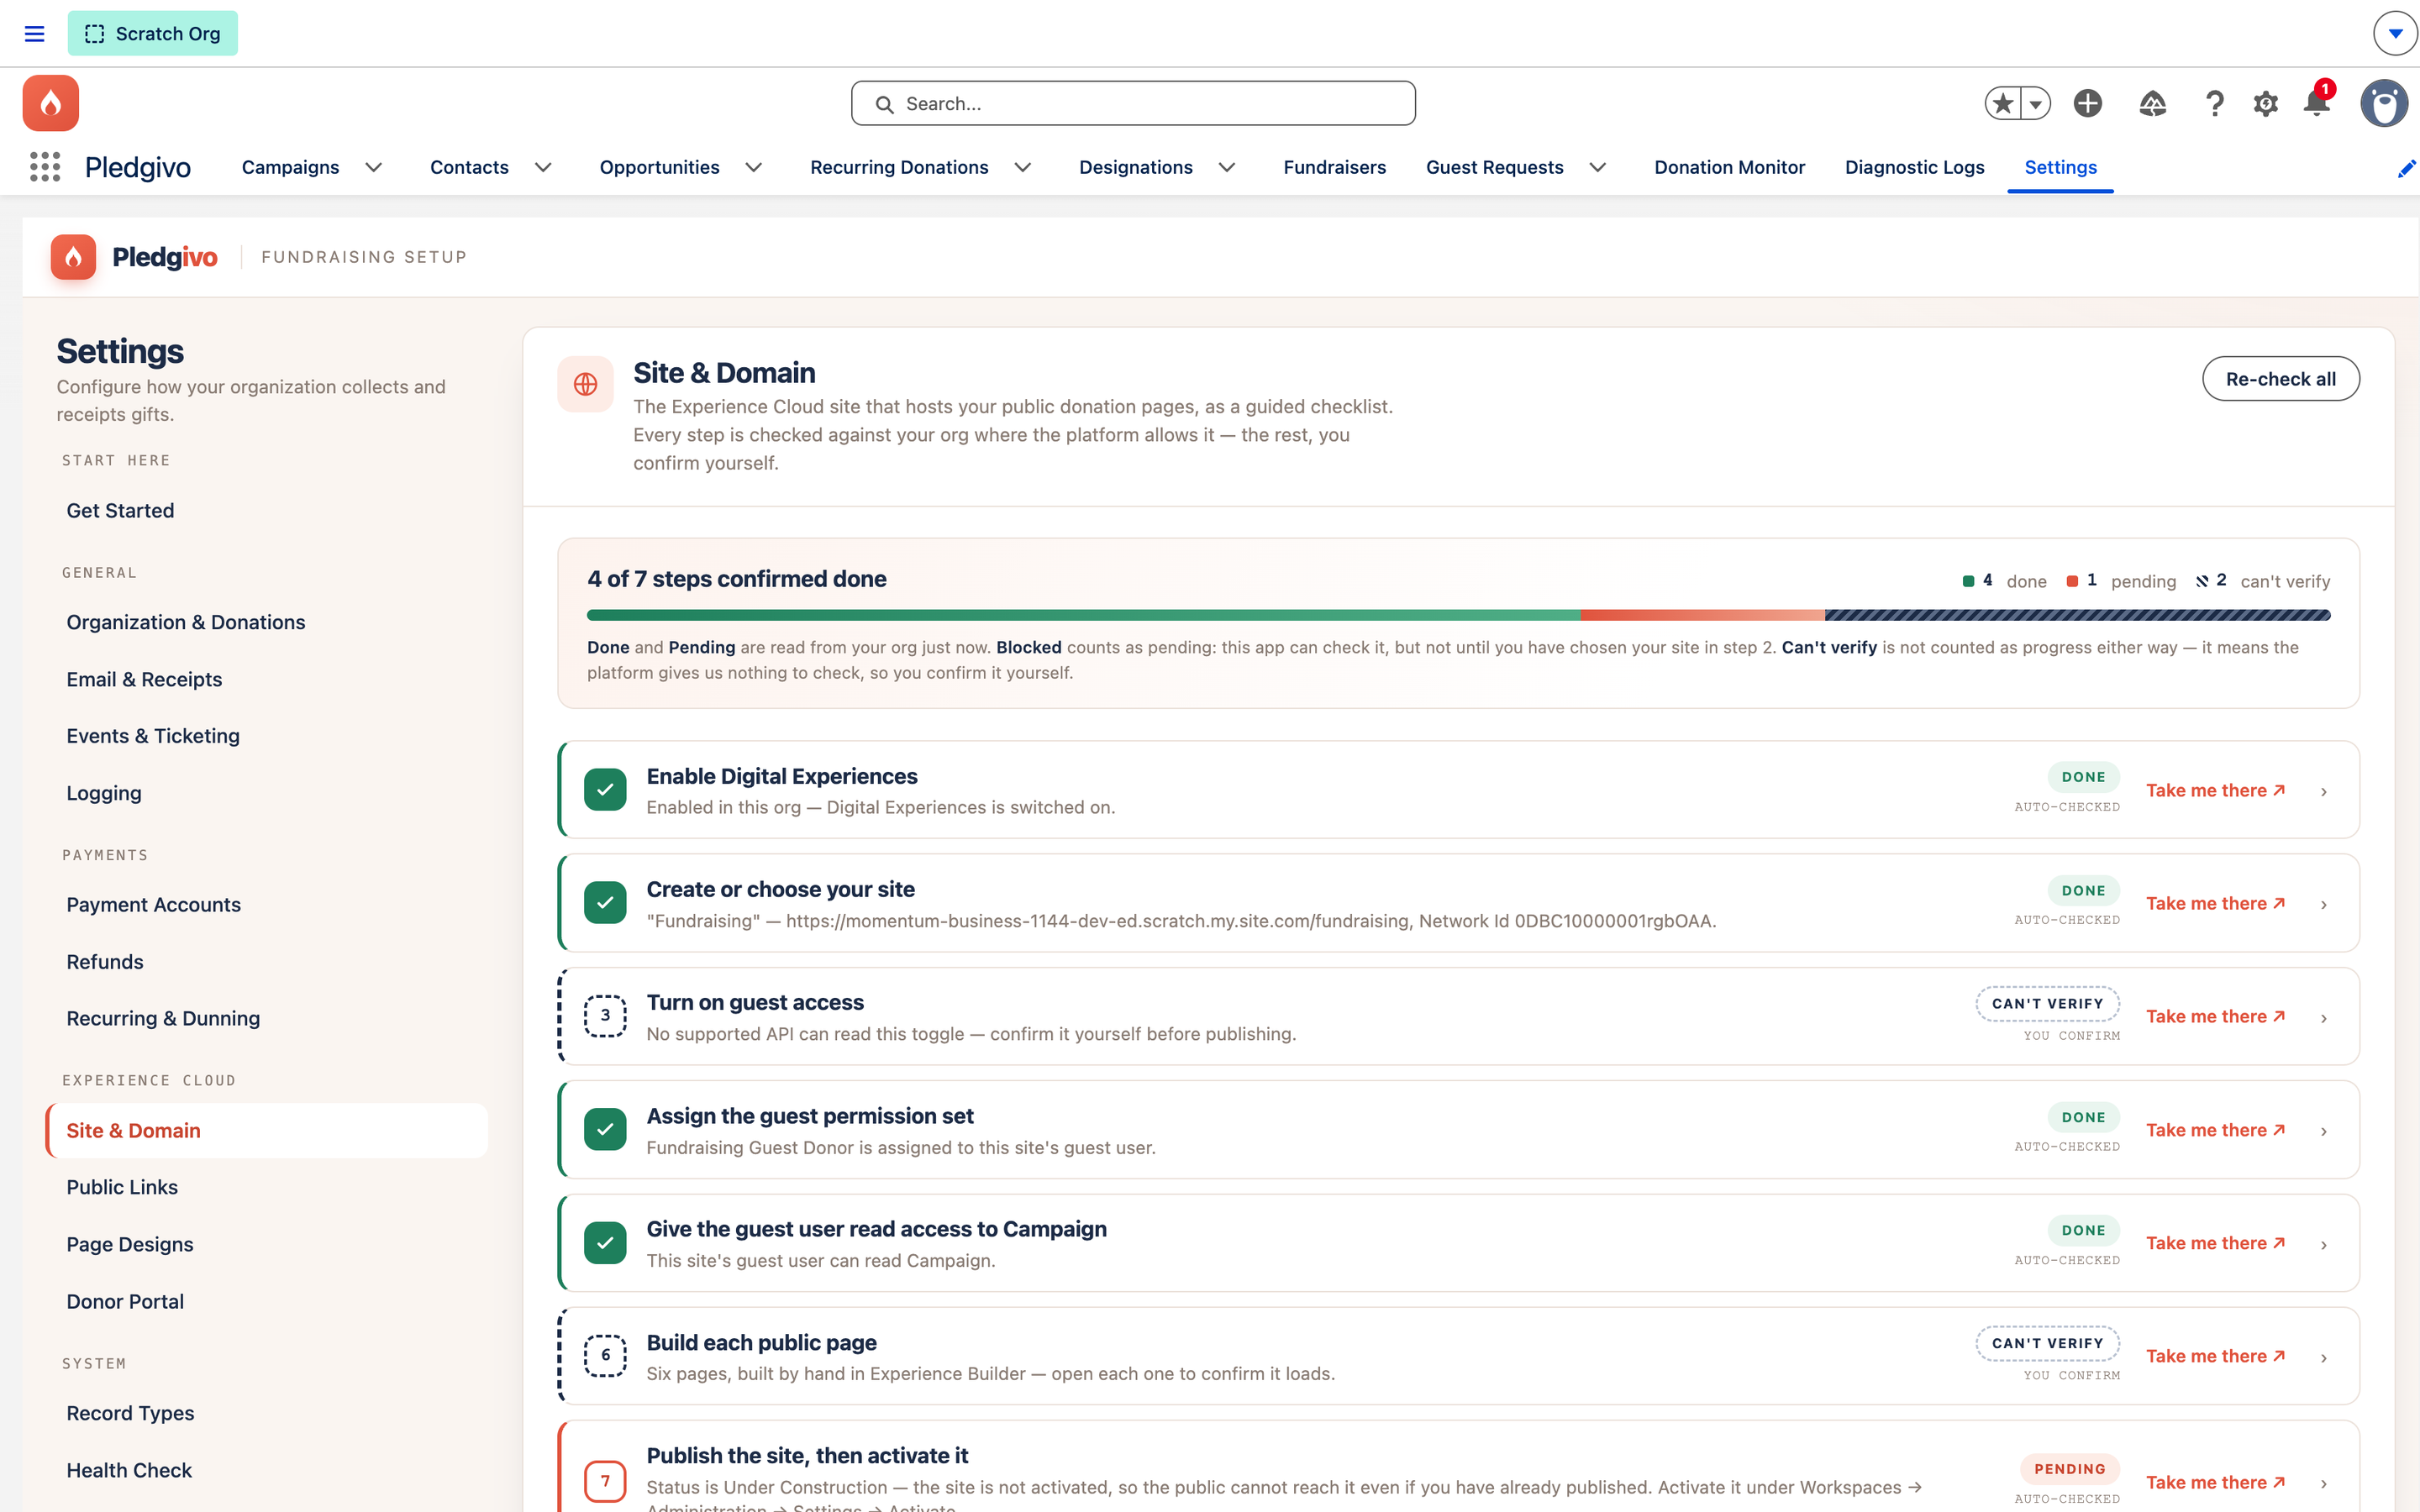
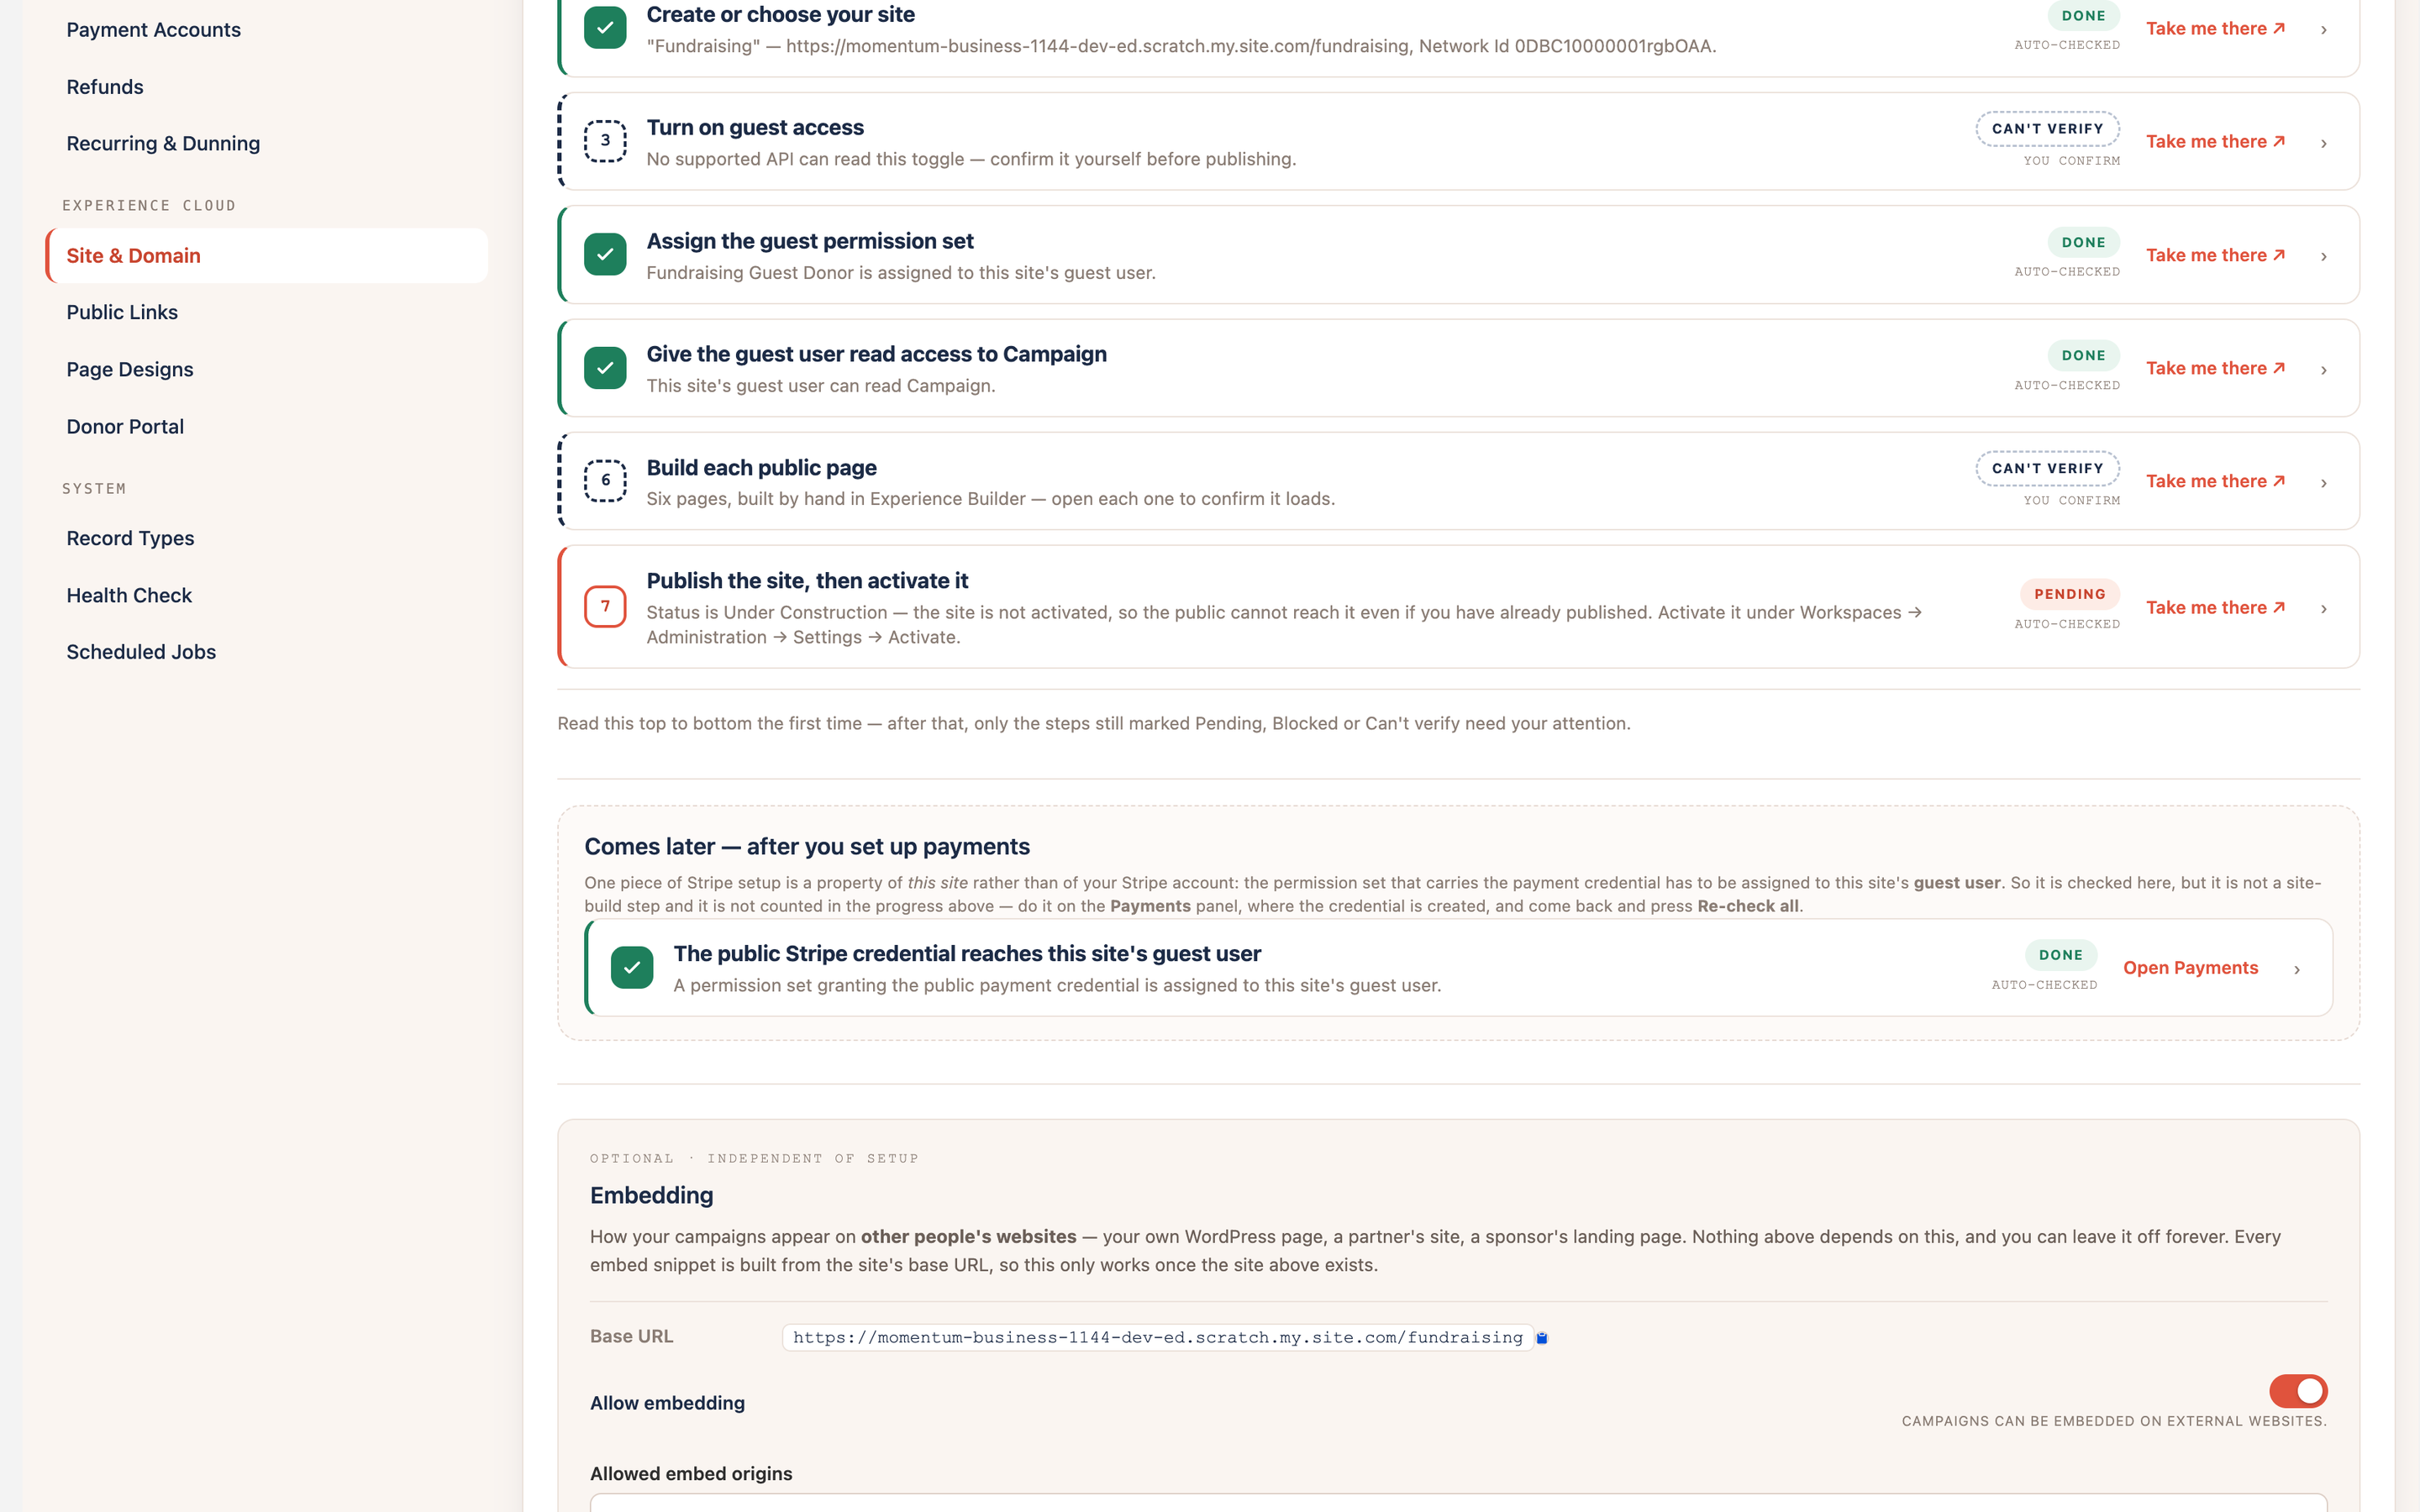
The console's Experience Cloud → Site & Domain panel is the checklist for this whole section. It grades each step against your org where Salesforce exposes an API and says so plainly where it does not: a step marked Can't verify is not a warning, it is the honest state, and it is yours to confirm.
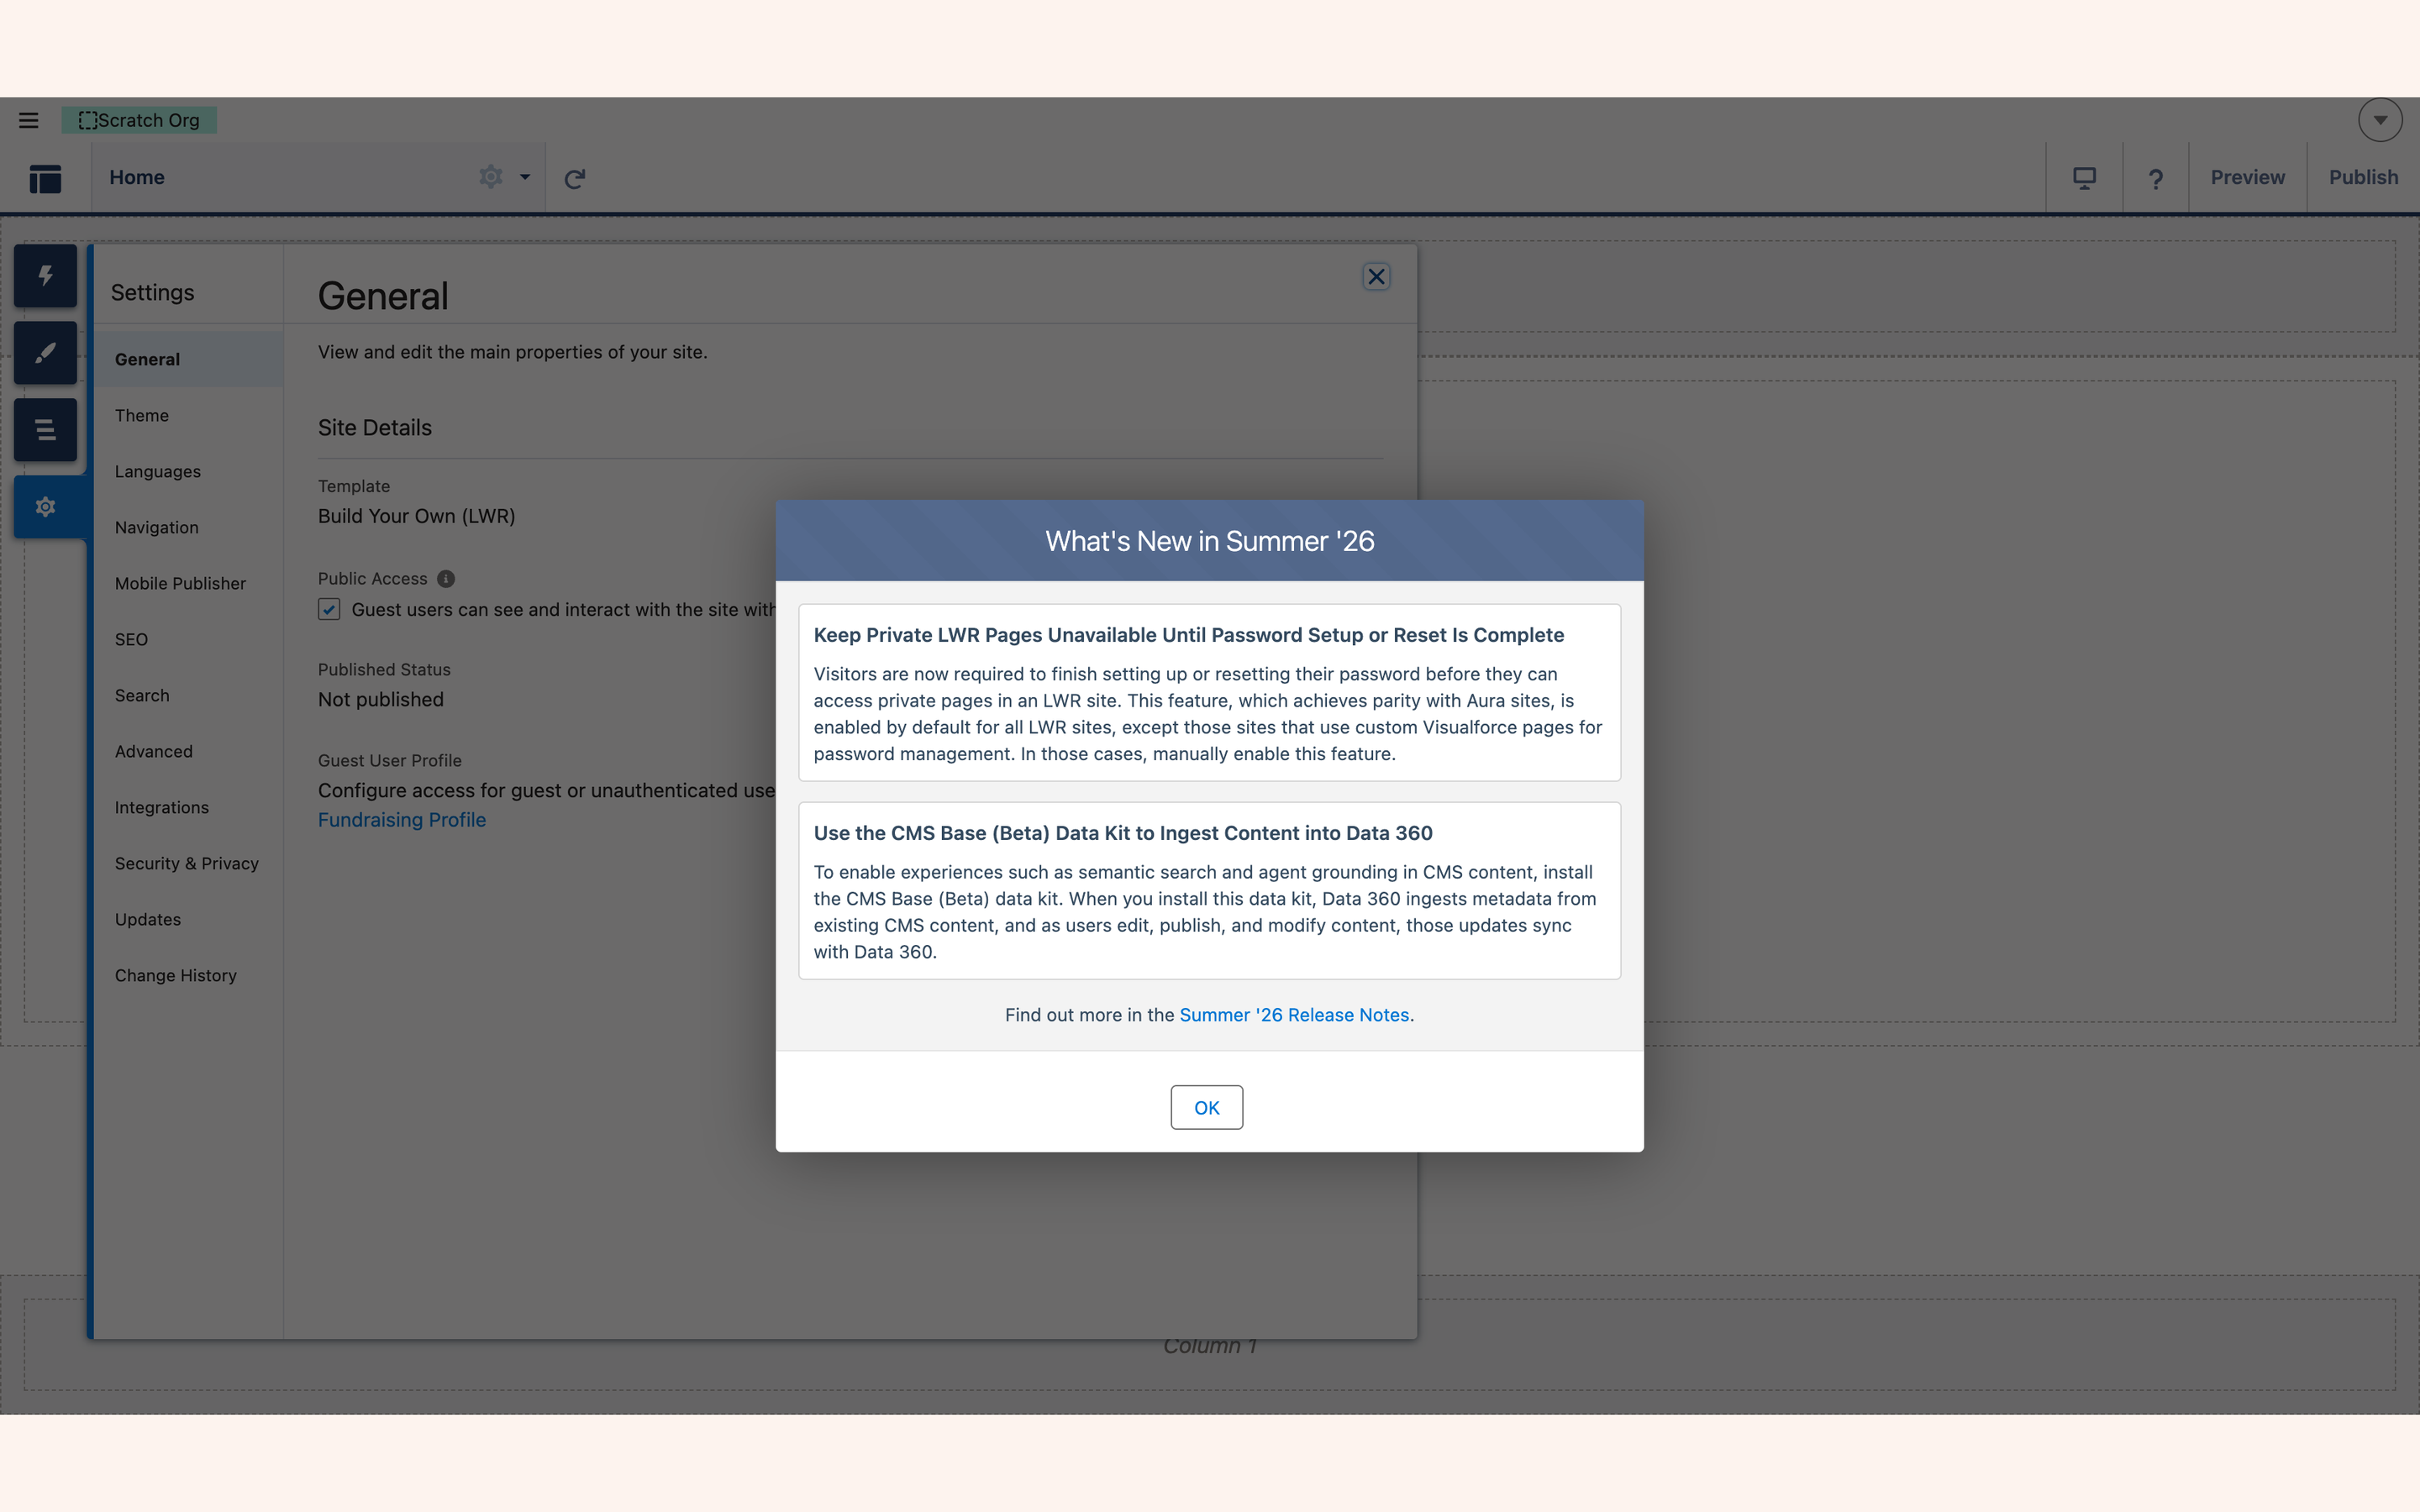
If Setup has no Digital Experiences menu, switch the feature on first: Setup → Digital Experiences → Settings → Enable Digital Experiences. It is org-wide, asks you to pick an Enhanced Domain subdomain, and cannot be undone.
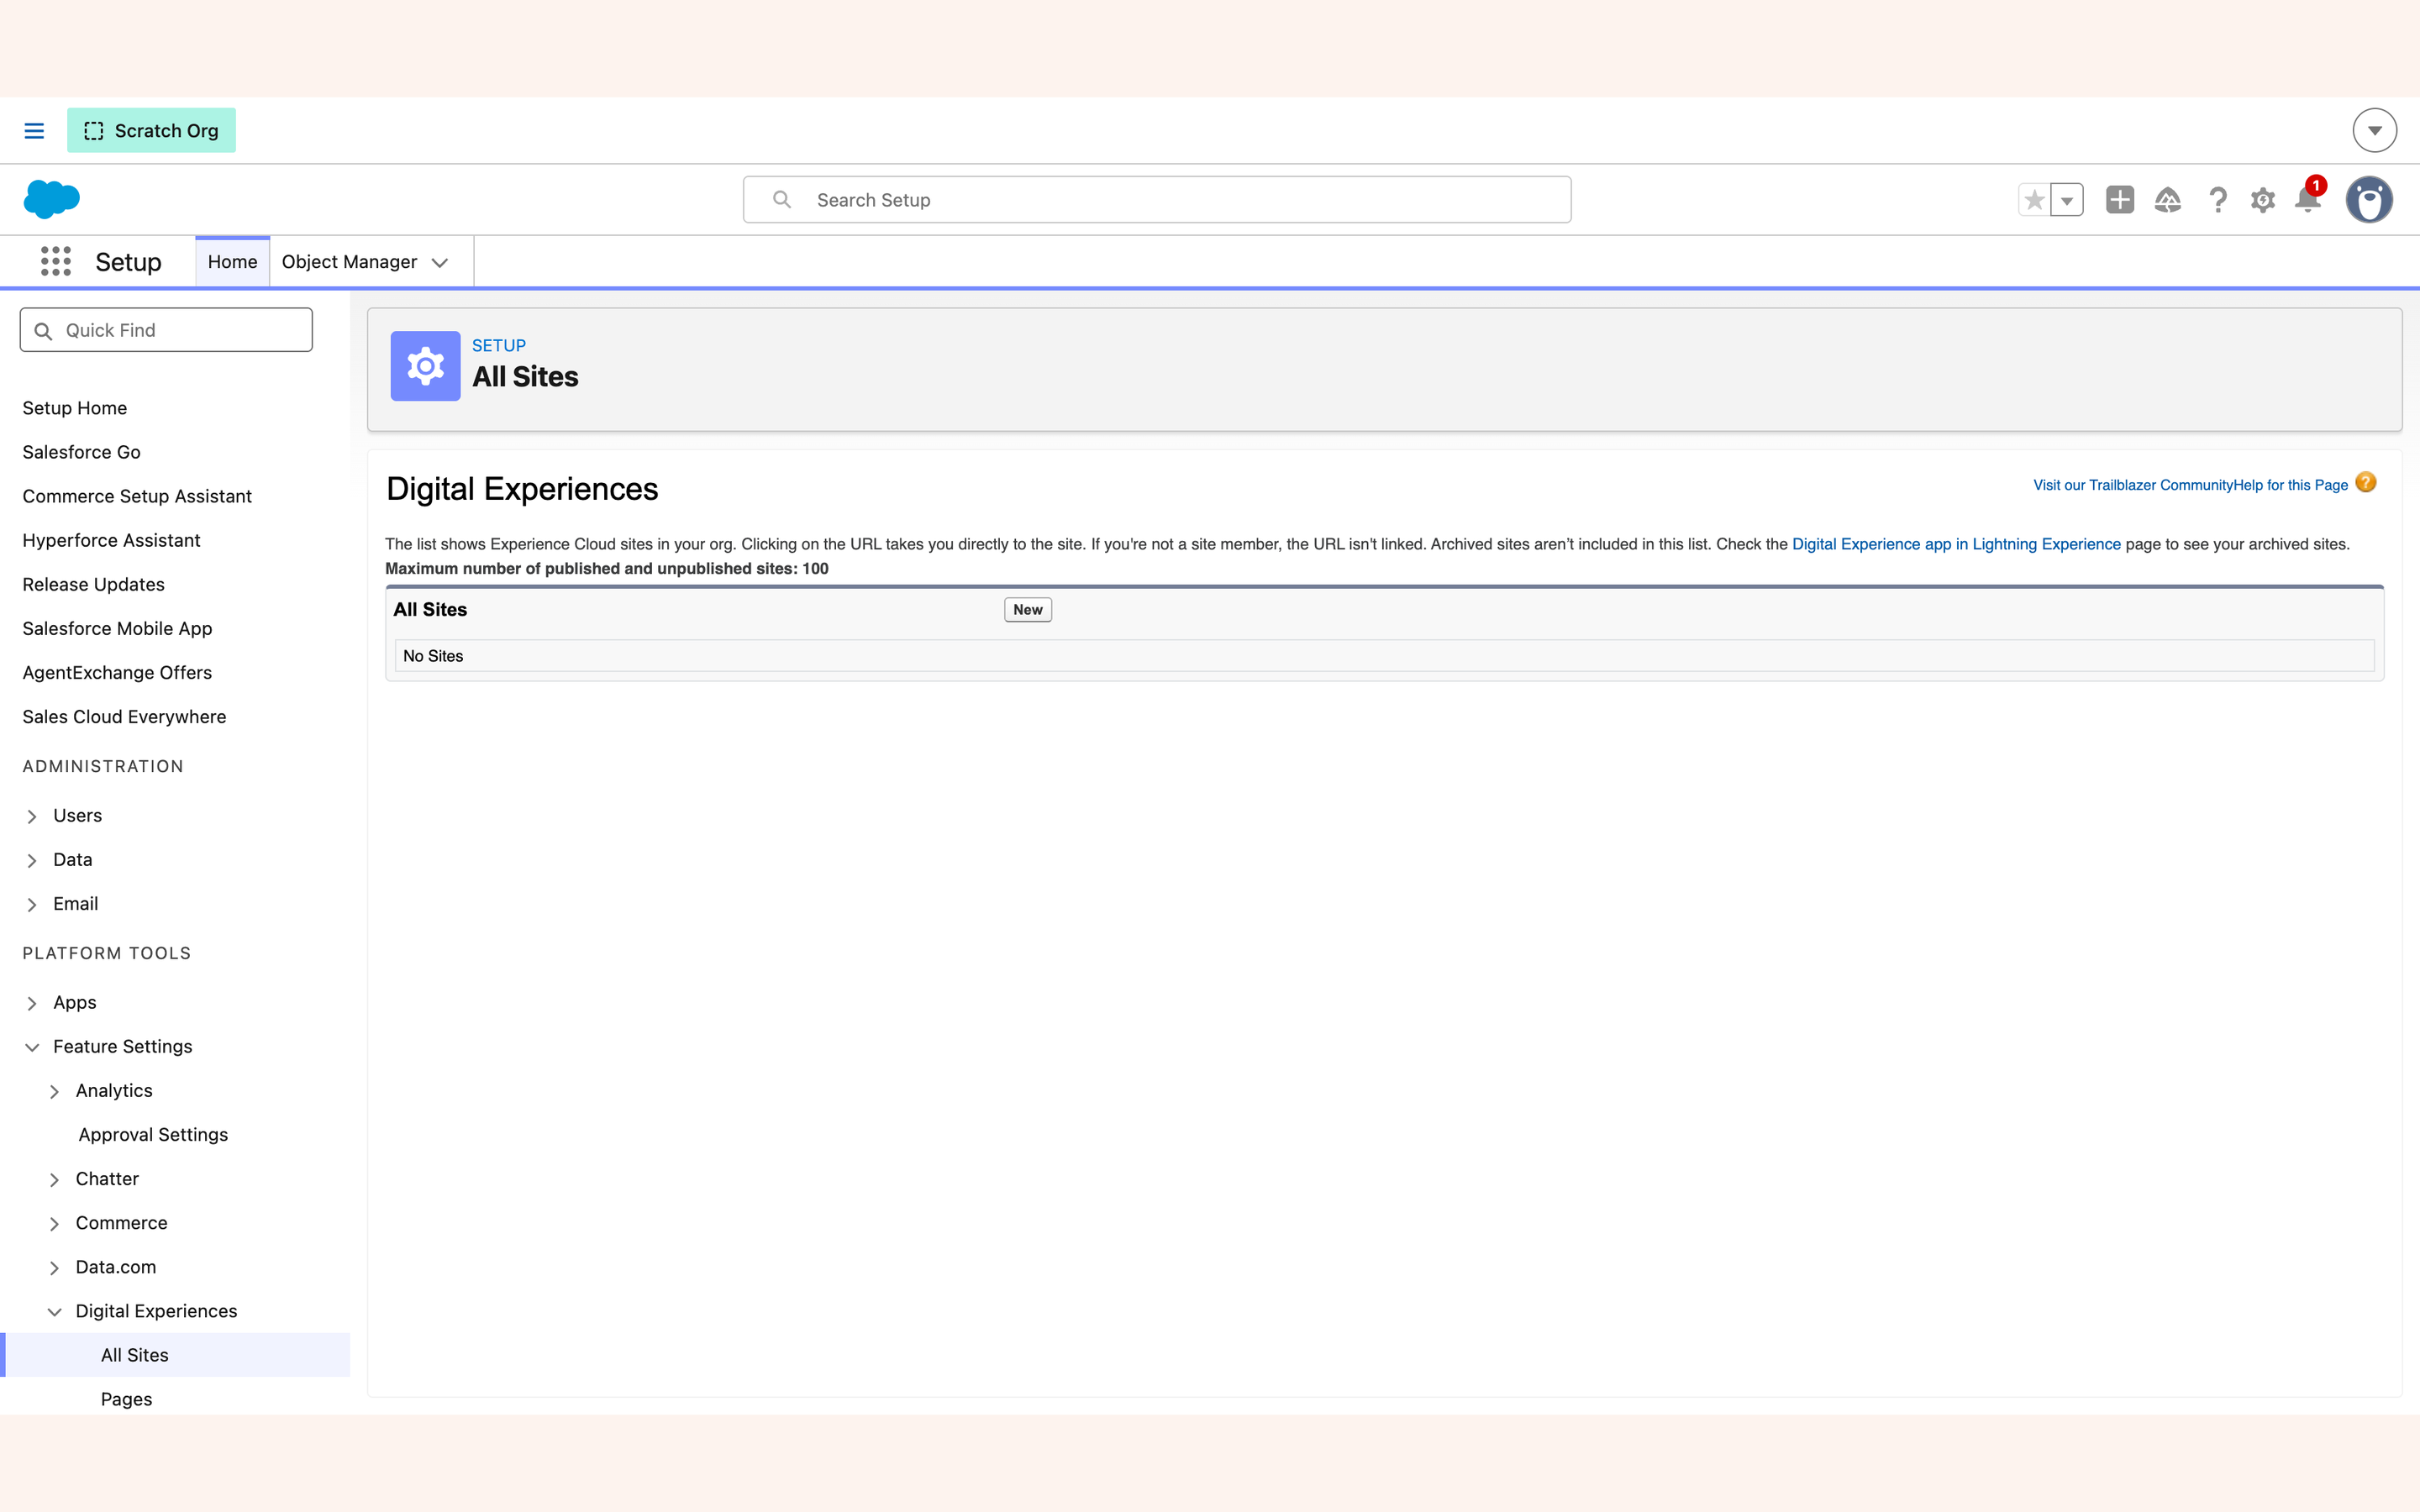
sf community create command for anyone who works from a terminal; the UI route below is the same outcome.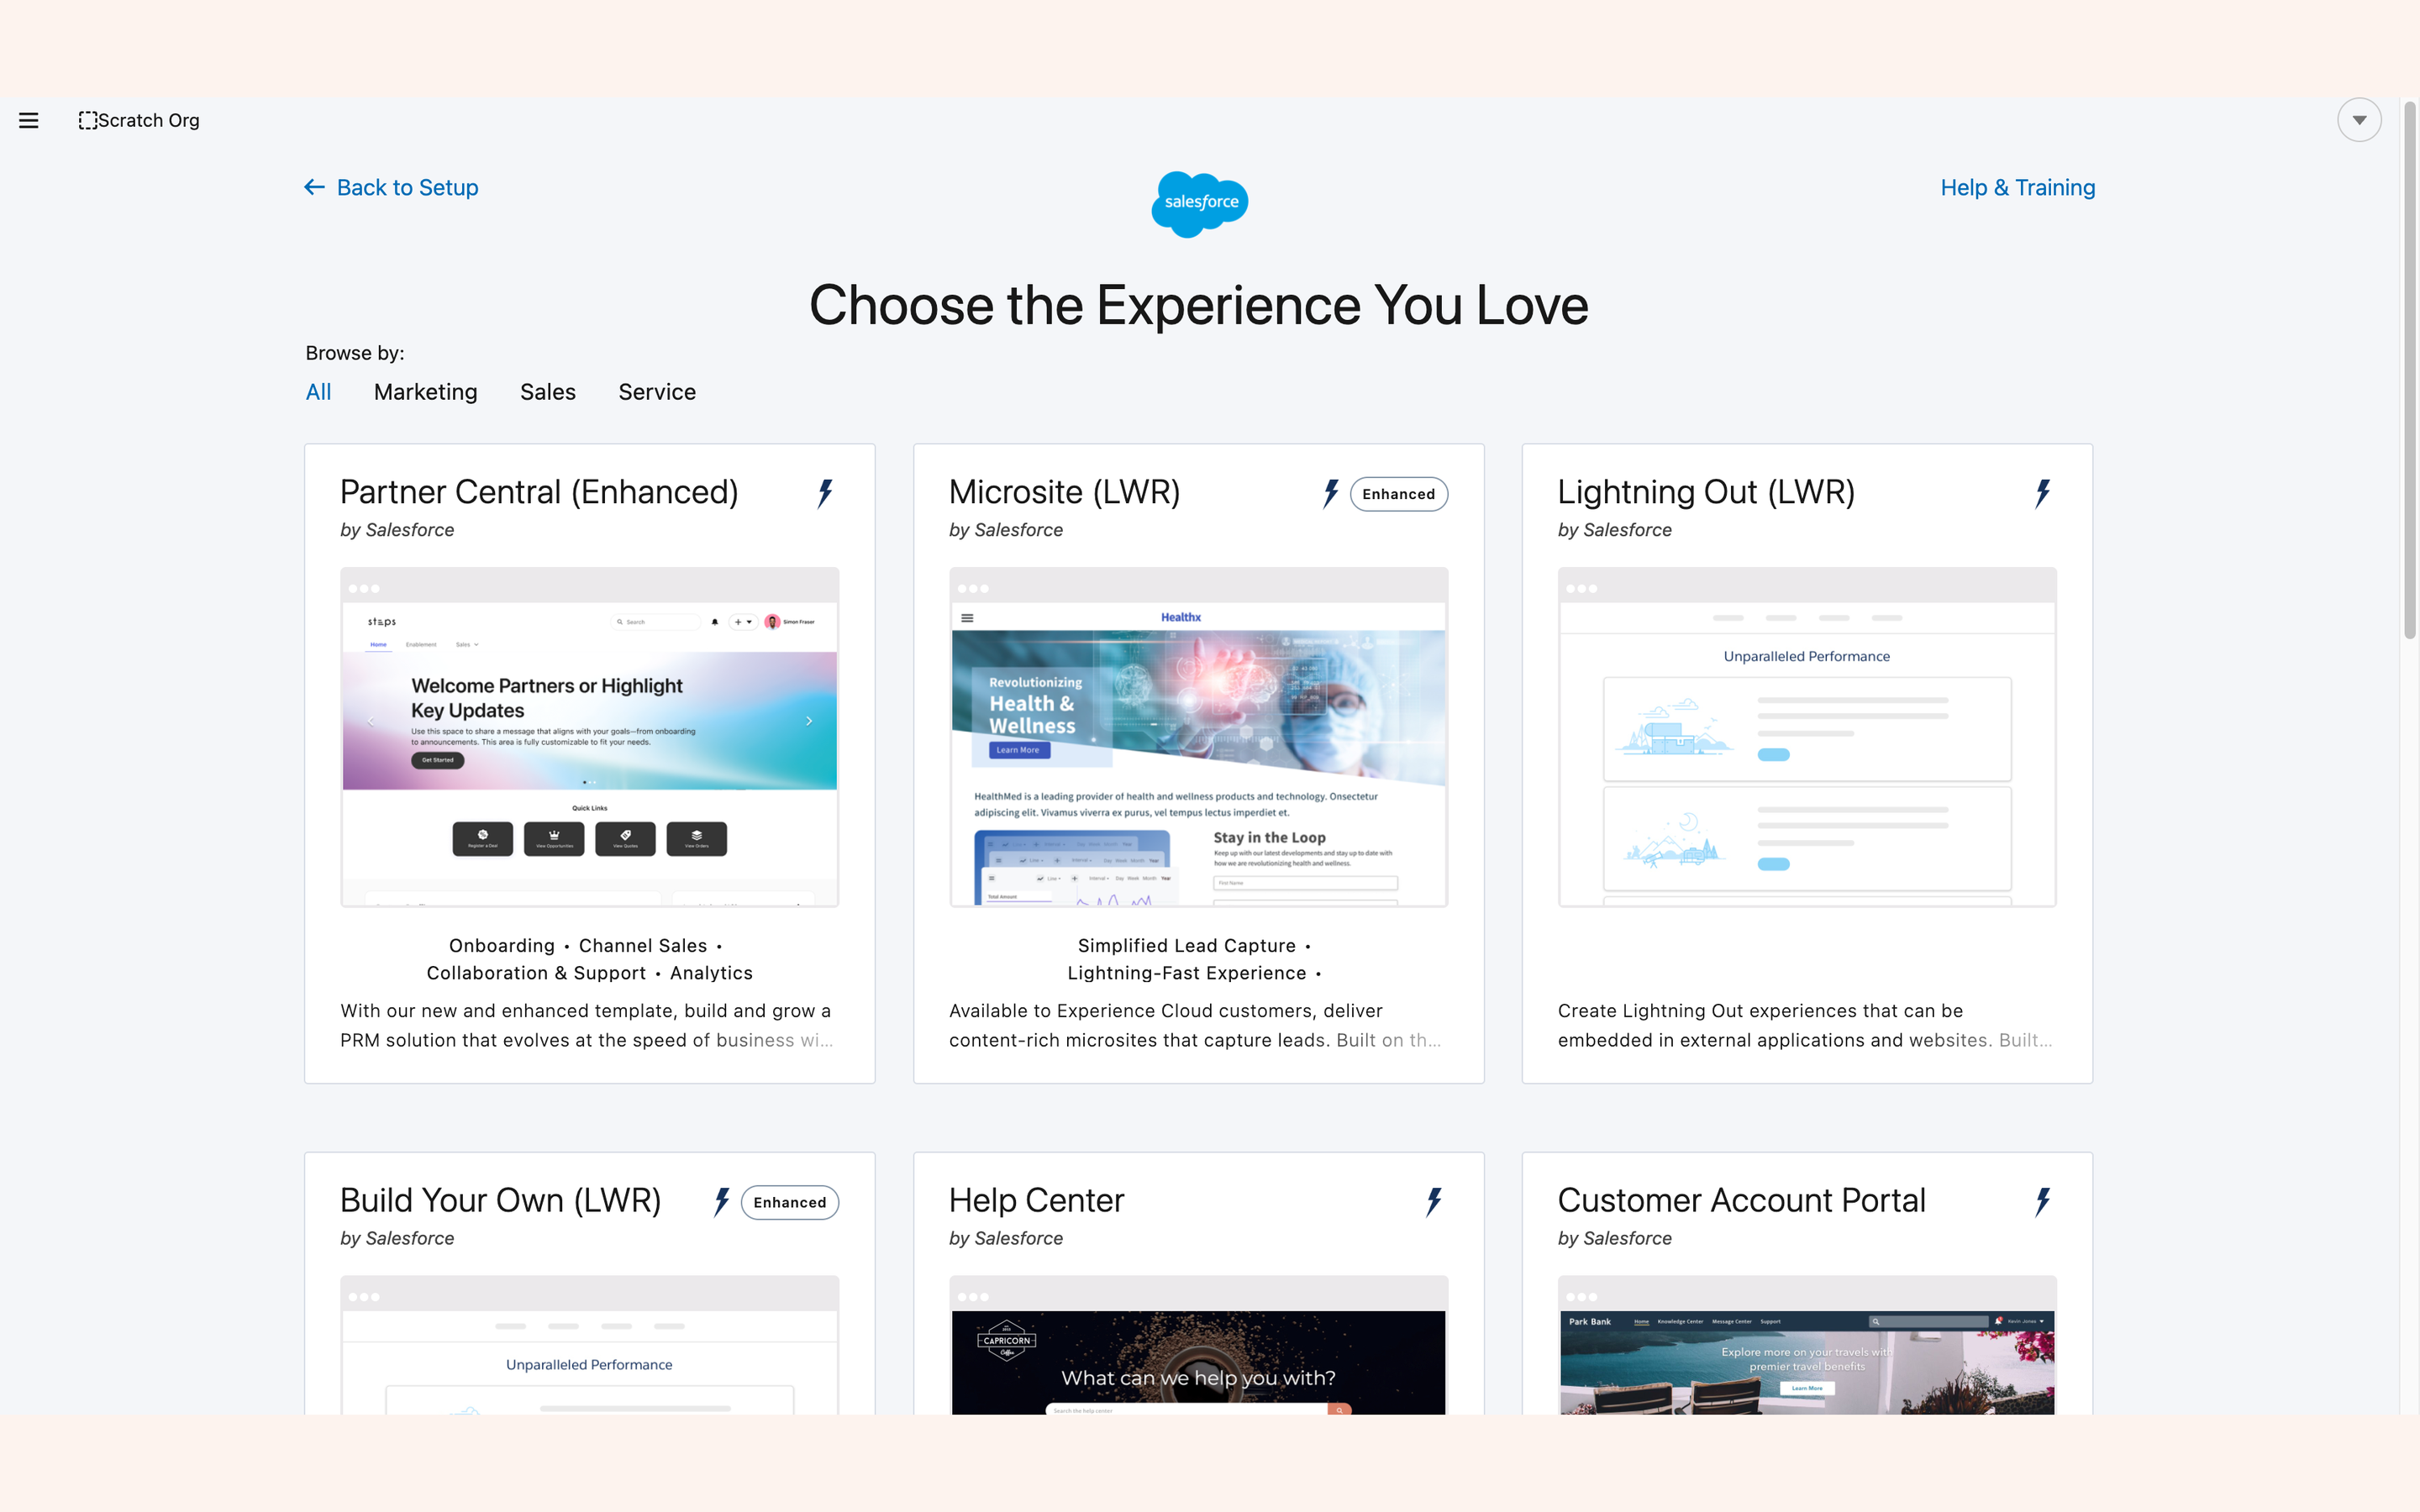
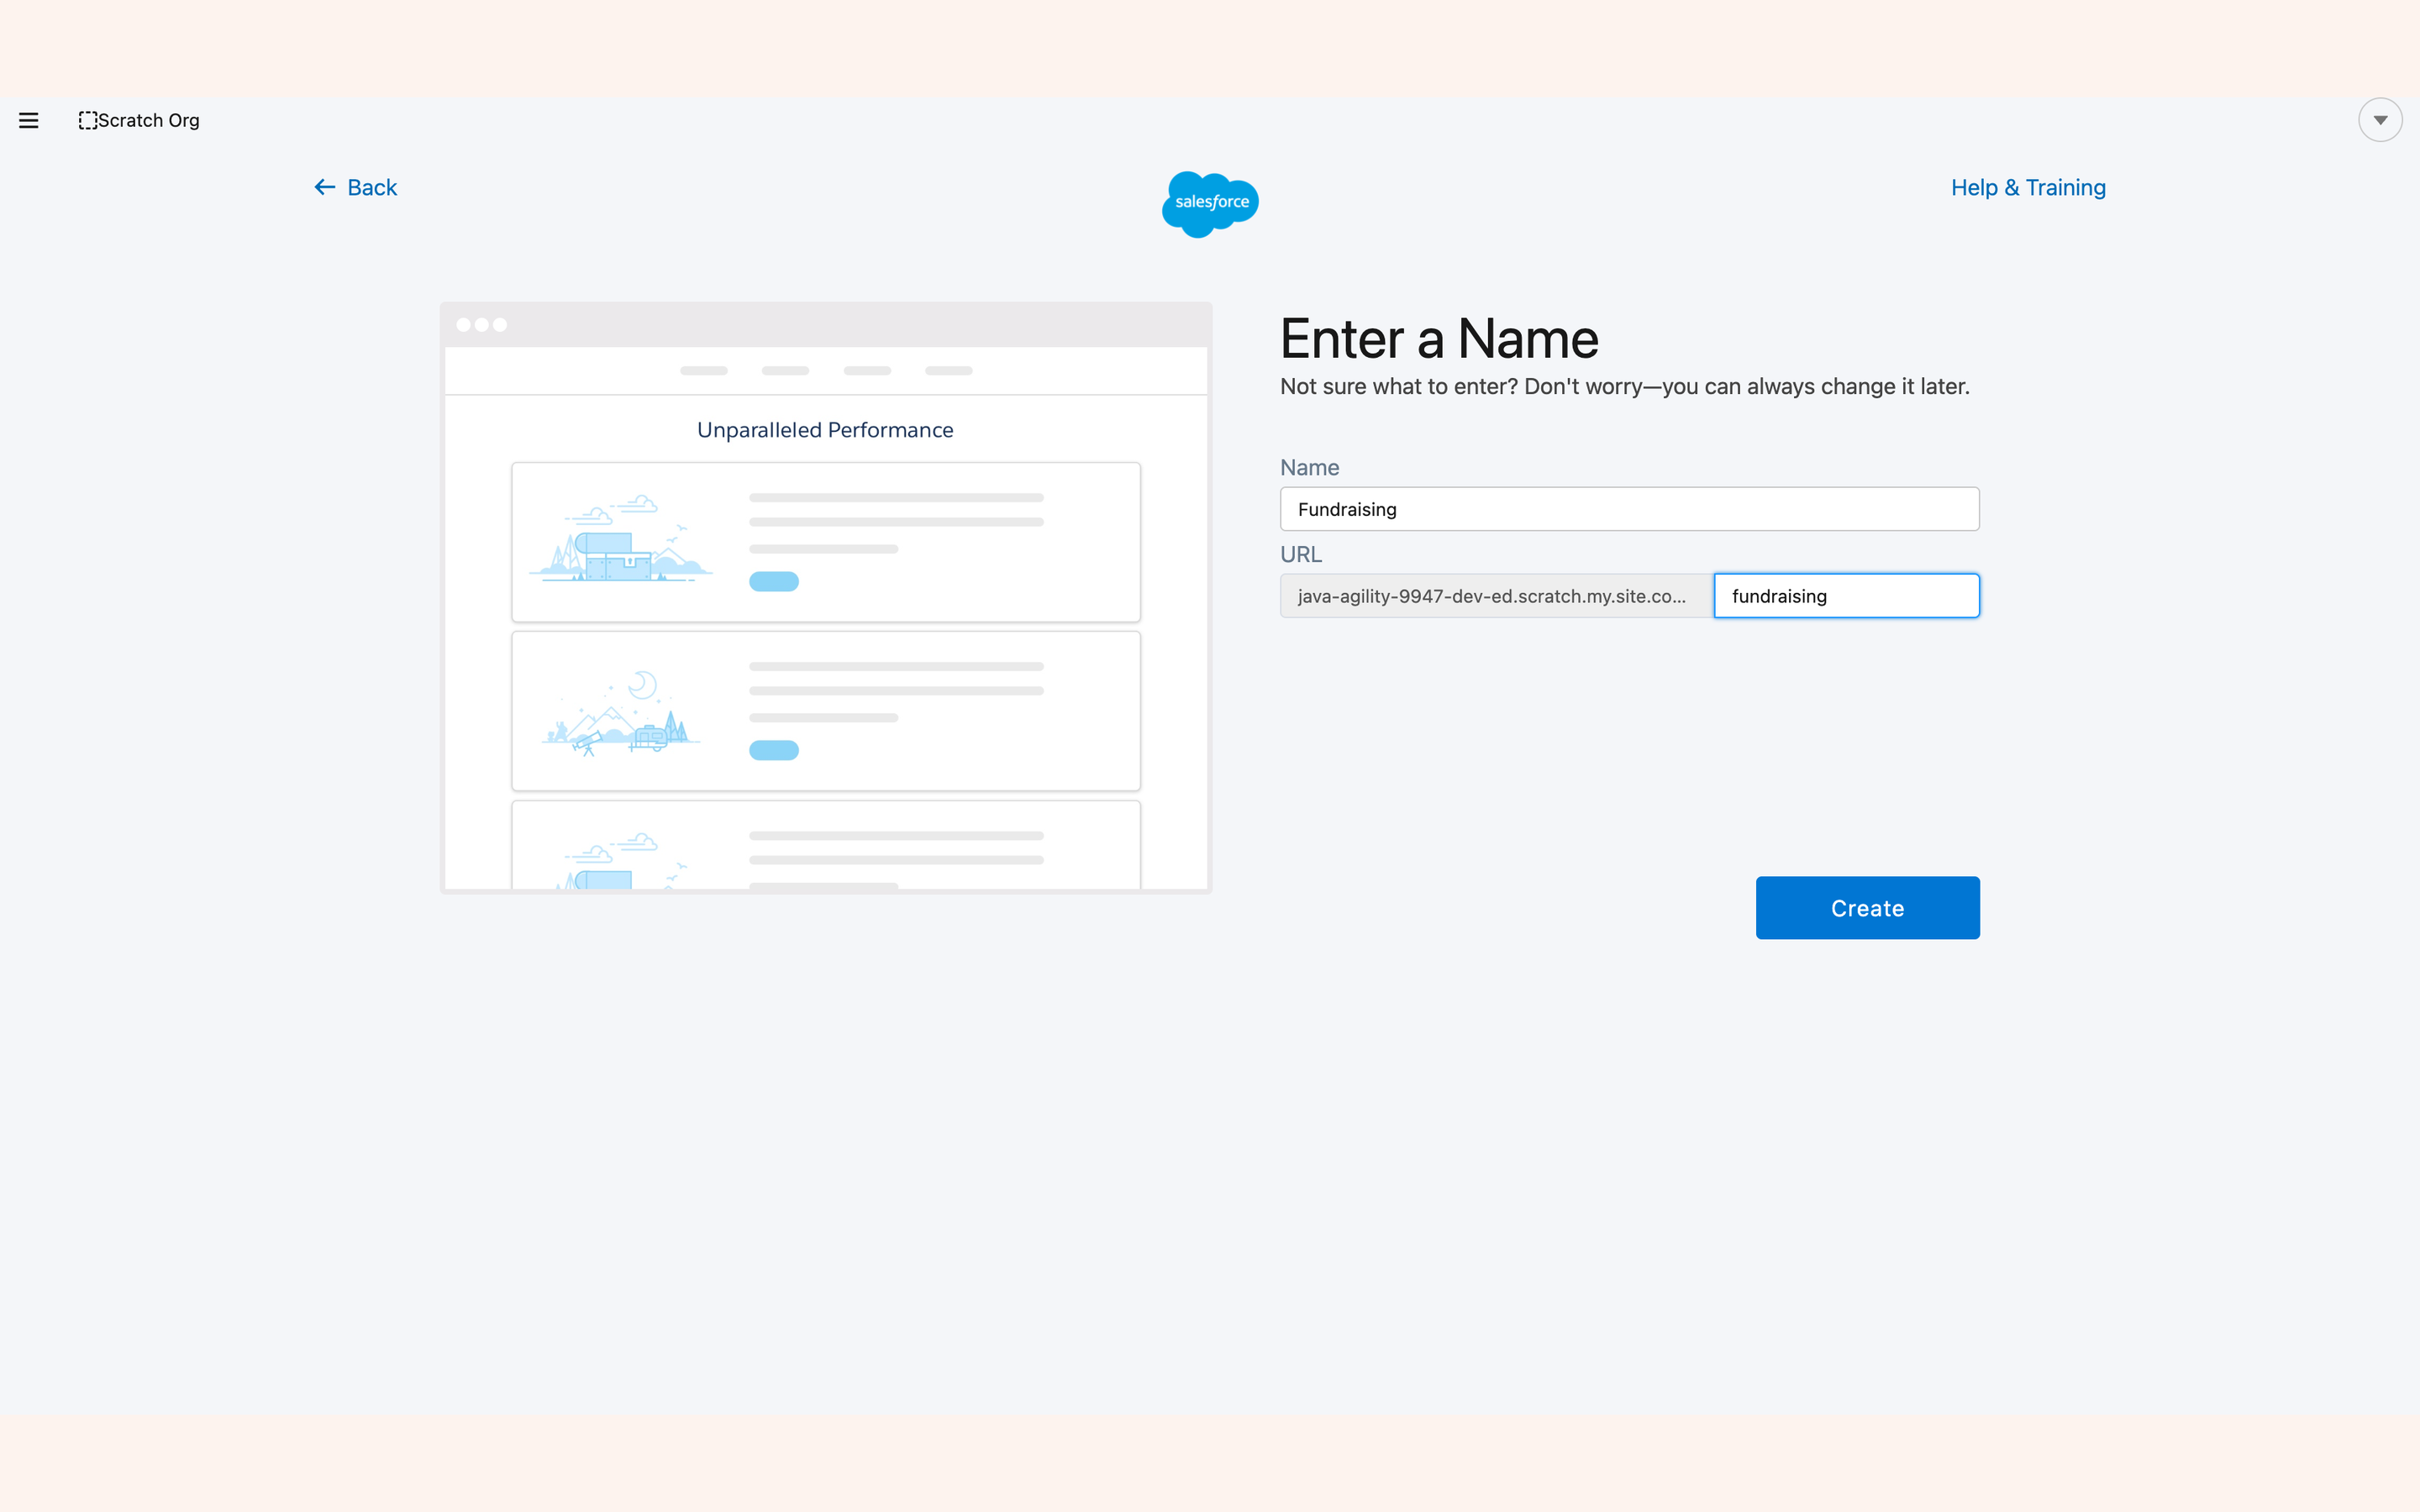
fundraising, not fundraising-2026-test.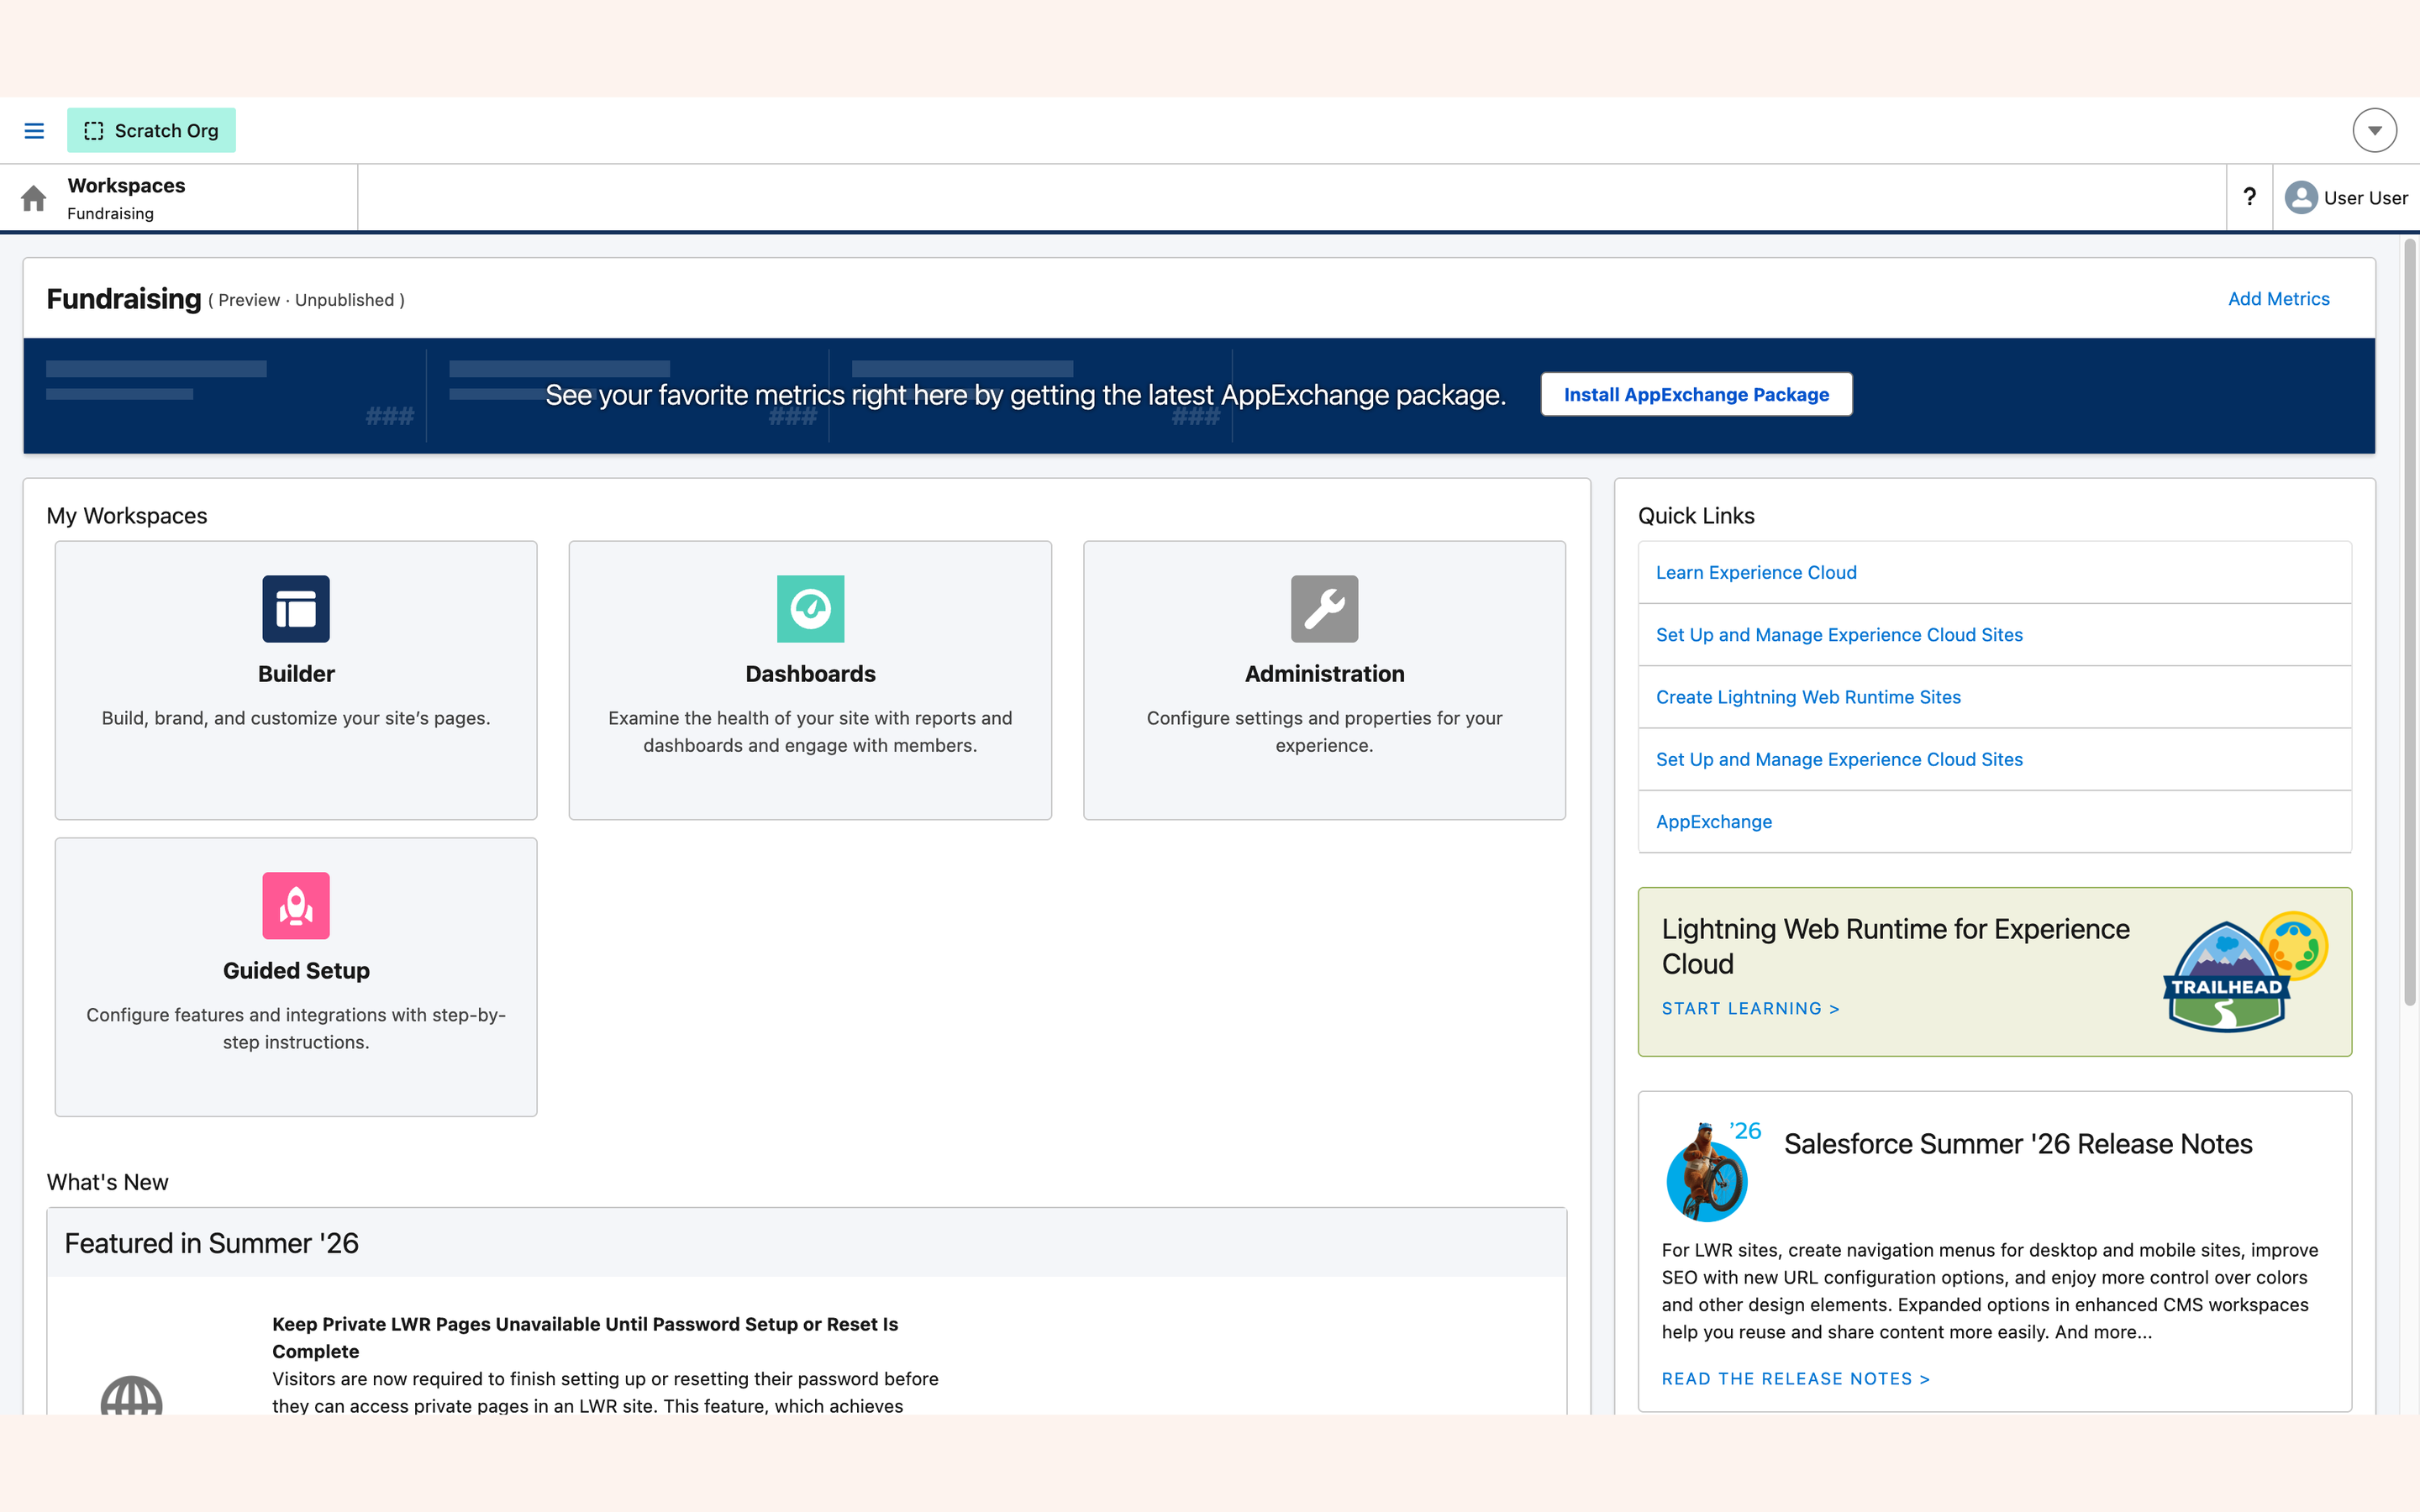
4. The site's guest user#
Get Started step 3, part two
Every public visitor to your site is one Salesforce user: the site's guest user. What that user can reach is what the public can reach, so this section is the security boundary of the entire public experience — and it is where a first setup most often stalls, because the guest user is not where you would look for it.
How to actually reach the guest user
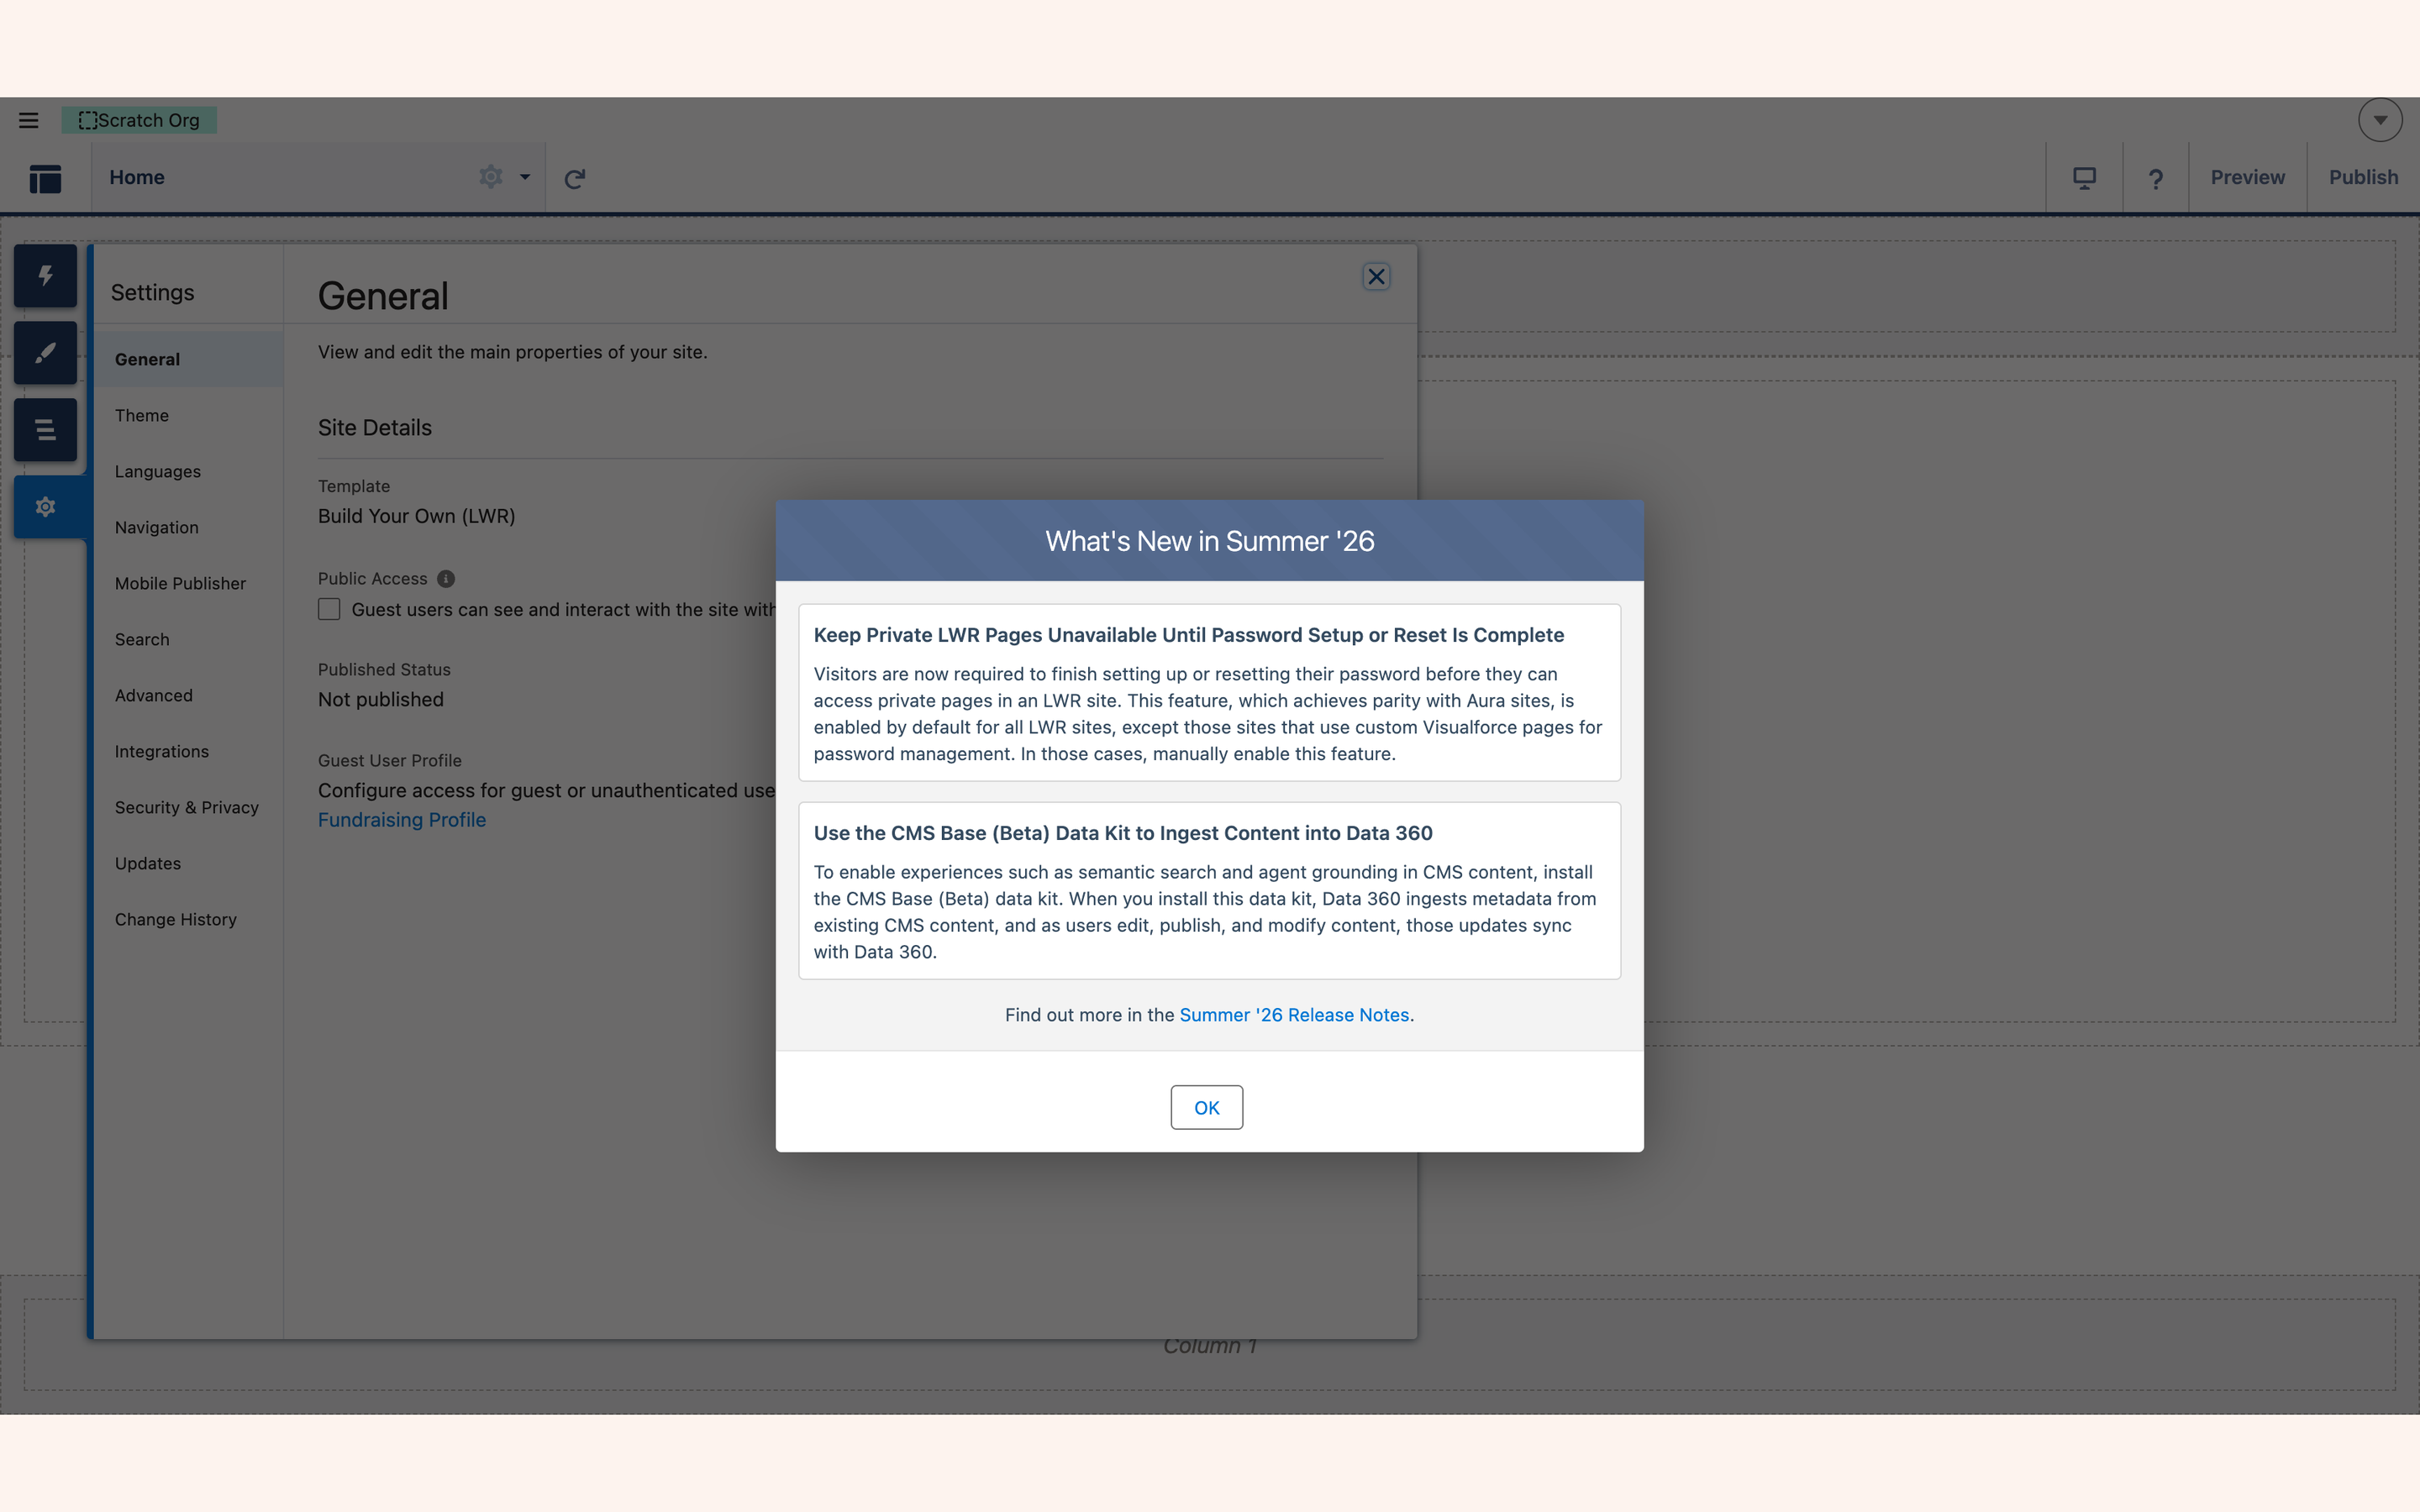
It is not in Setup → Users (no list view contains it), and Experience Workspaces → Administration → Members cannot assign to it — that page defines which profiles and permission sets count as site members, which is a different thing entirely.
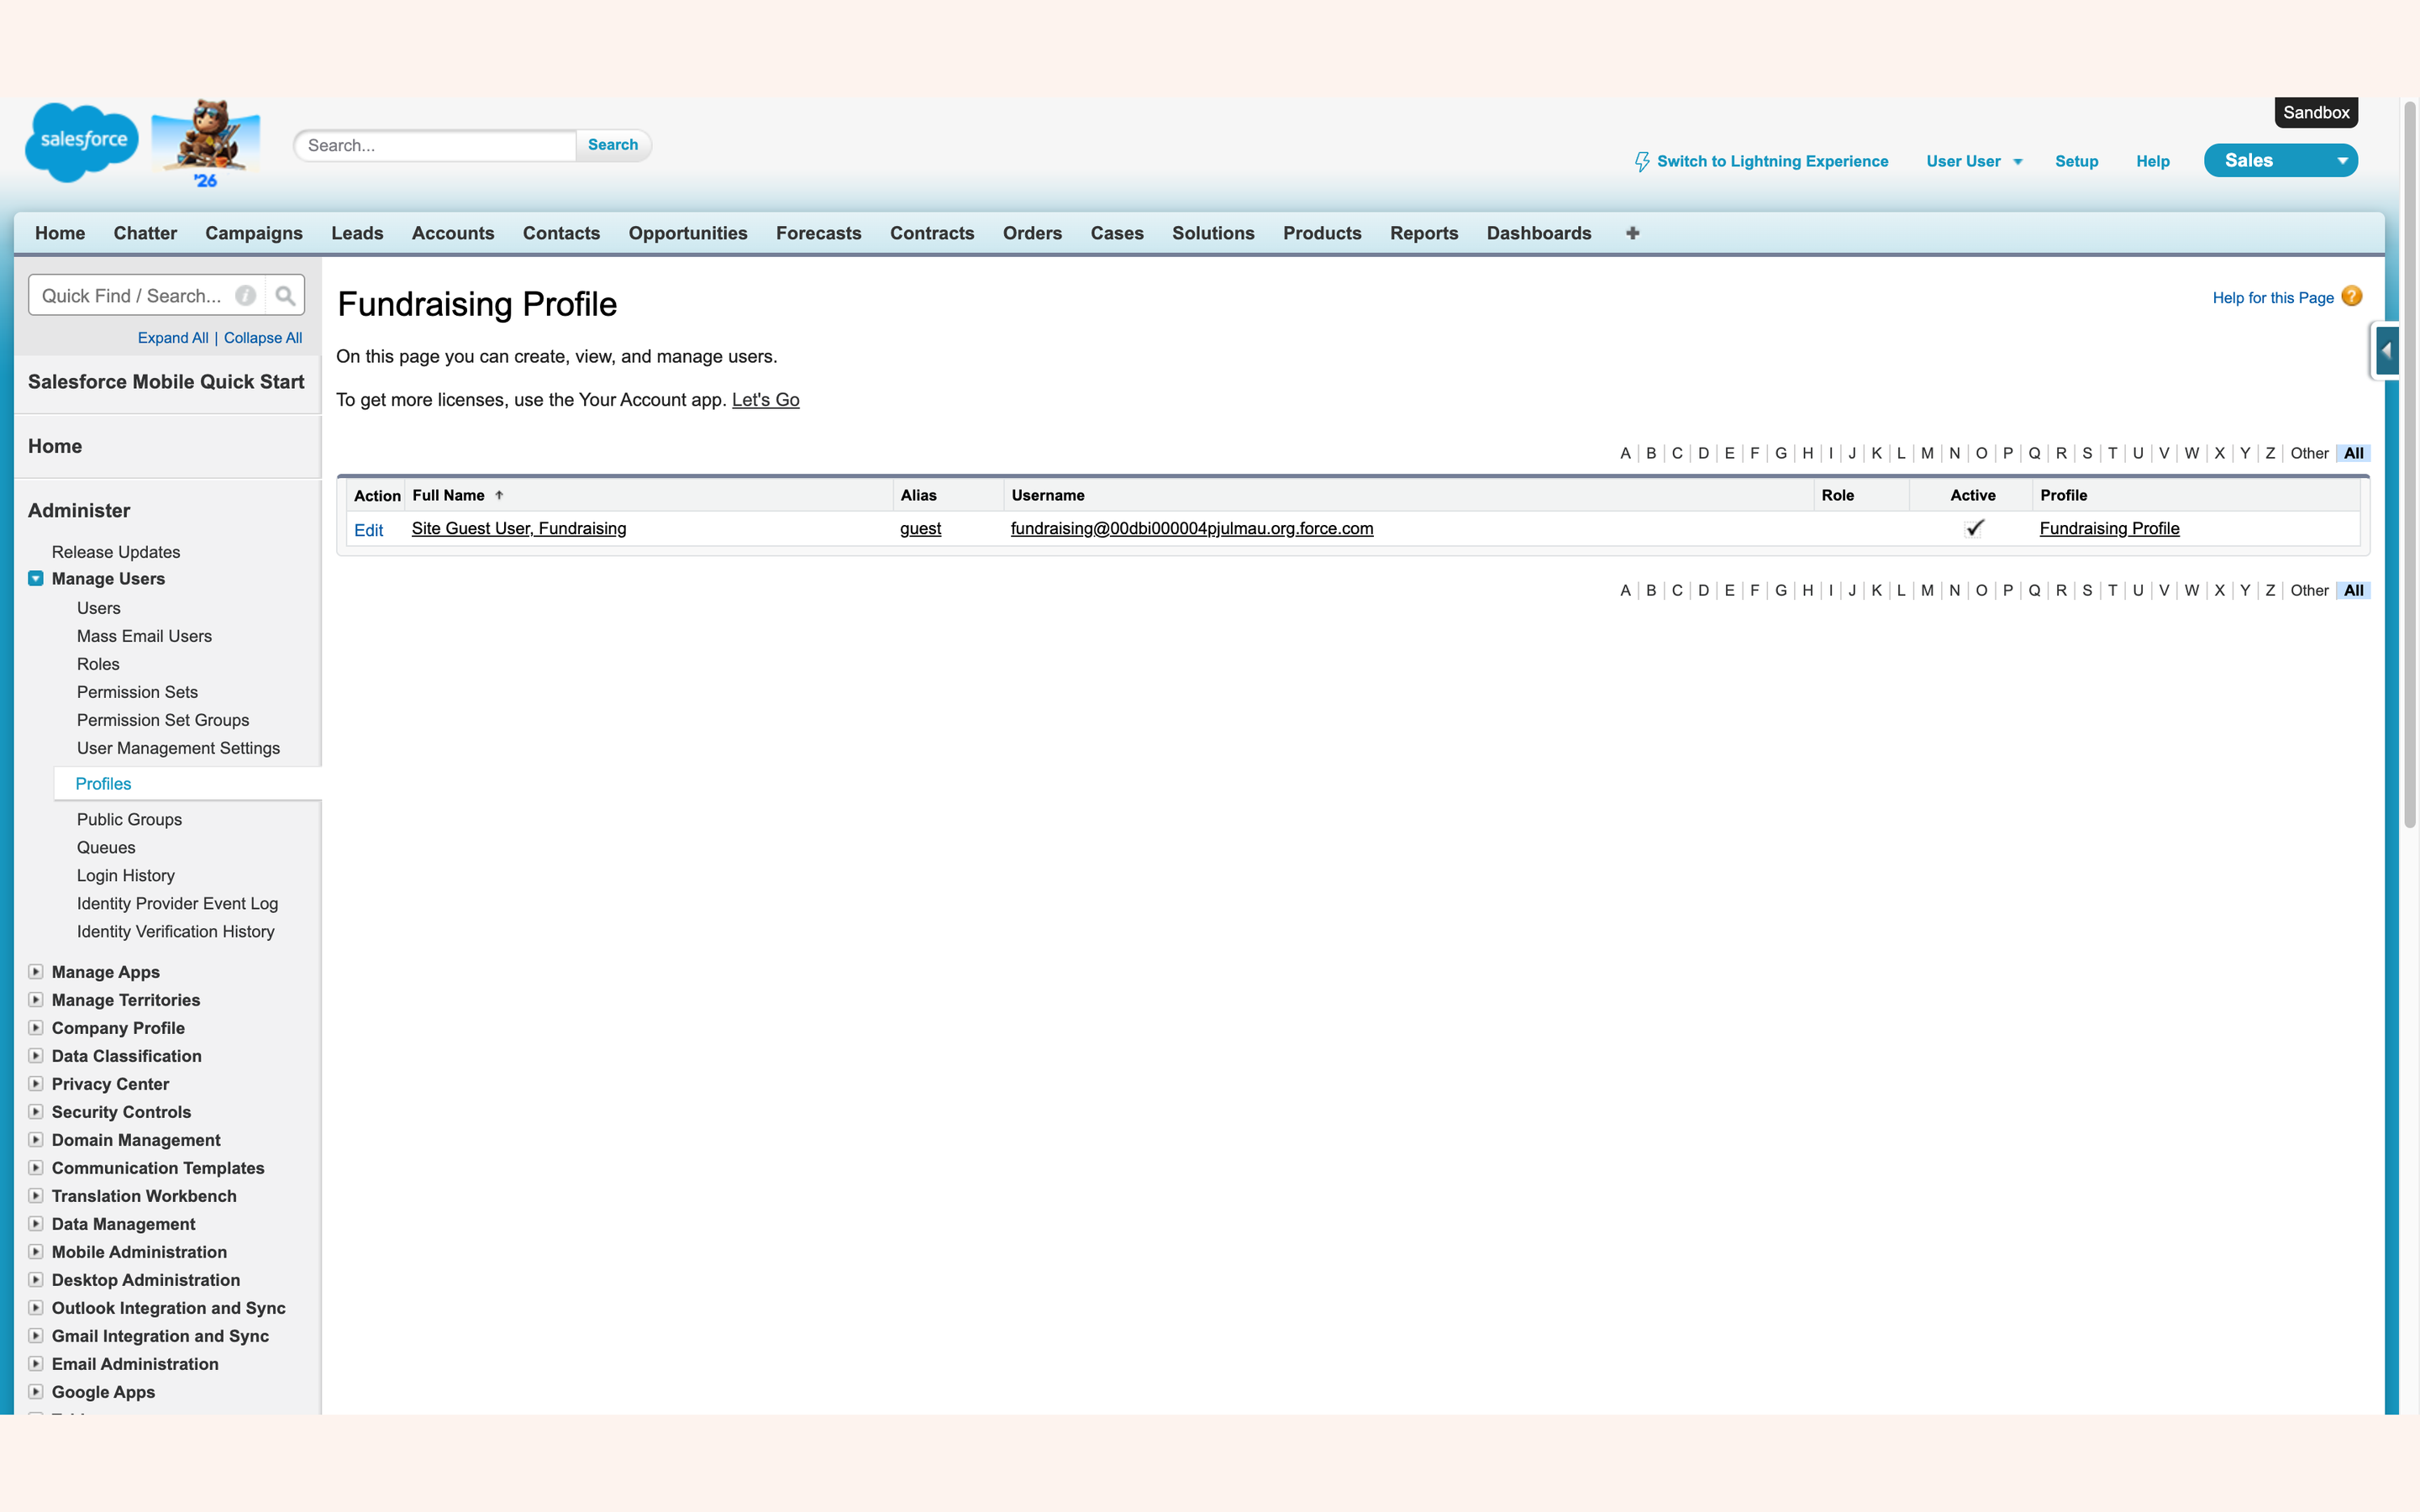
The route that works: Workspaces → Administration → Pages → Go to Force.com → Public Access Settings → View Users → the user named "<your site> Site Guest User".
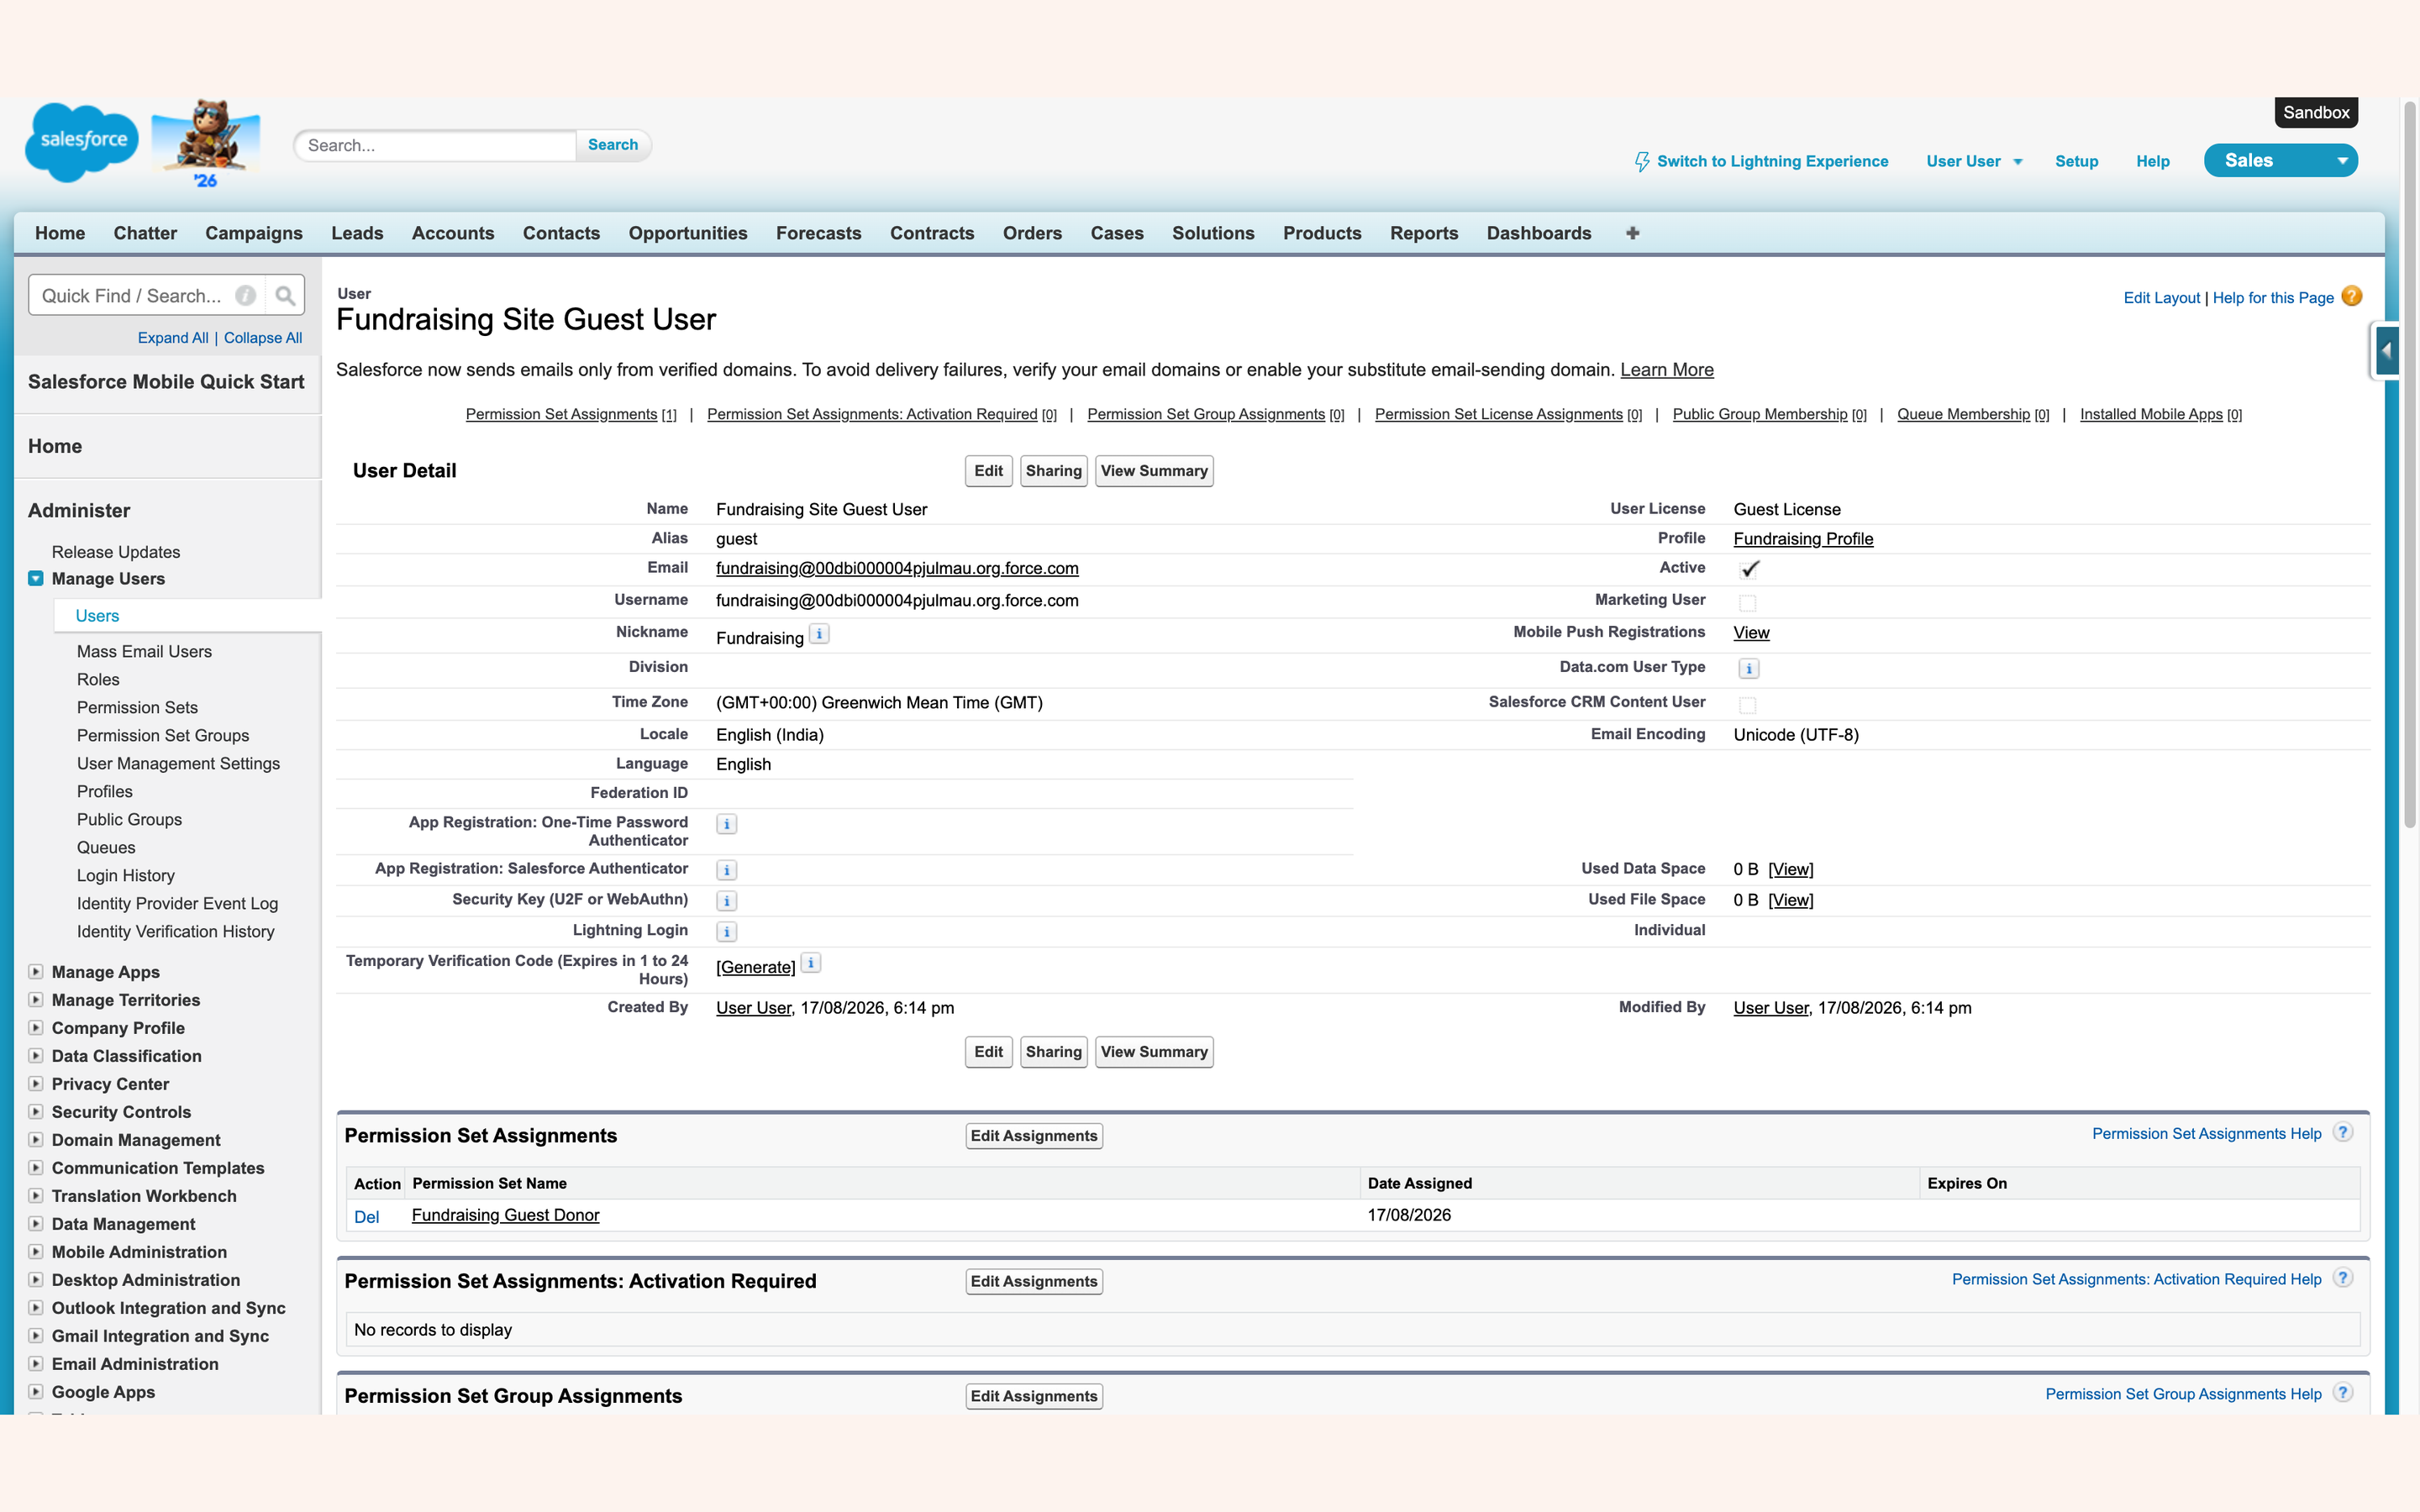
From there, Permission Set Assignments → Edit Assignments behaves like any other user.
Two permission sets have to reach that user, and only one of them ships with the package.
| Set | Where it comes from | Why |
|---|---|---|
Fundraising_GuestDonor |
Packaged | Every custom object and field a public donation, event or ticket page reads |
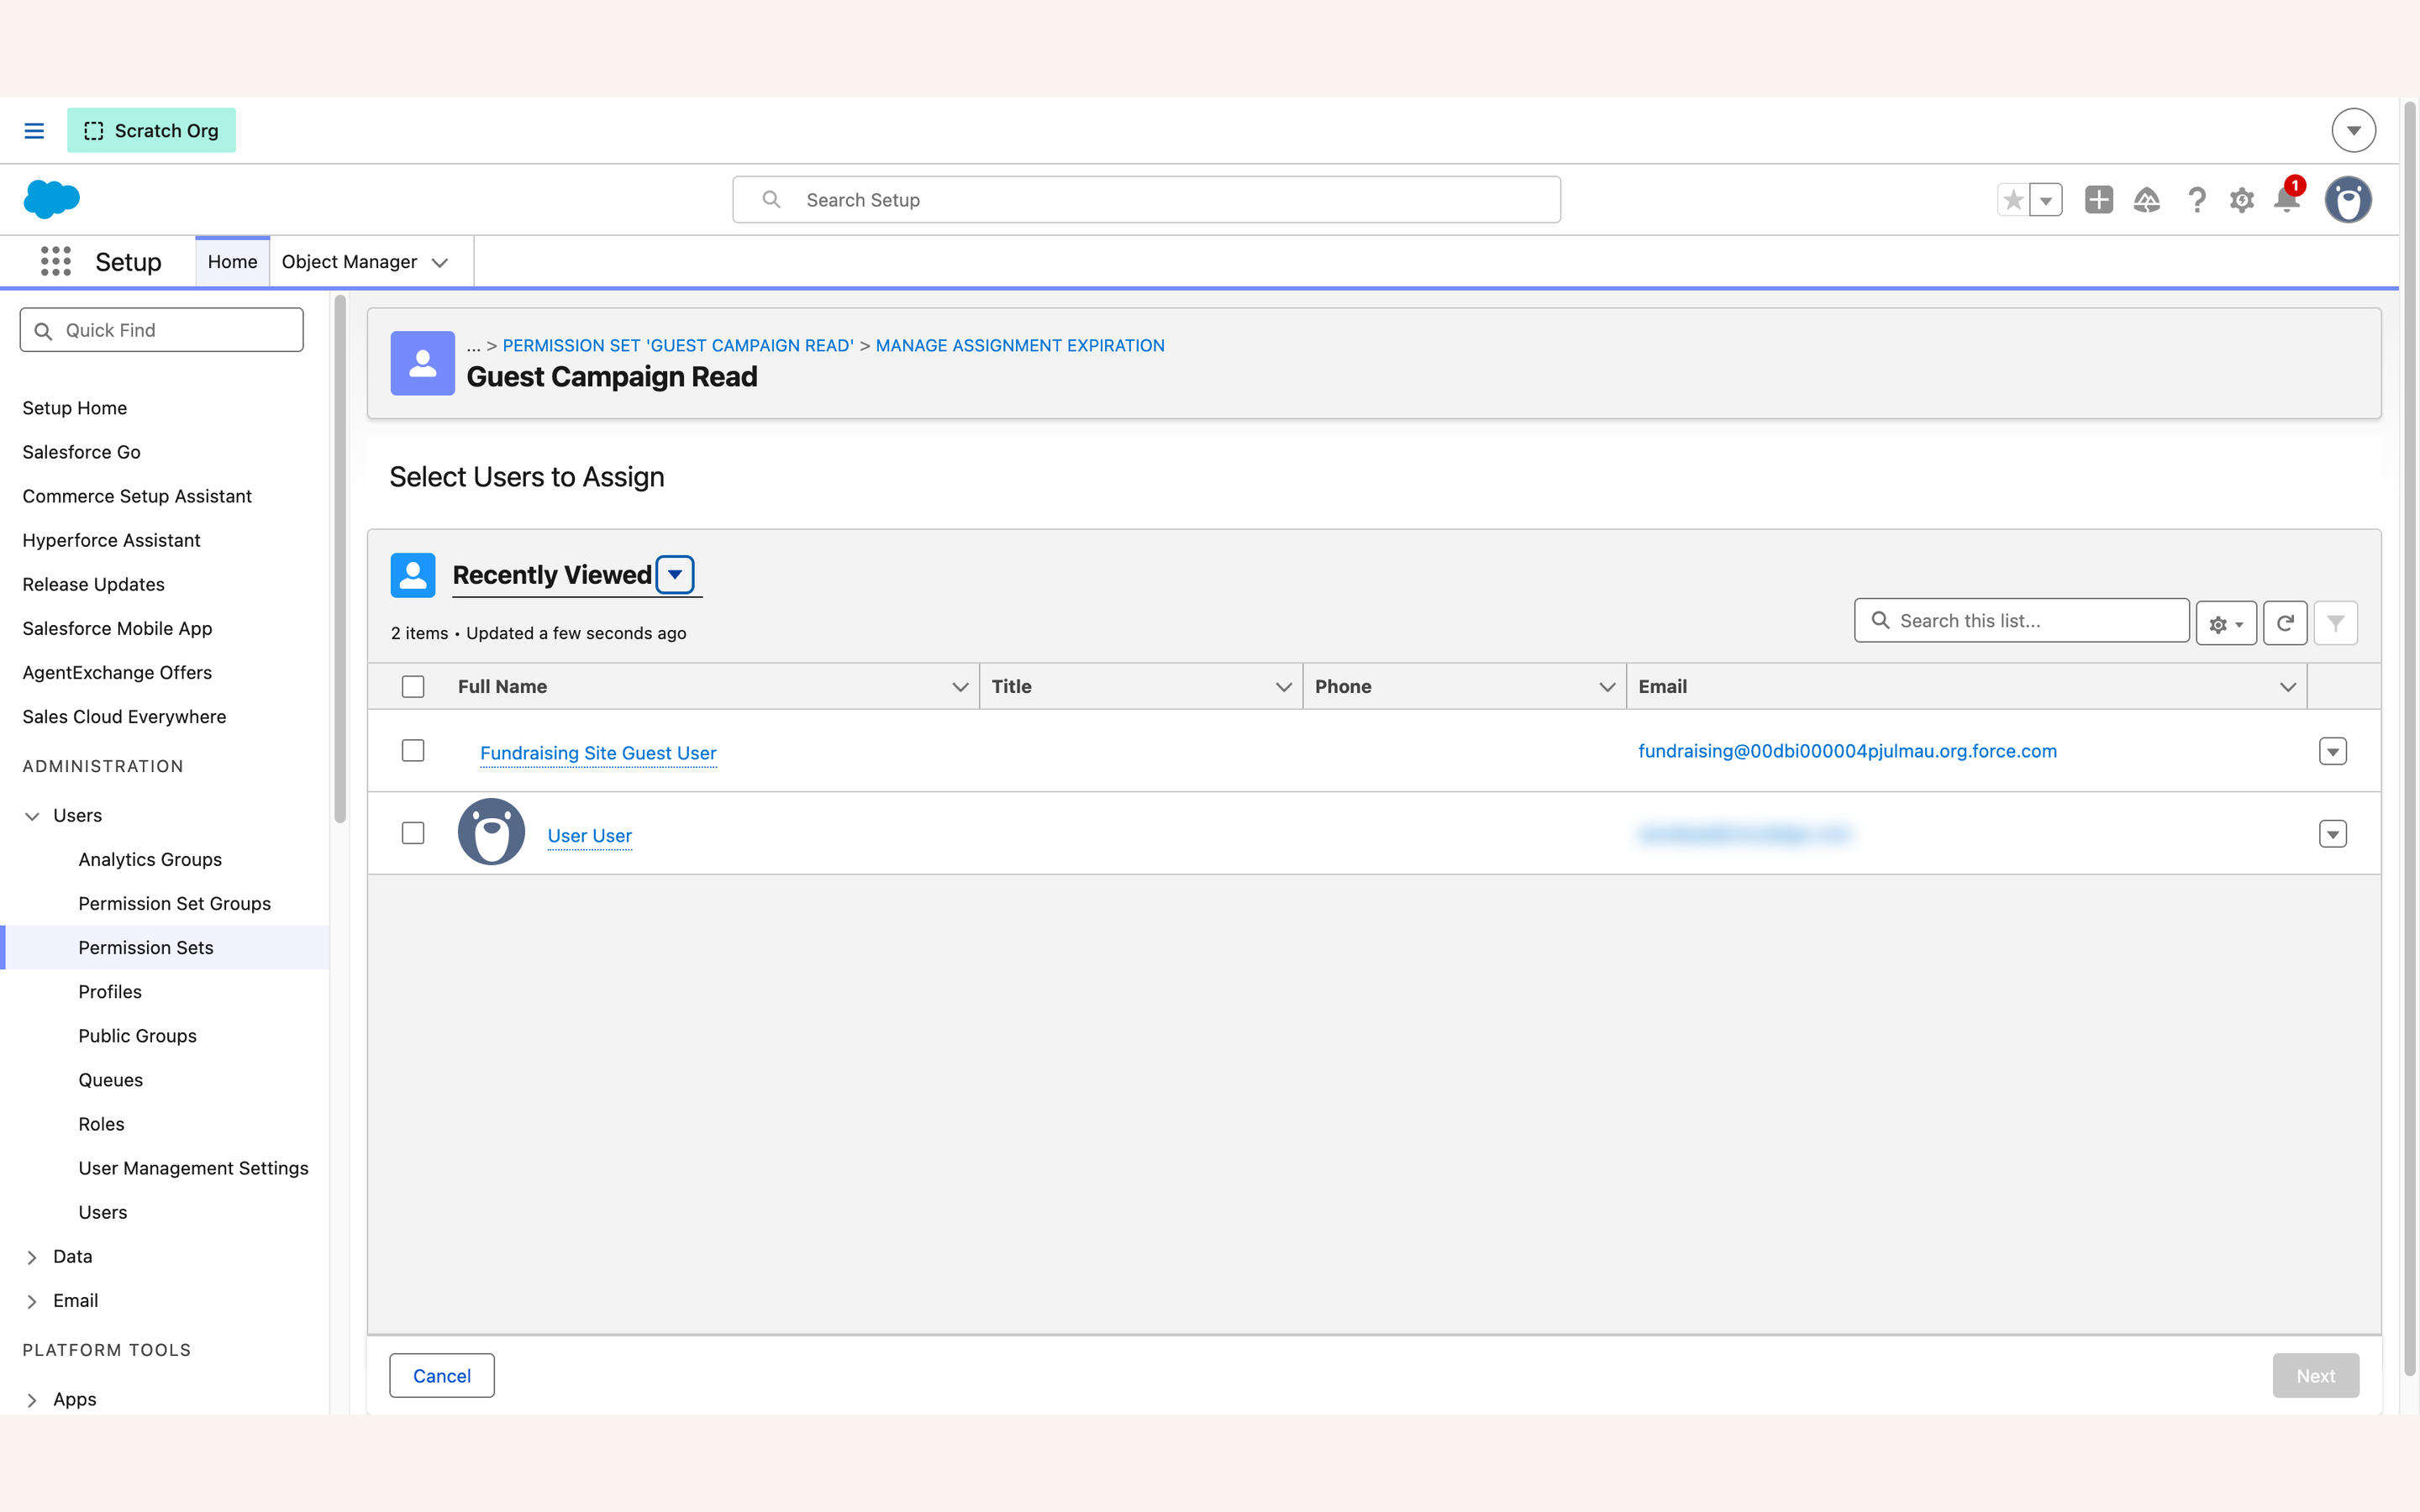
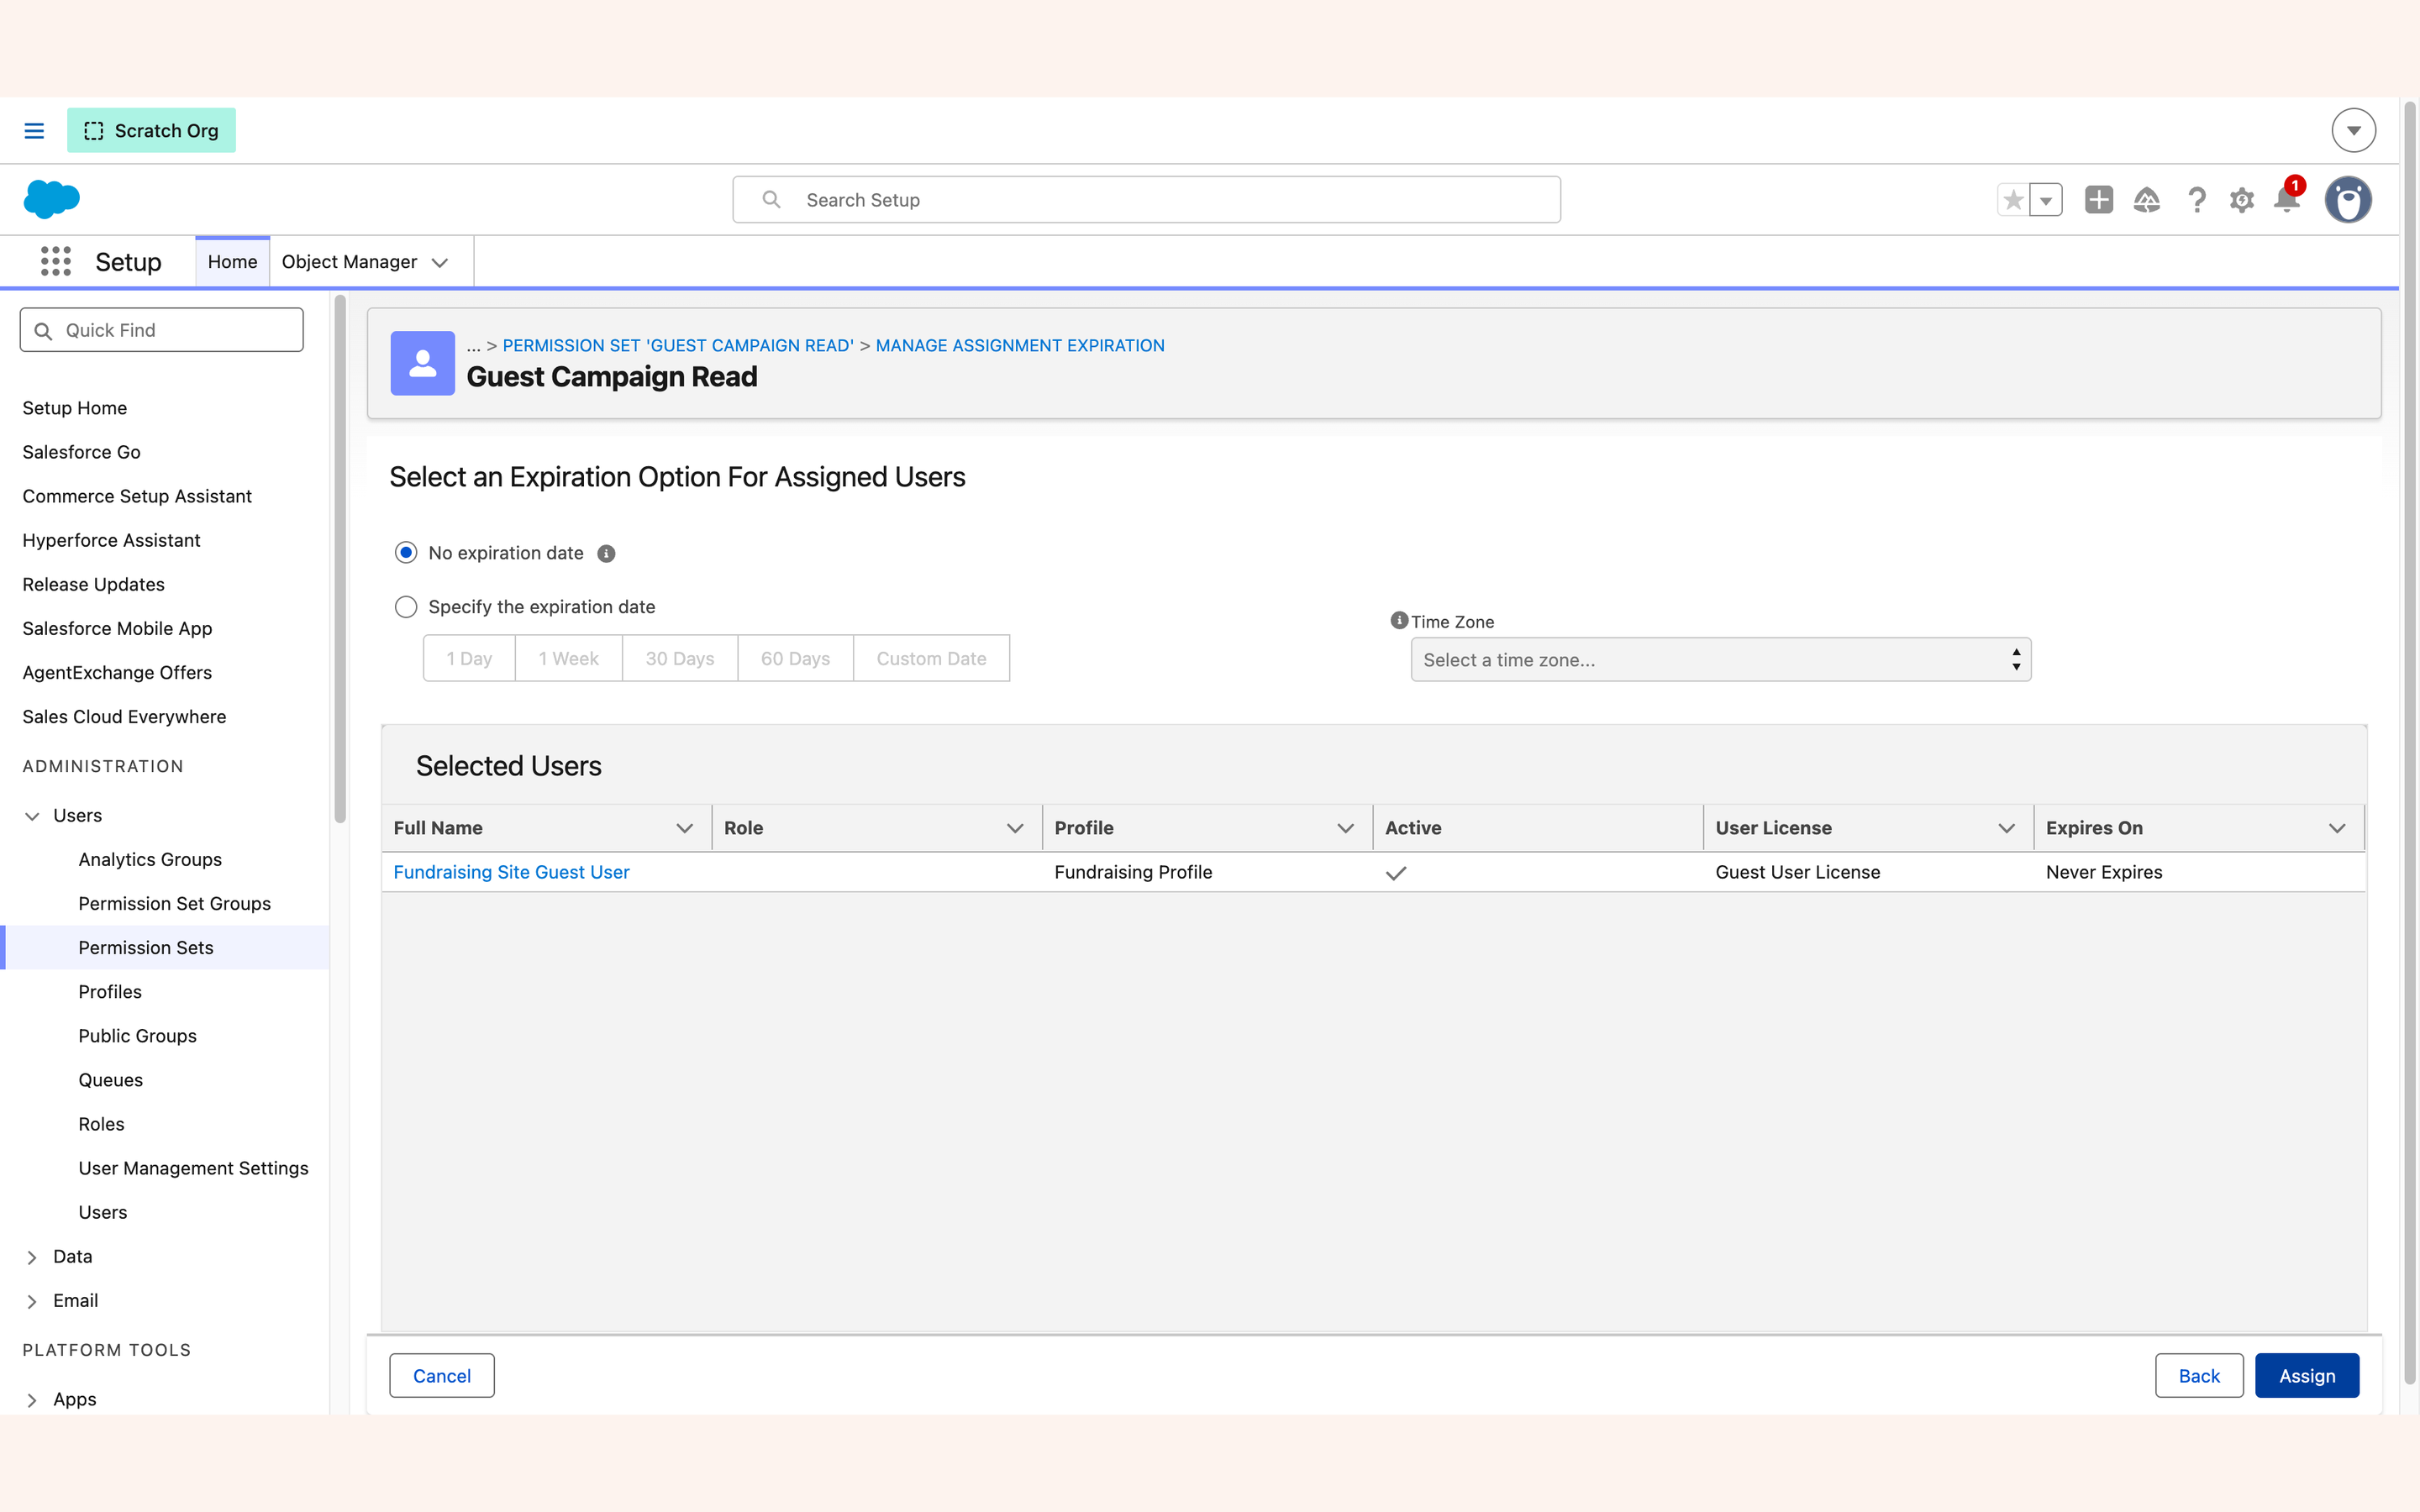
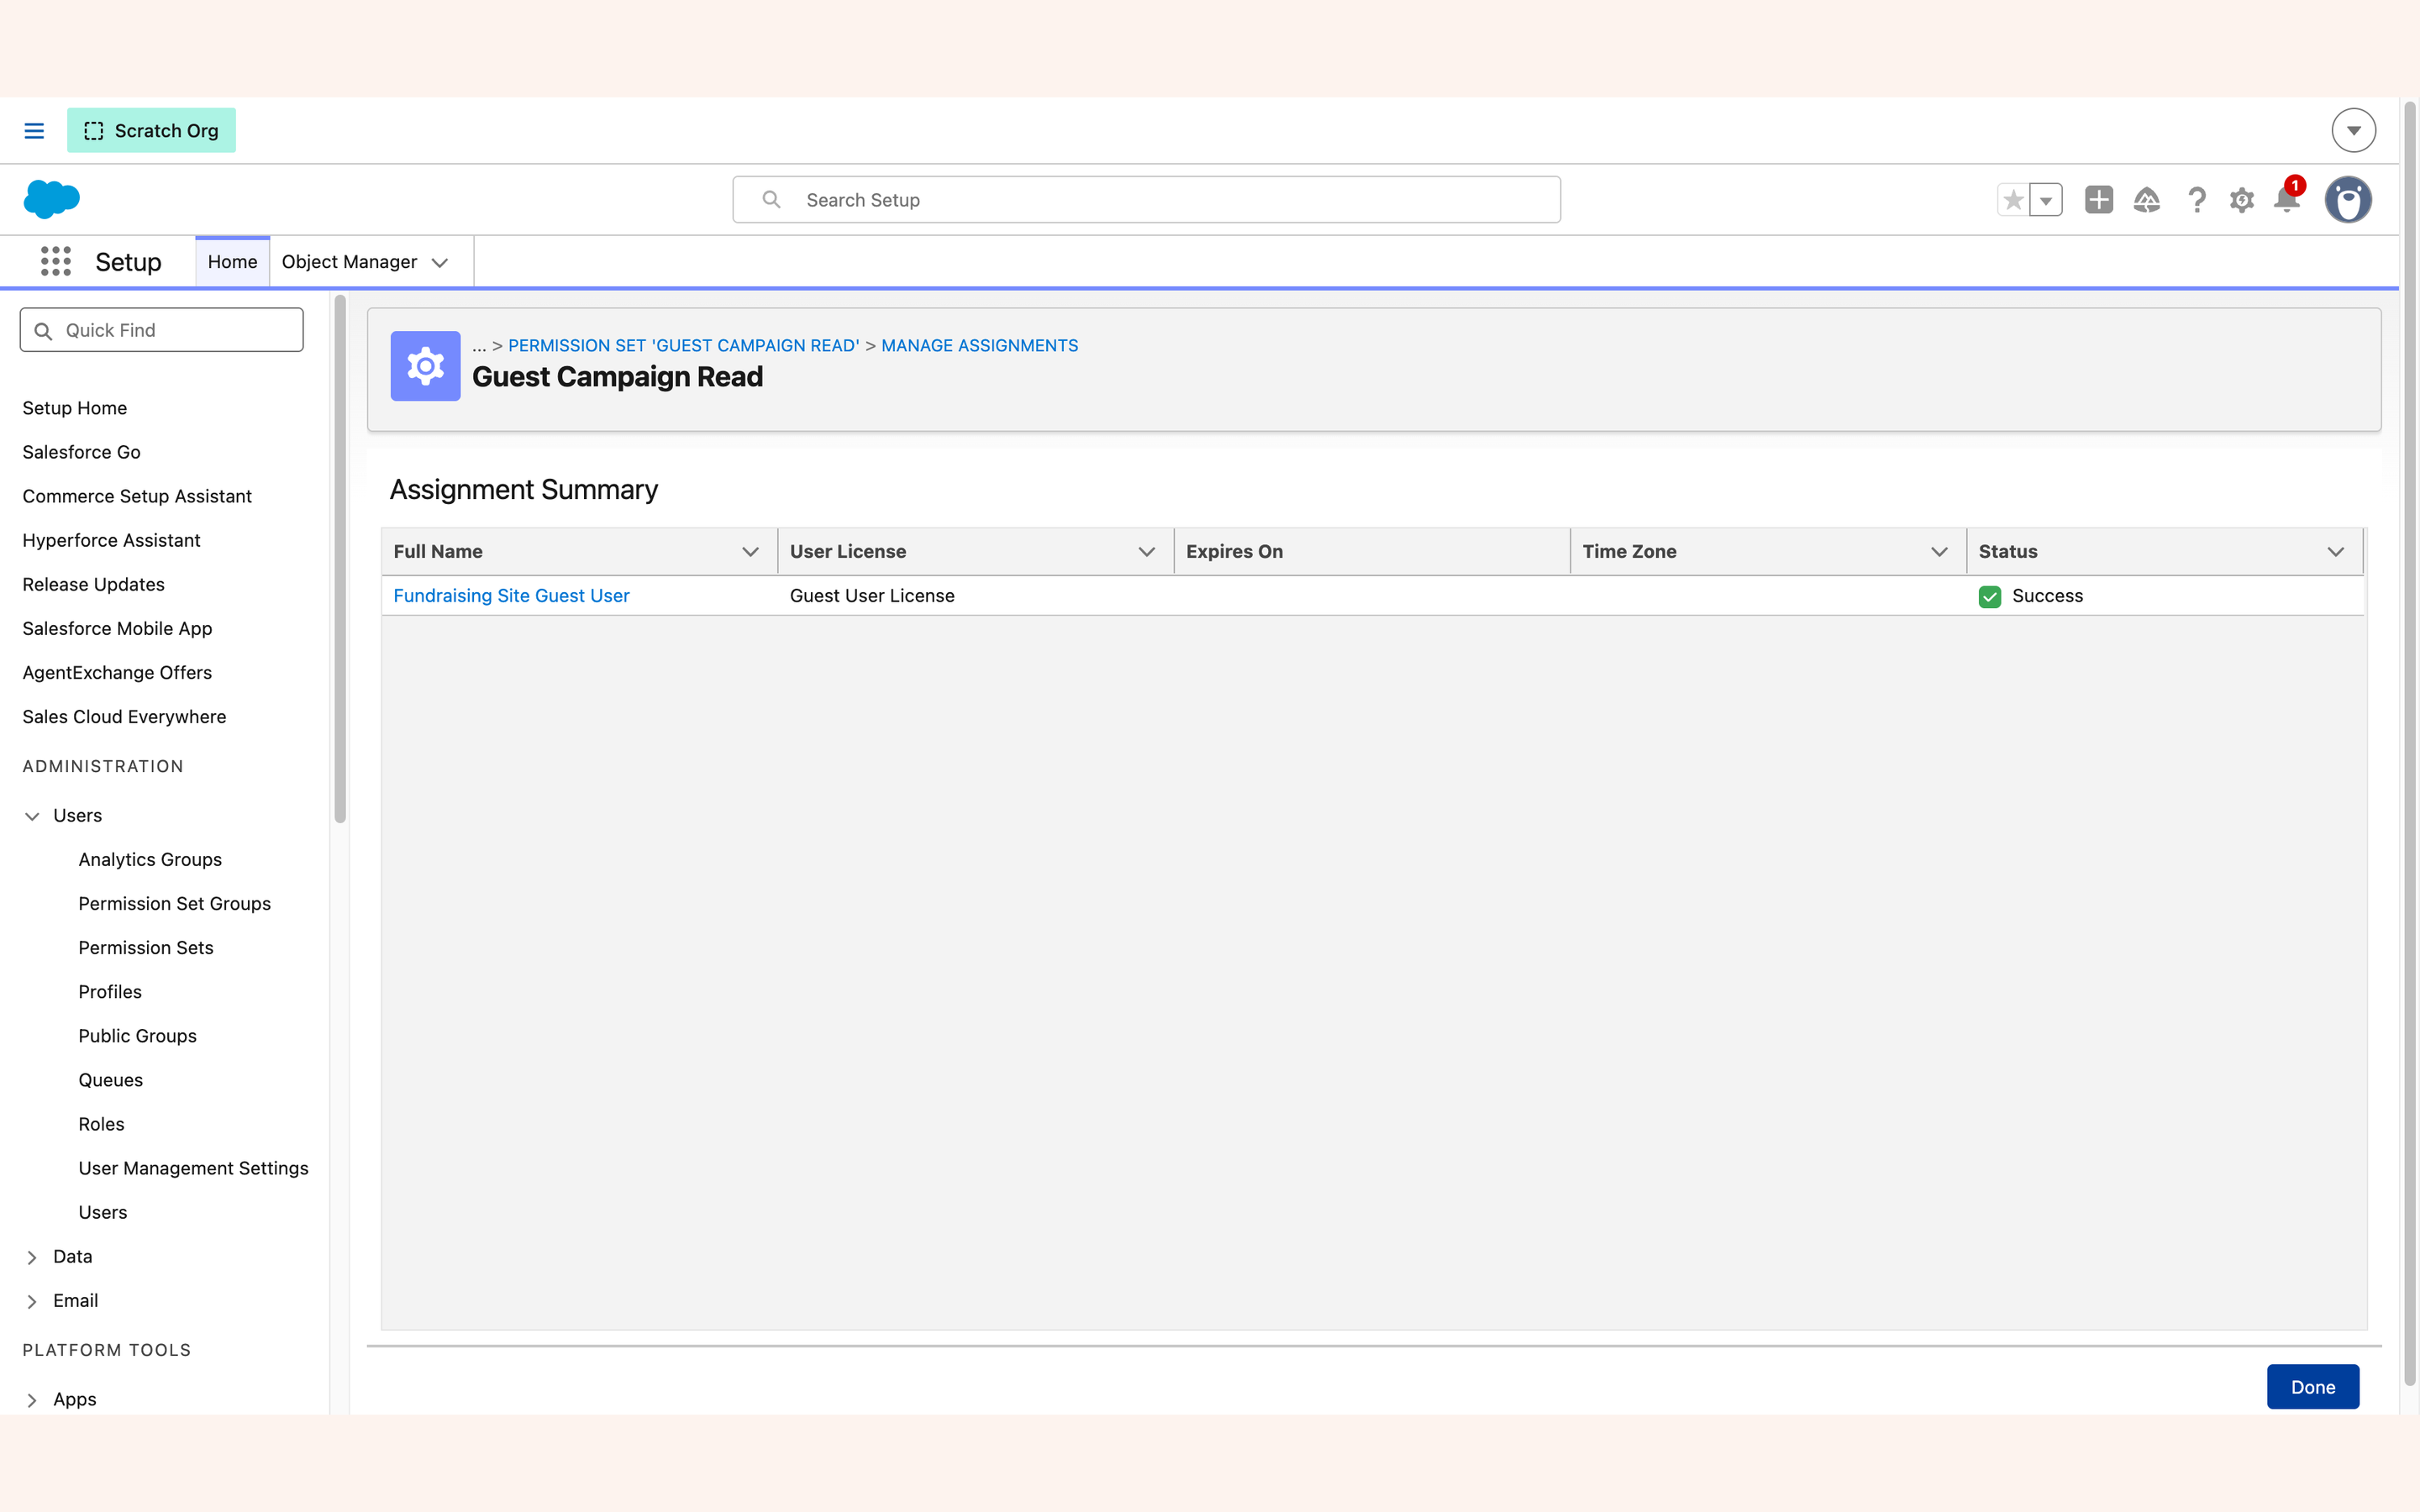
| A Guest Campaign Read set you create (the name is yours; that is the one in the screenshots) | You, by hand | Campaign is a standard object, and Salesforce strips standard-object permissions out of a packaged permission set at build time |
A fundraiser is a Campaign record, so without that second grant every public campaign, donation and ticket page fails to load.
Read, and nothing else
A guest user must never hold Create, Edit or Delete on Campaign. When you create the
permission set, leave the License field as --None--: the picklist offers no "Guest User
License" option, and a set created under the org's Salesforce licence cannot be assigned to a
guest user at all — the assignment fails three clicks later with a licence mismatch.
Fundraising Guest Donor set assigned. This is per site, not org-wide: repointing the package at a different site later means assigning it there too. A site whose guest user never got this fails quietly — pages load, forms render, and every donation breaks on submit.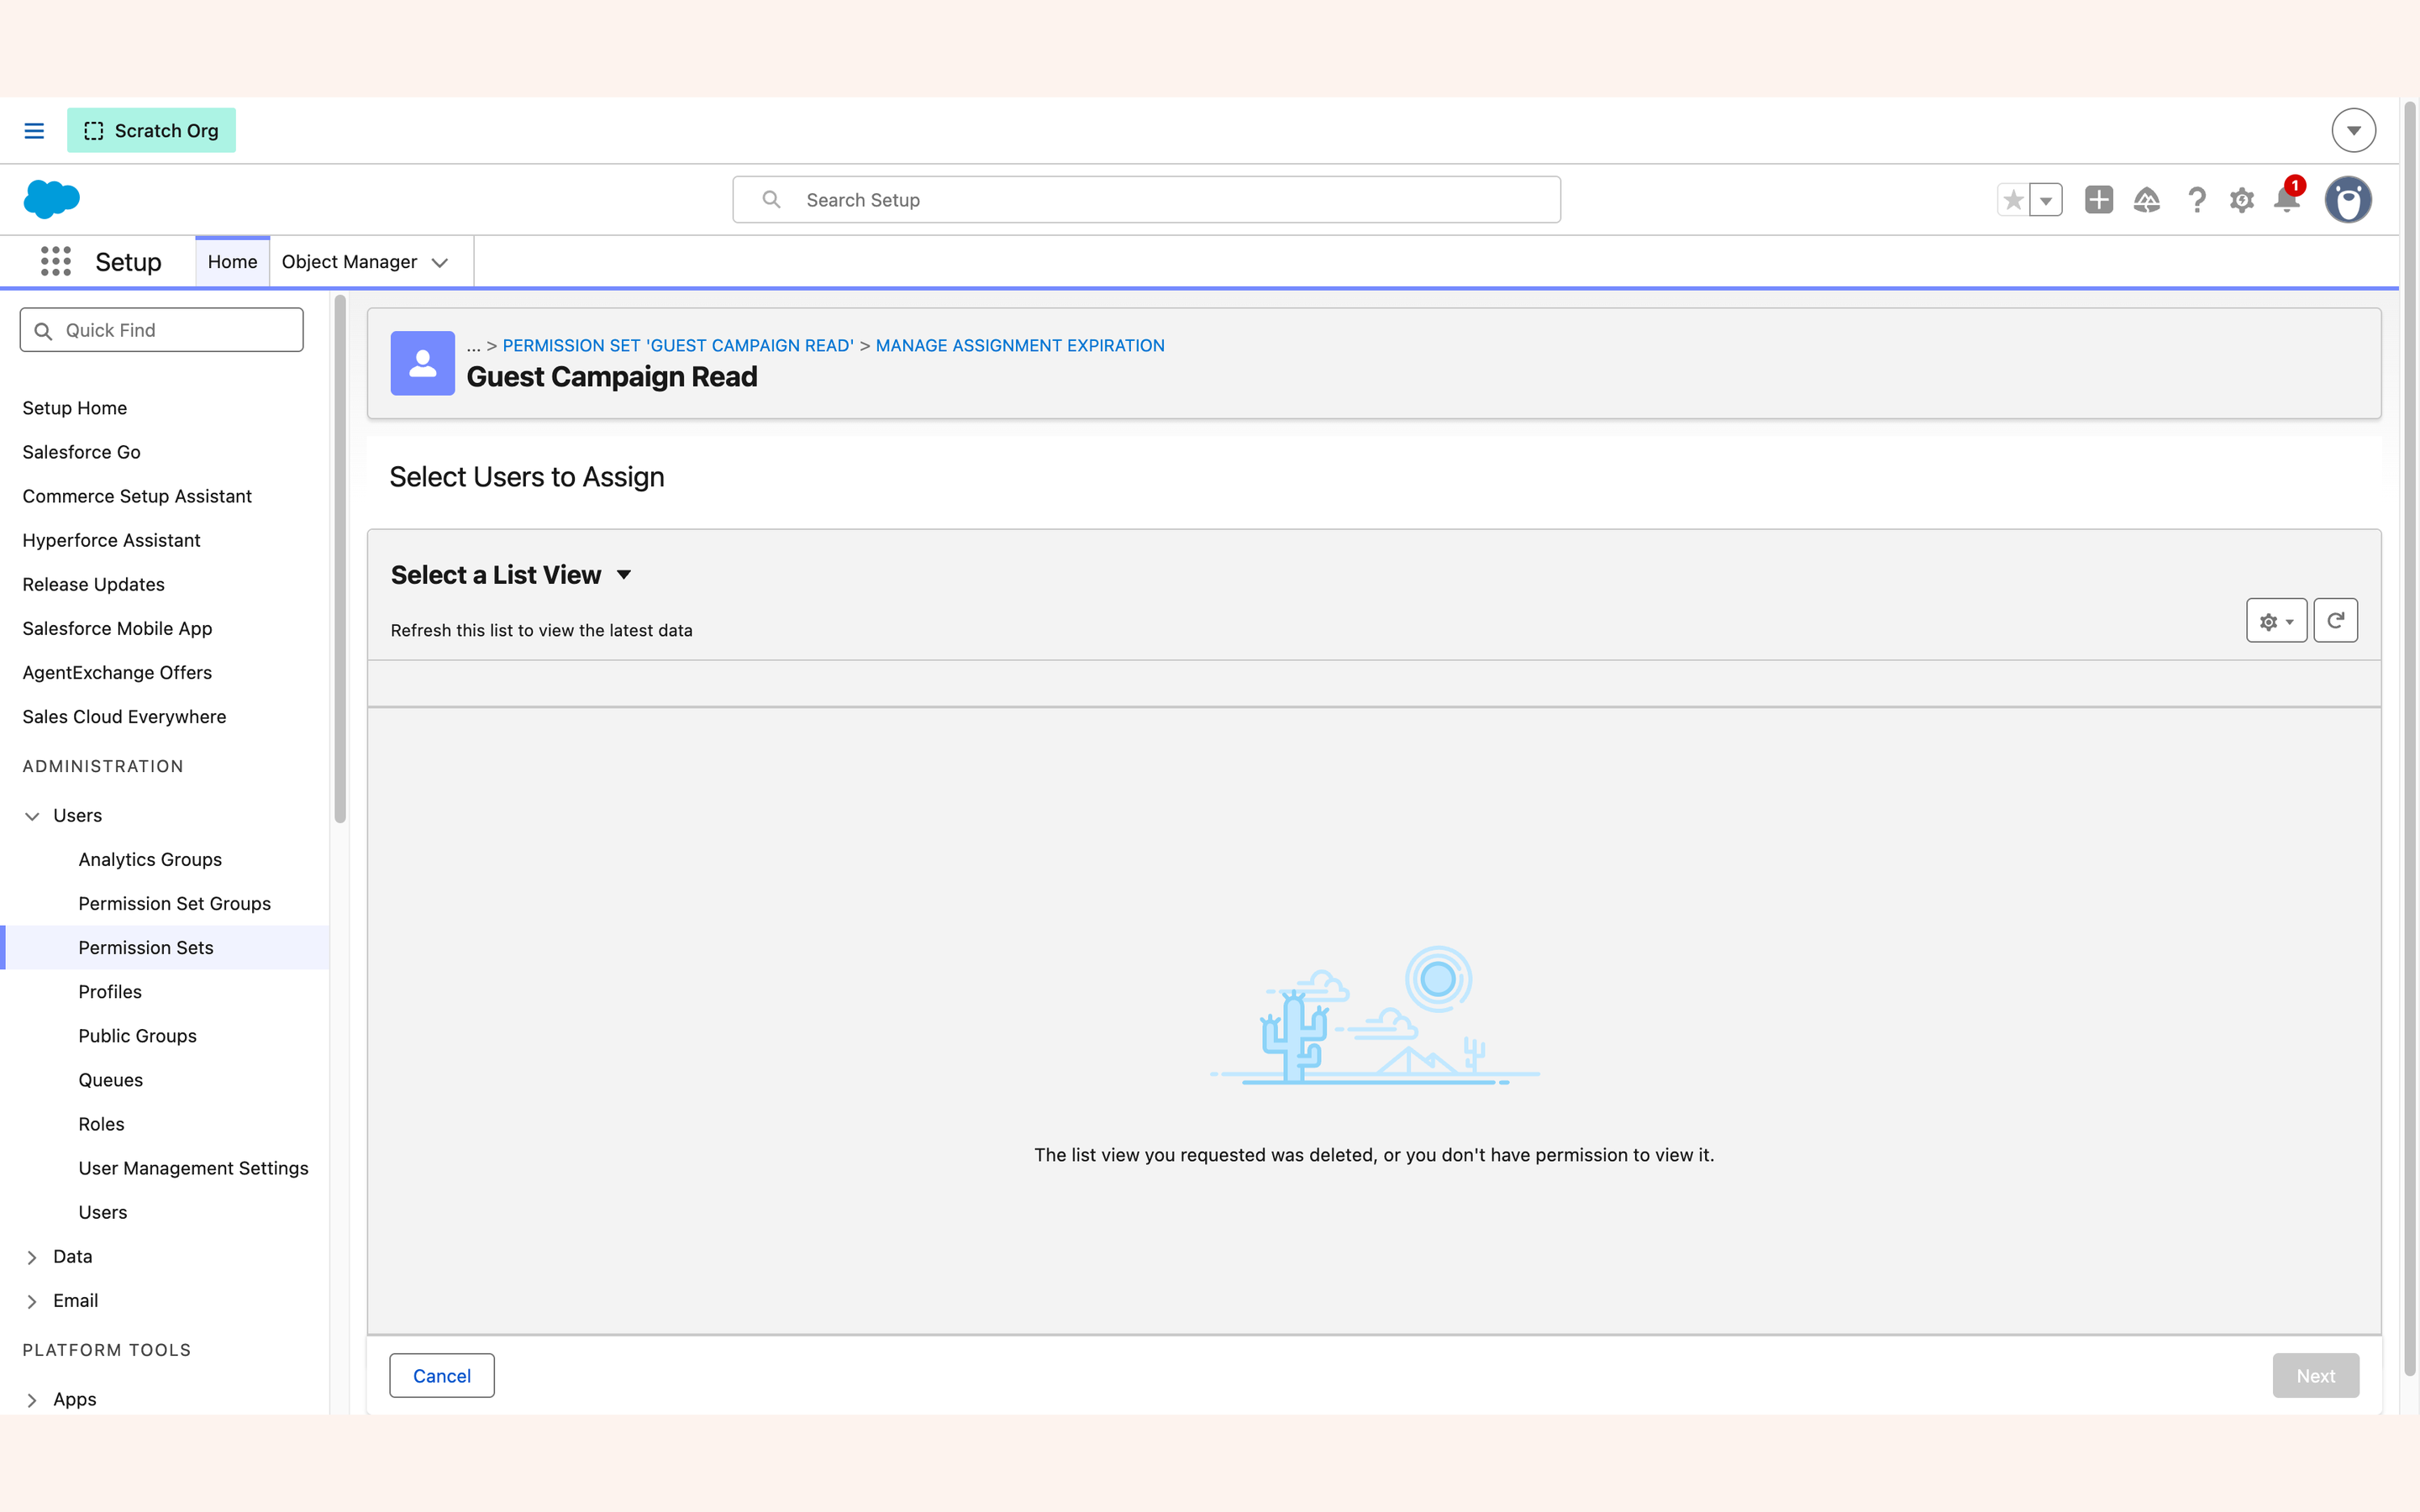
5. Build the Stripe credential pair#
Get Started step 4, stages 1 and 2
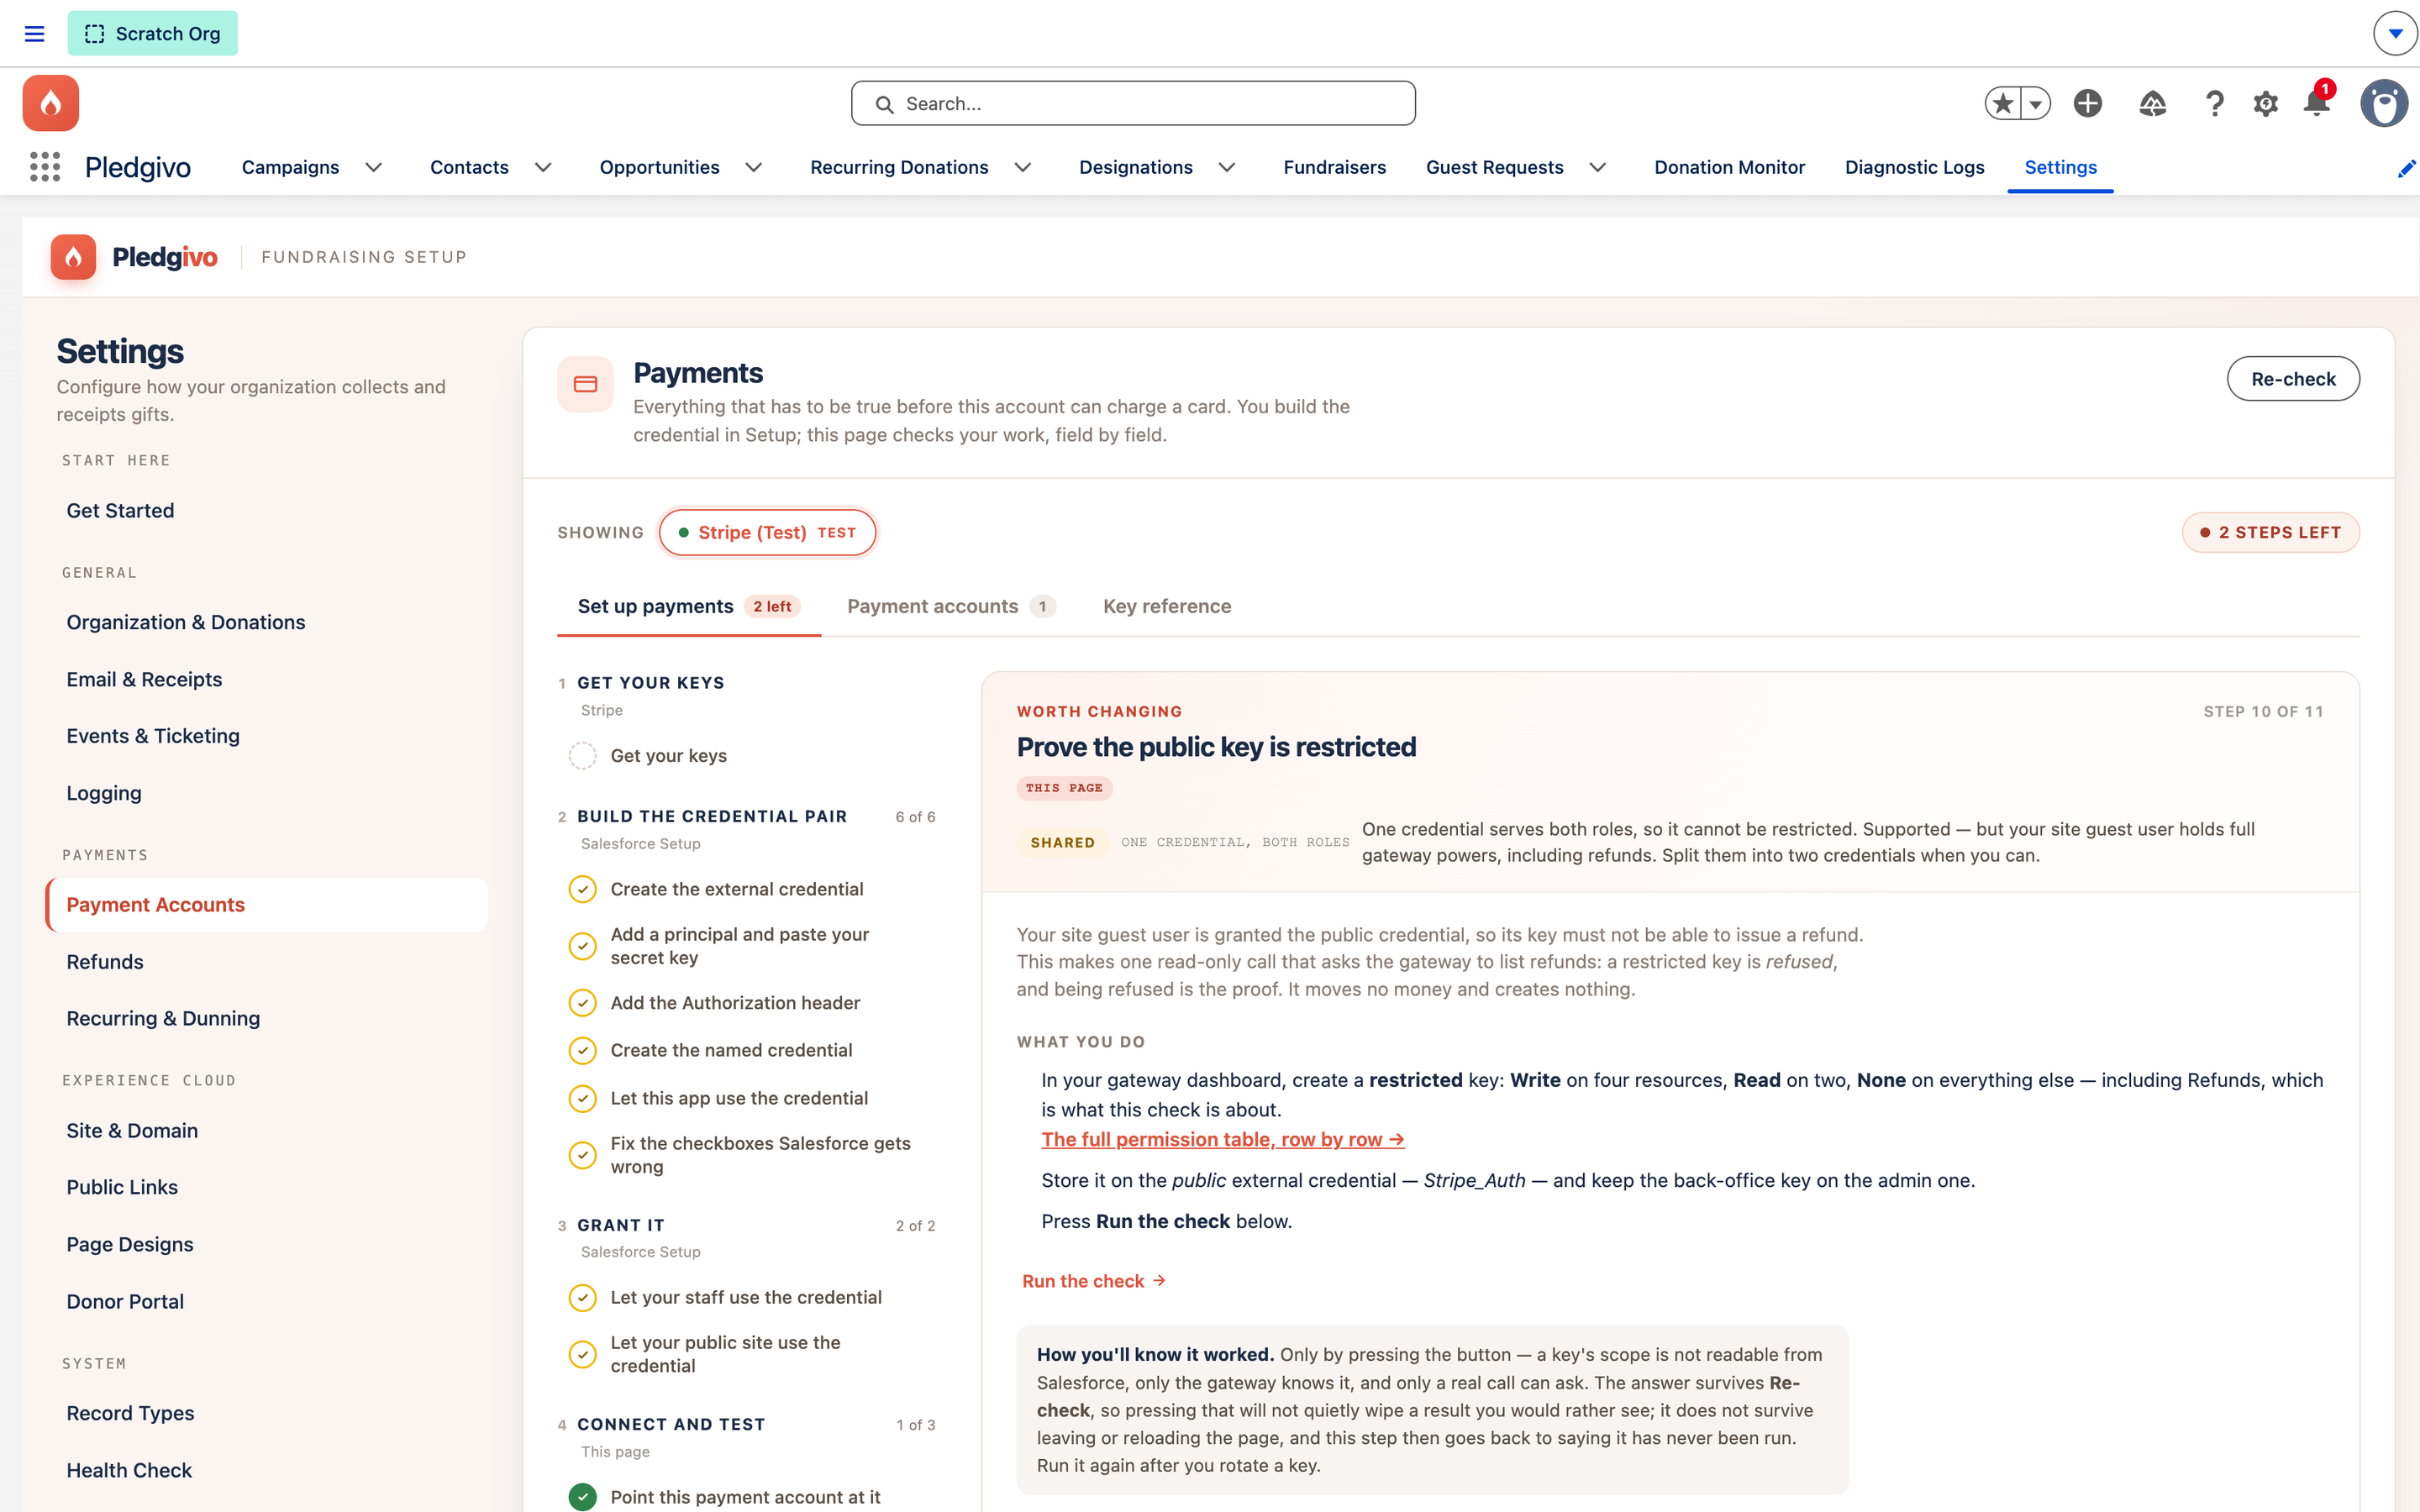
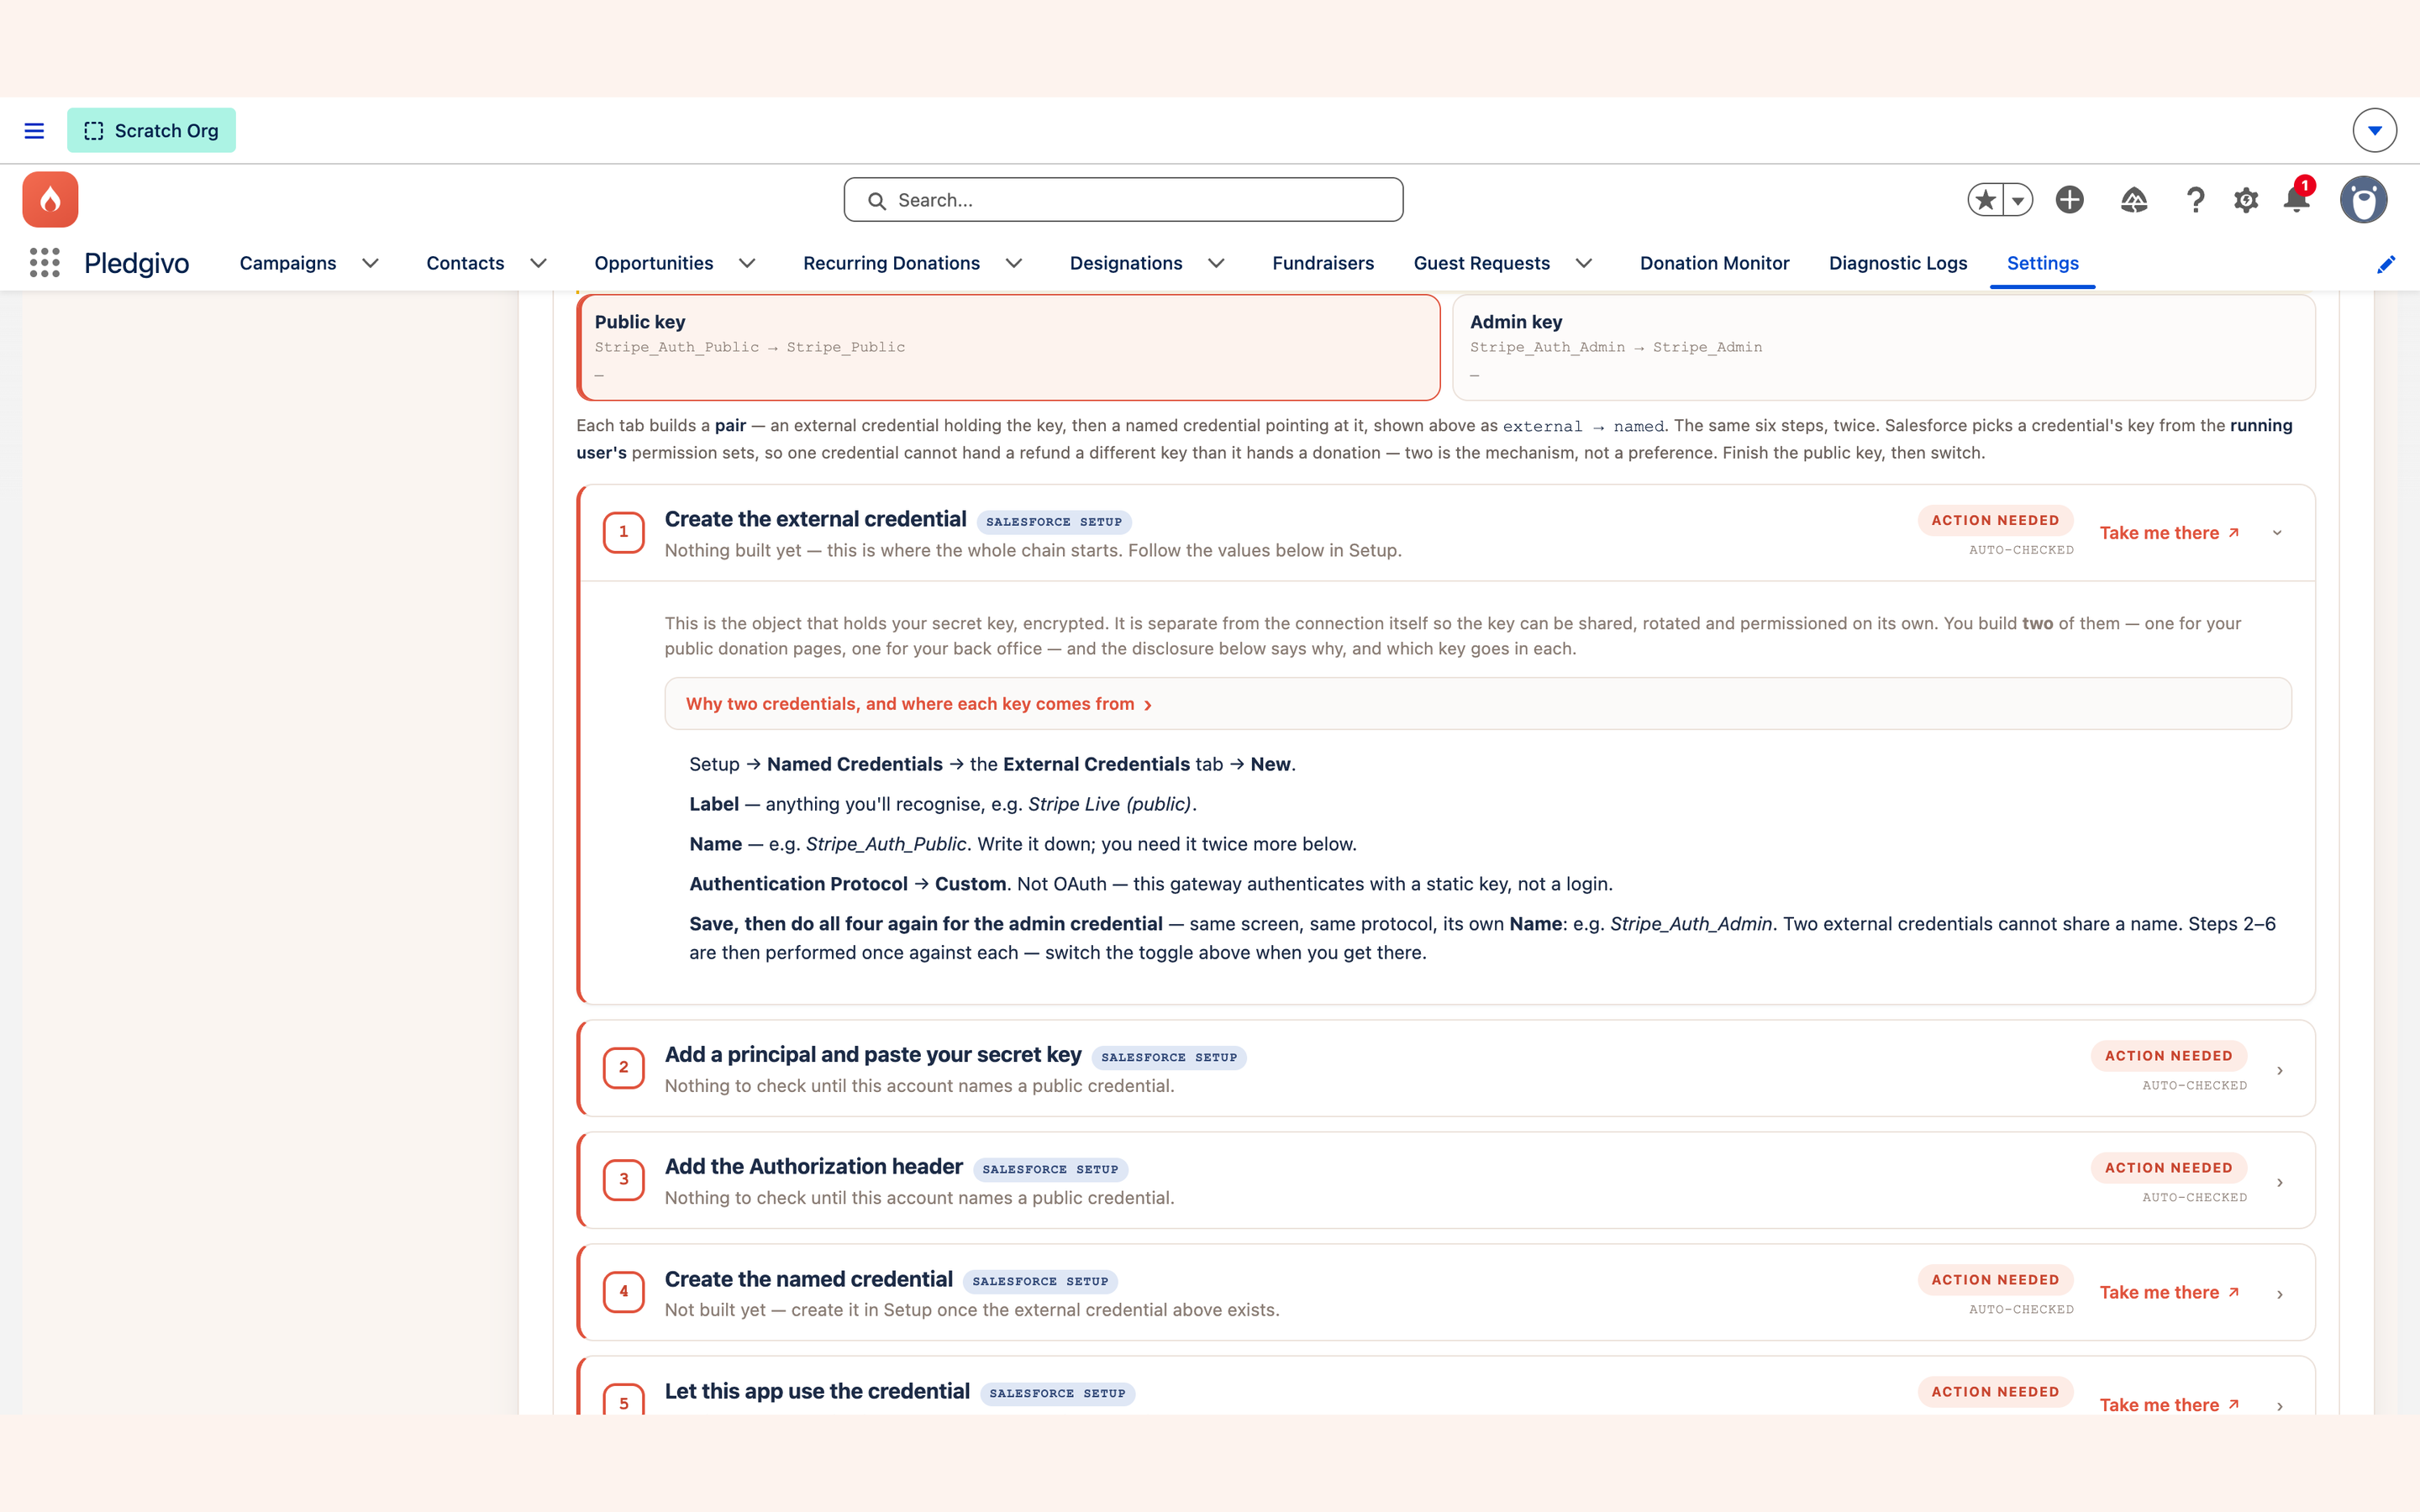
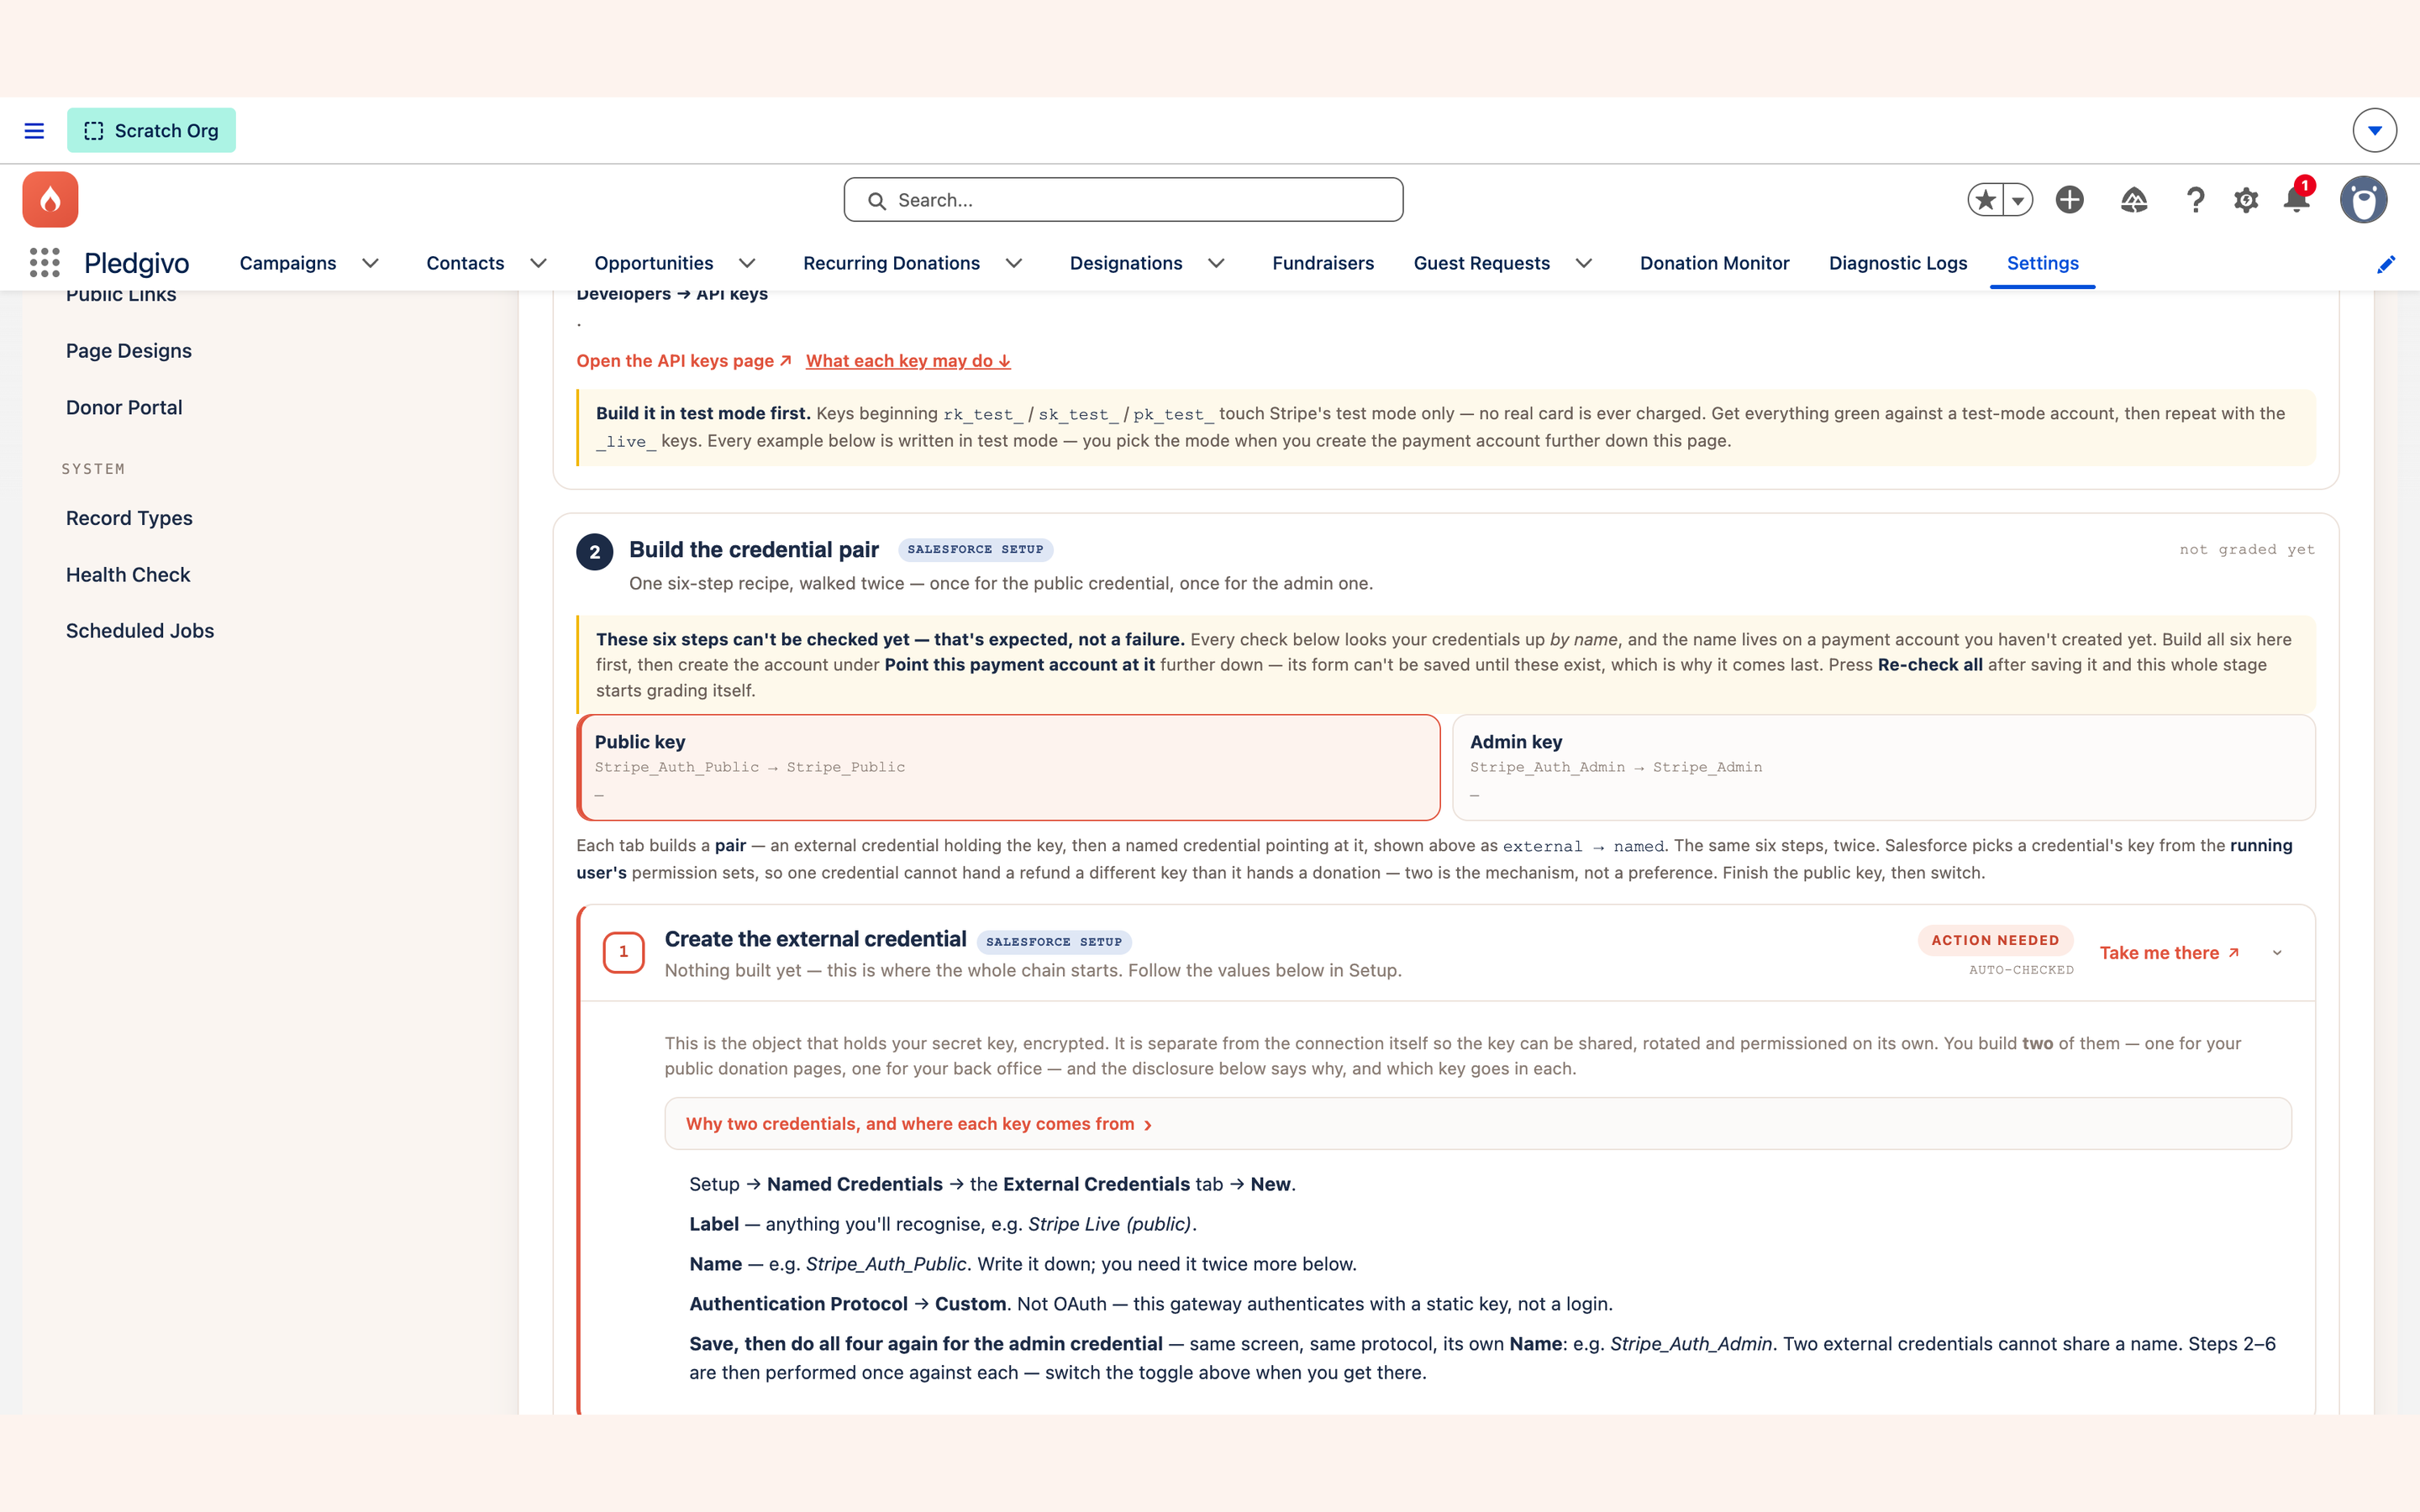
This package never ships, stores, or creates a payment credential of its own. You build the External Credential and Named Credential yourself in Setup — that is where your Stripe secret key lives, encrypted, and it never touches a custom field or an Apex method.
You build two pairs, not one. This is deliberate, and it is the security boundary of the whole integration:
| Pair | Suggested names | Key to use | Who is allowed to reach it |
|---|---|---|---|
| Donor | Stripe_Auth_Donor_Restricted + Stripe_Donor_Restricted |
A restricted key (rk_live_… / rk_test_…) that can take a payment and read its result, but never refund |
Staff and the site's guest user |
| Admin | Stripe_Auth_Admin_Restricted + Stripe_Admin_Restricted |
A second restricted key, scoped to refunds, renewals and the reconcilers' reads | Staff only. Never the guest user |
Those names are suggestions, not requirements. The app reads whichever credential names you
save on the Payment Account record, so call the pair anything your team will recognise —
Stripe_Auth_Chapter_West and Stripe_Chapter_West if that is the Stripe account it belongs to.
If you connect more than one Stripe account you will need different names for the second pair.
The full list of what you may rename and what you may not is in
Which names are yours, and which must match.
A full secret key (sk_live_… / sk_test_…) is not an accepted value on either credential.
The setup guide calls each one and grades it Failed when it answers a request a scoped key would
have refused, so an account running a secret key can never reach Ready to take payments.
New to Stripe, or not sure which key is which and what to switch on when you create the restricted one? The two Stripe keys, and what each one may do covers it from the start, with the exact permissions to grant.
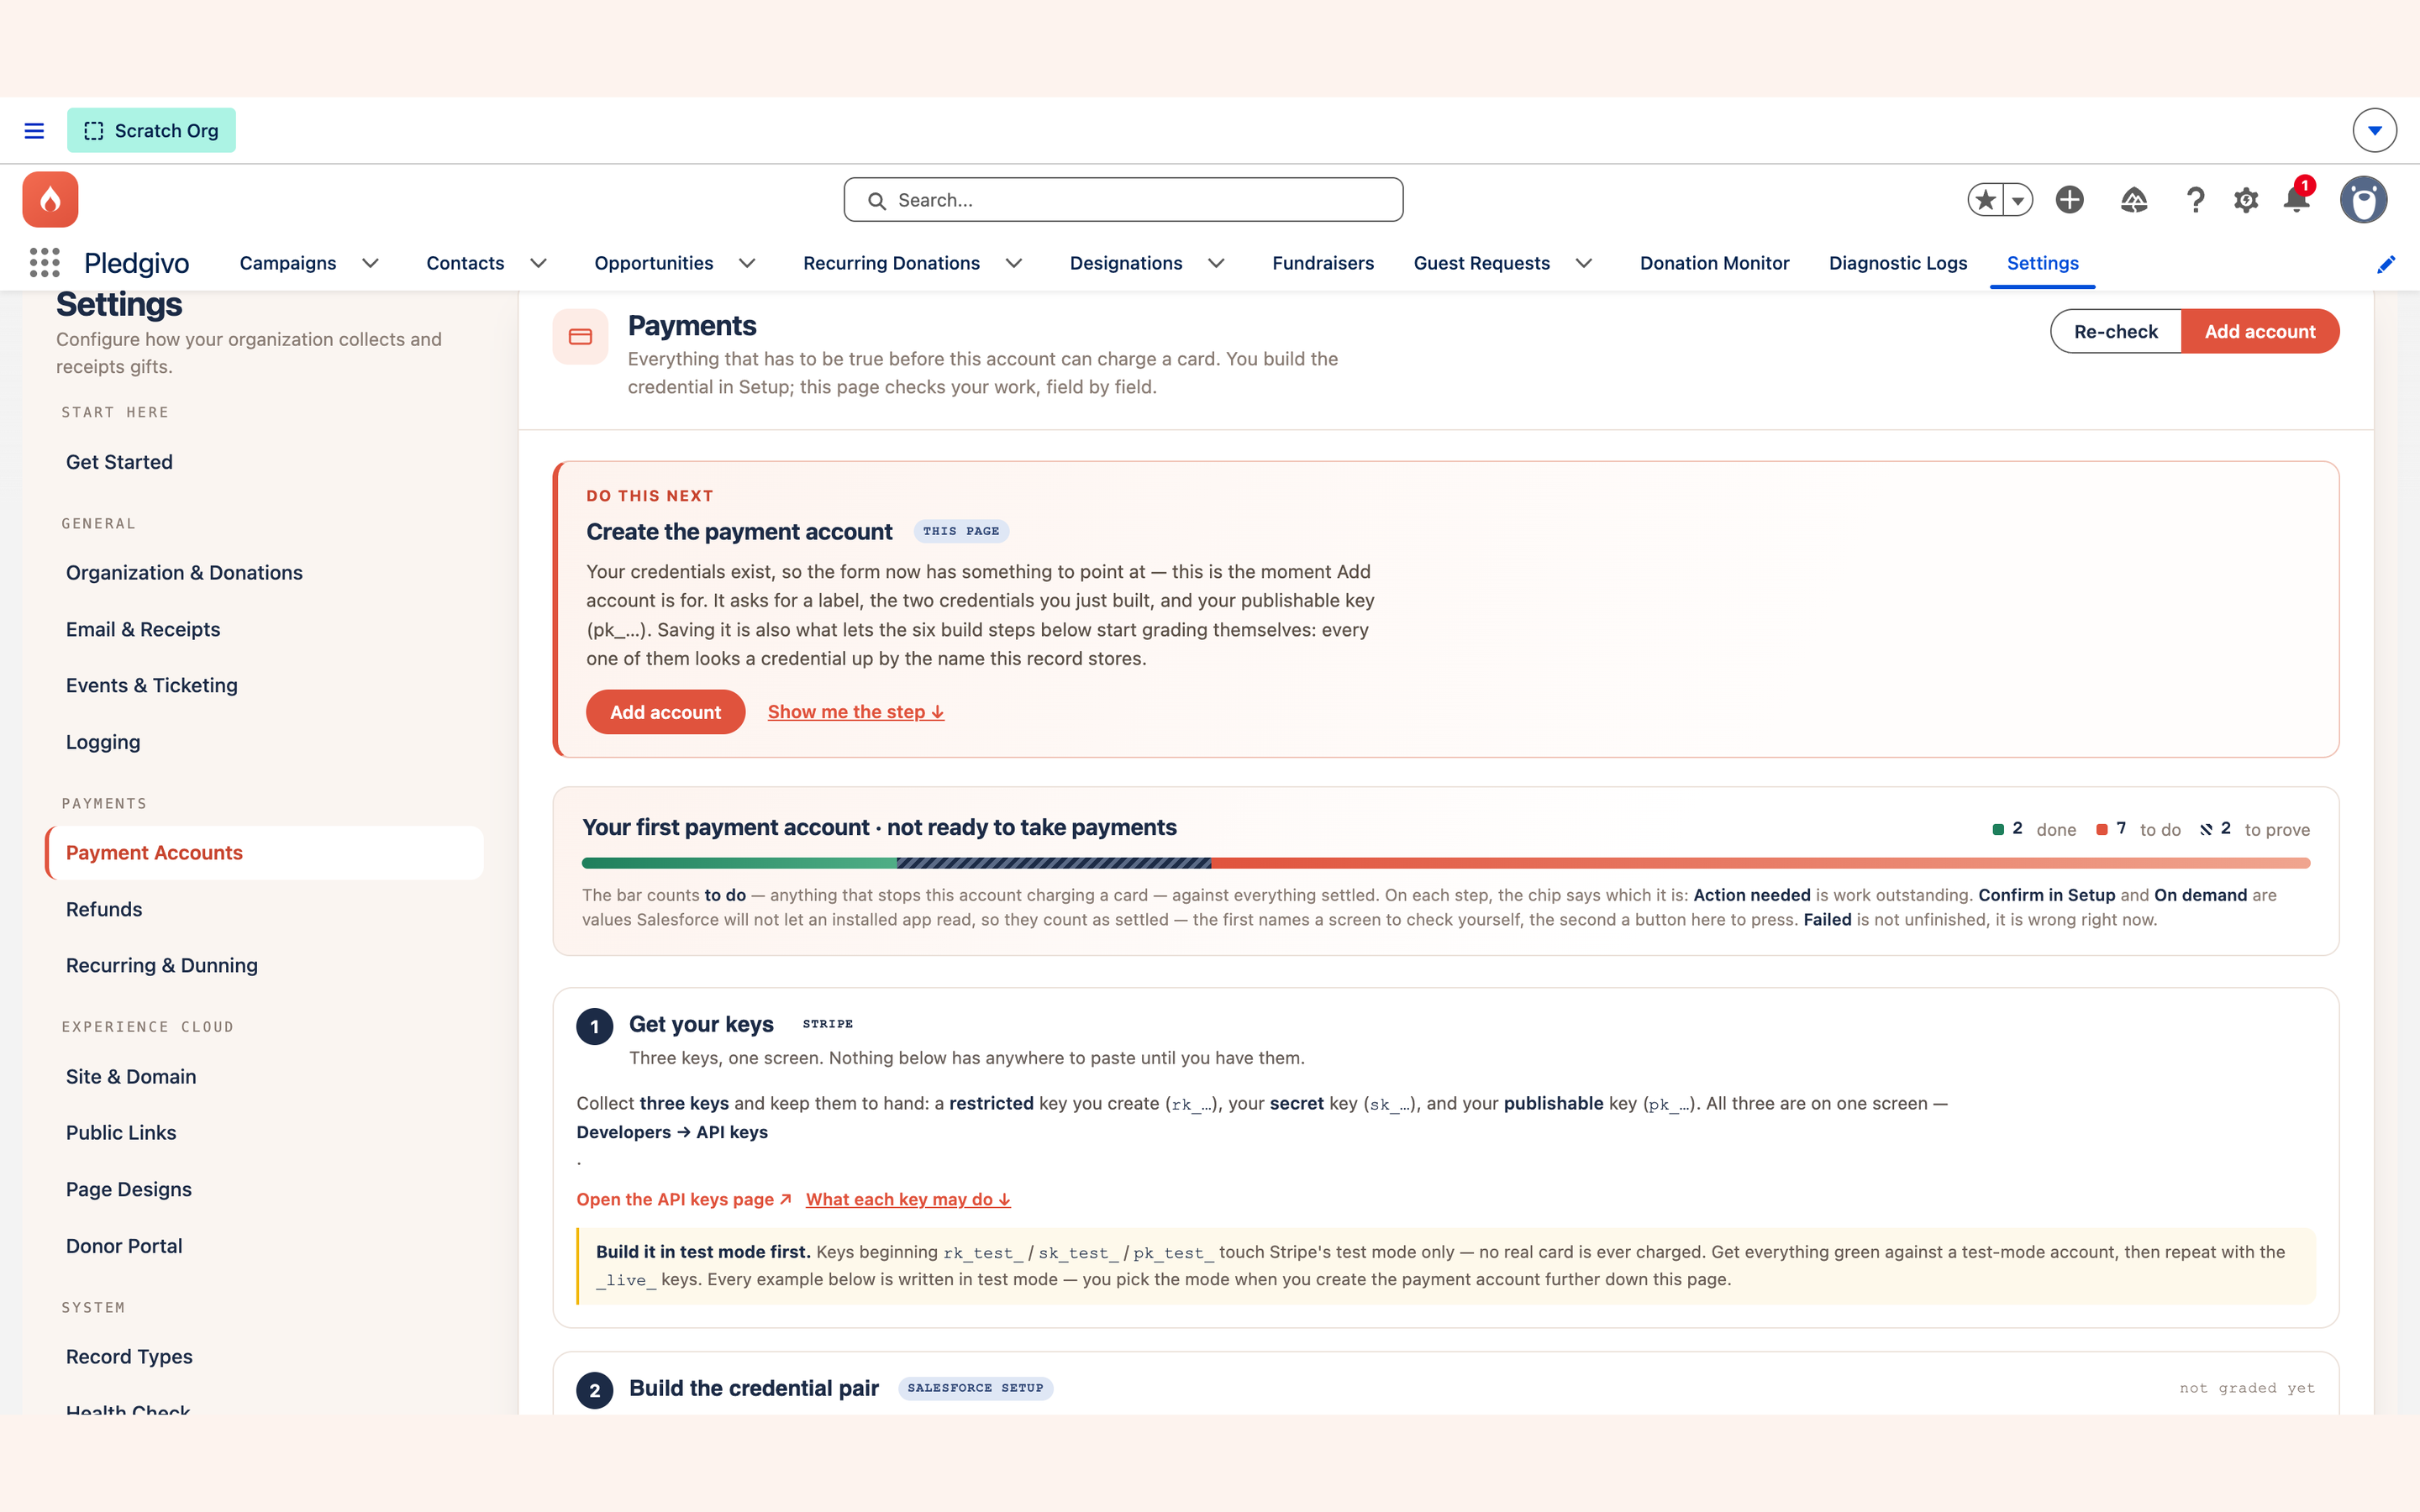
Why the panel cannot grade this stage yet
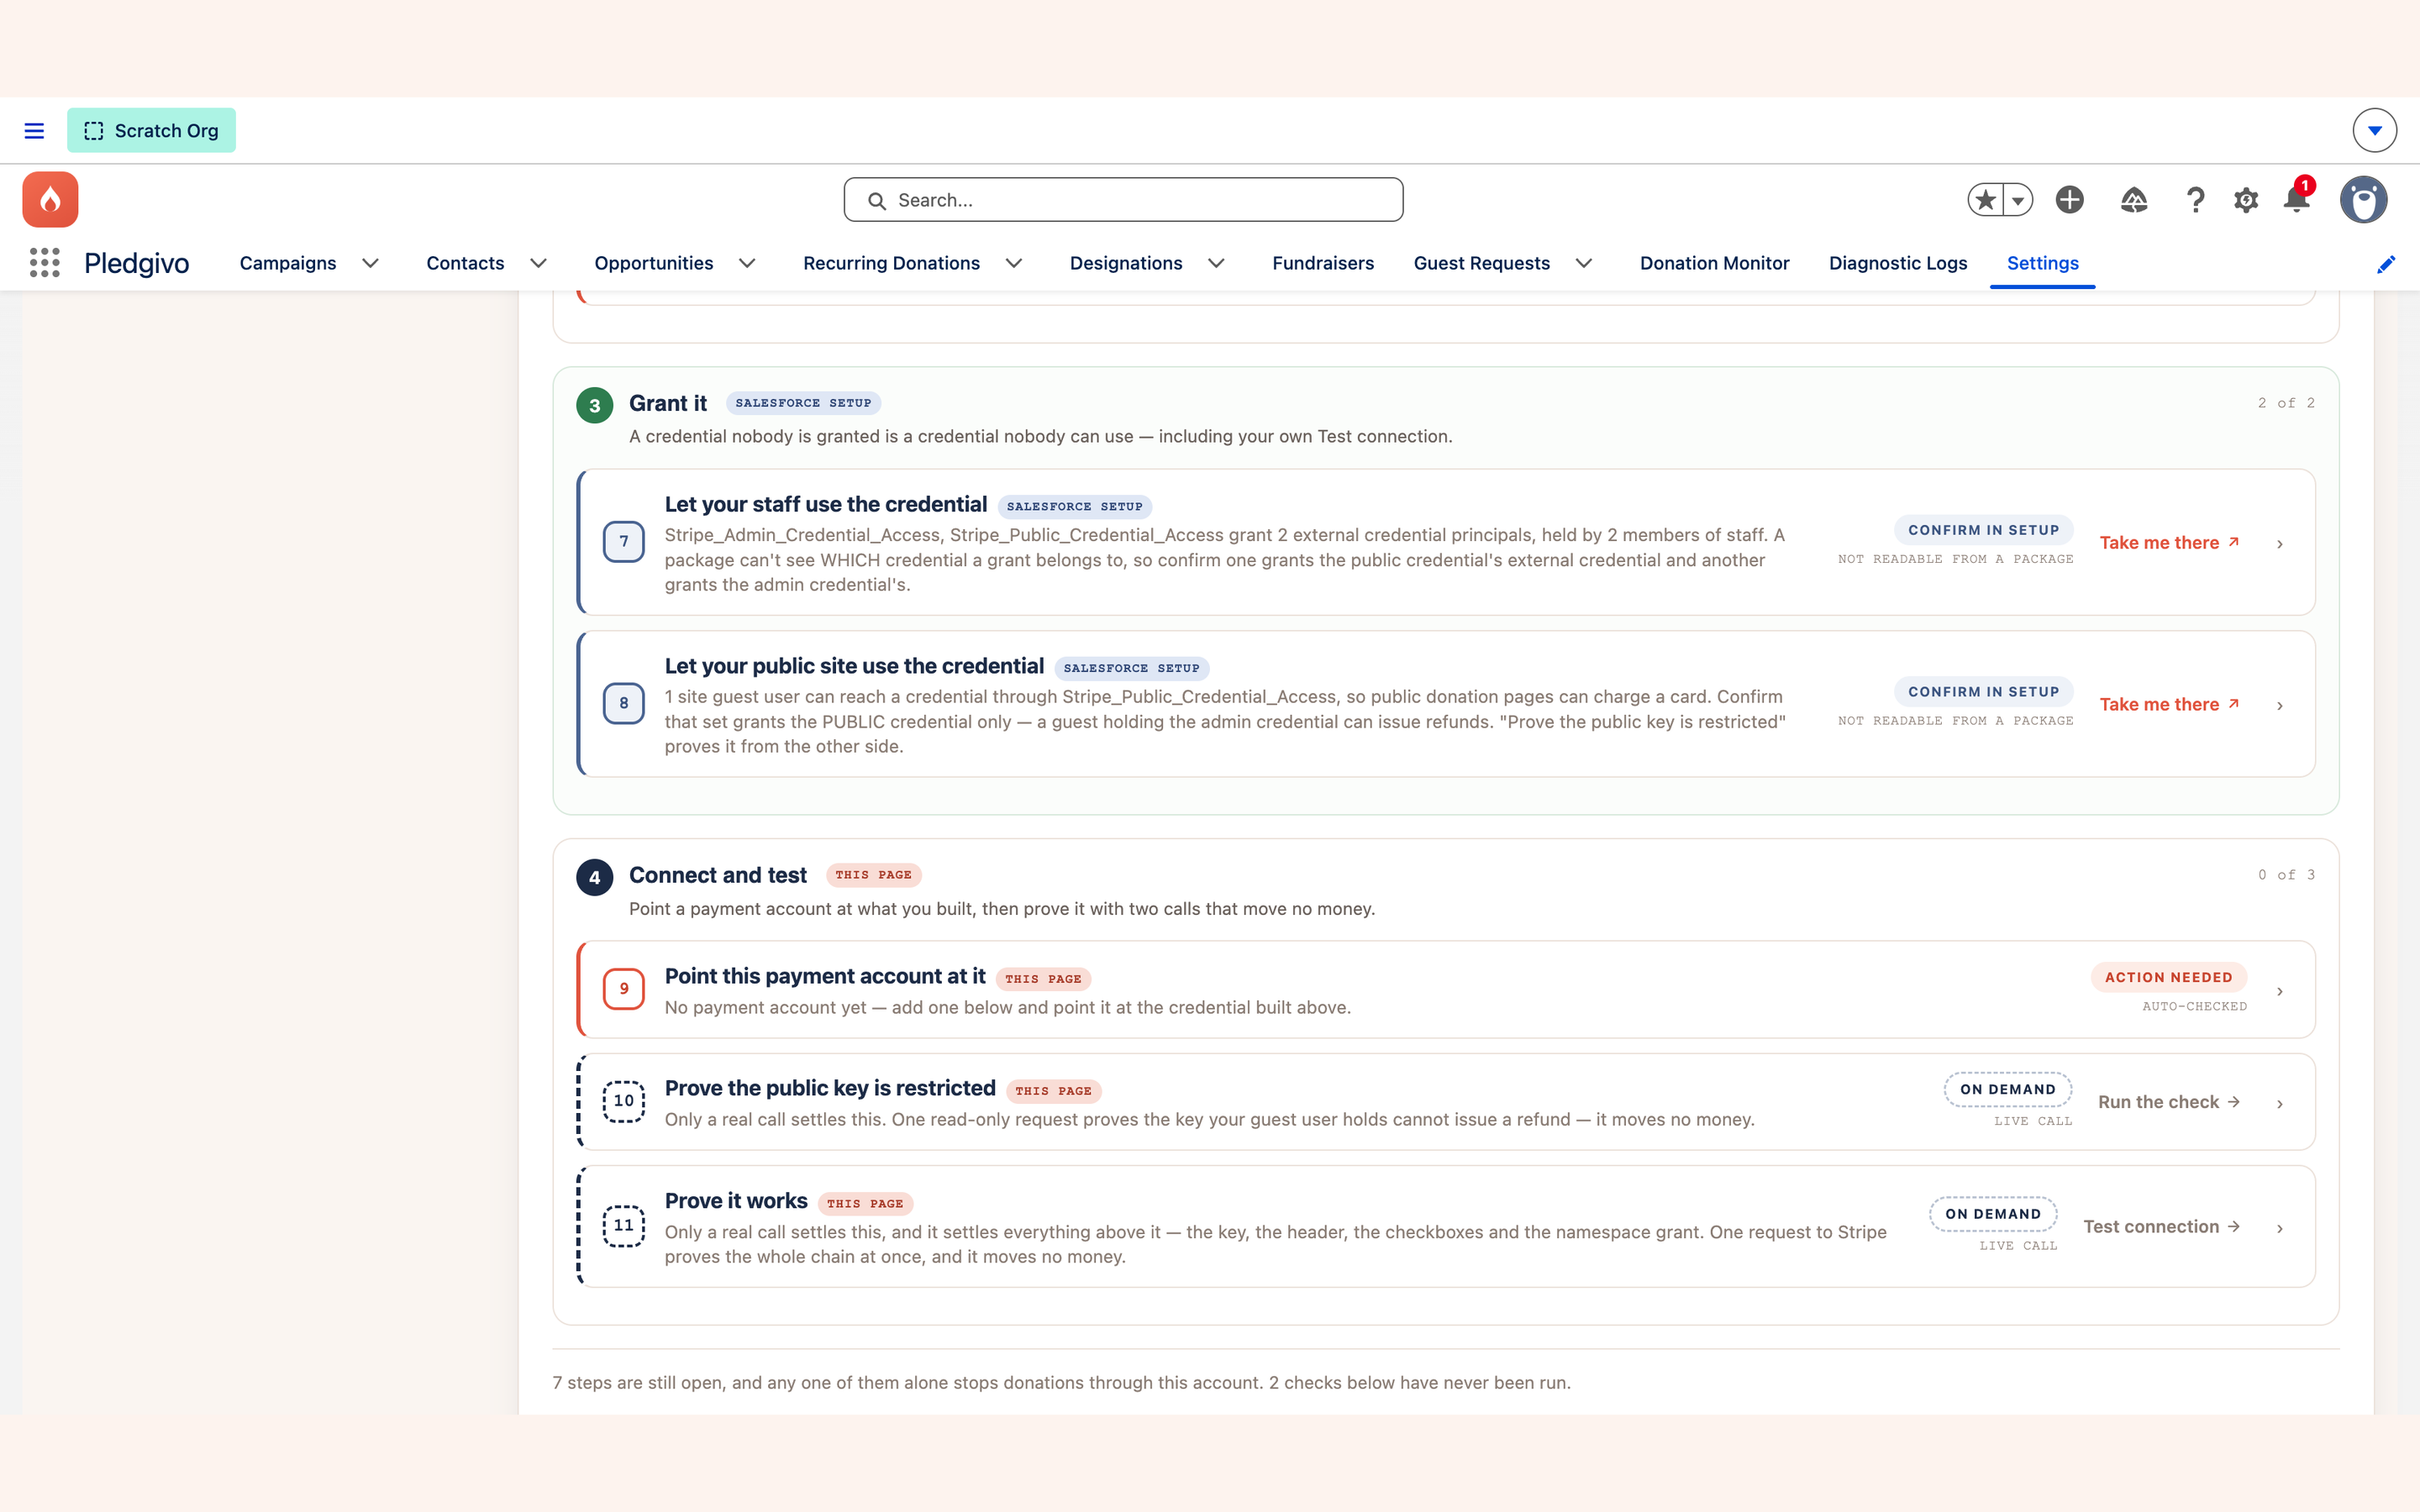
The ten steps are graded per payment account — the checks read the credential a payment account names. Until section 7 creates that account, the four build steps report Action needed no matter how correctly you have built them in Setup. That is why the panel leads with a Do this next card instead of the step list, and why Add account stays disabled until at least one named credential exists in the org. Build the pair first, and let the grading catch up afterwards.
Build it in Setup#
The external credential holds the secret; the named credential holds the URL and the callout options. Neither is usable without the other.
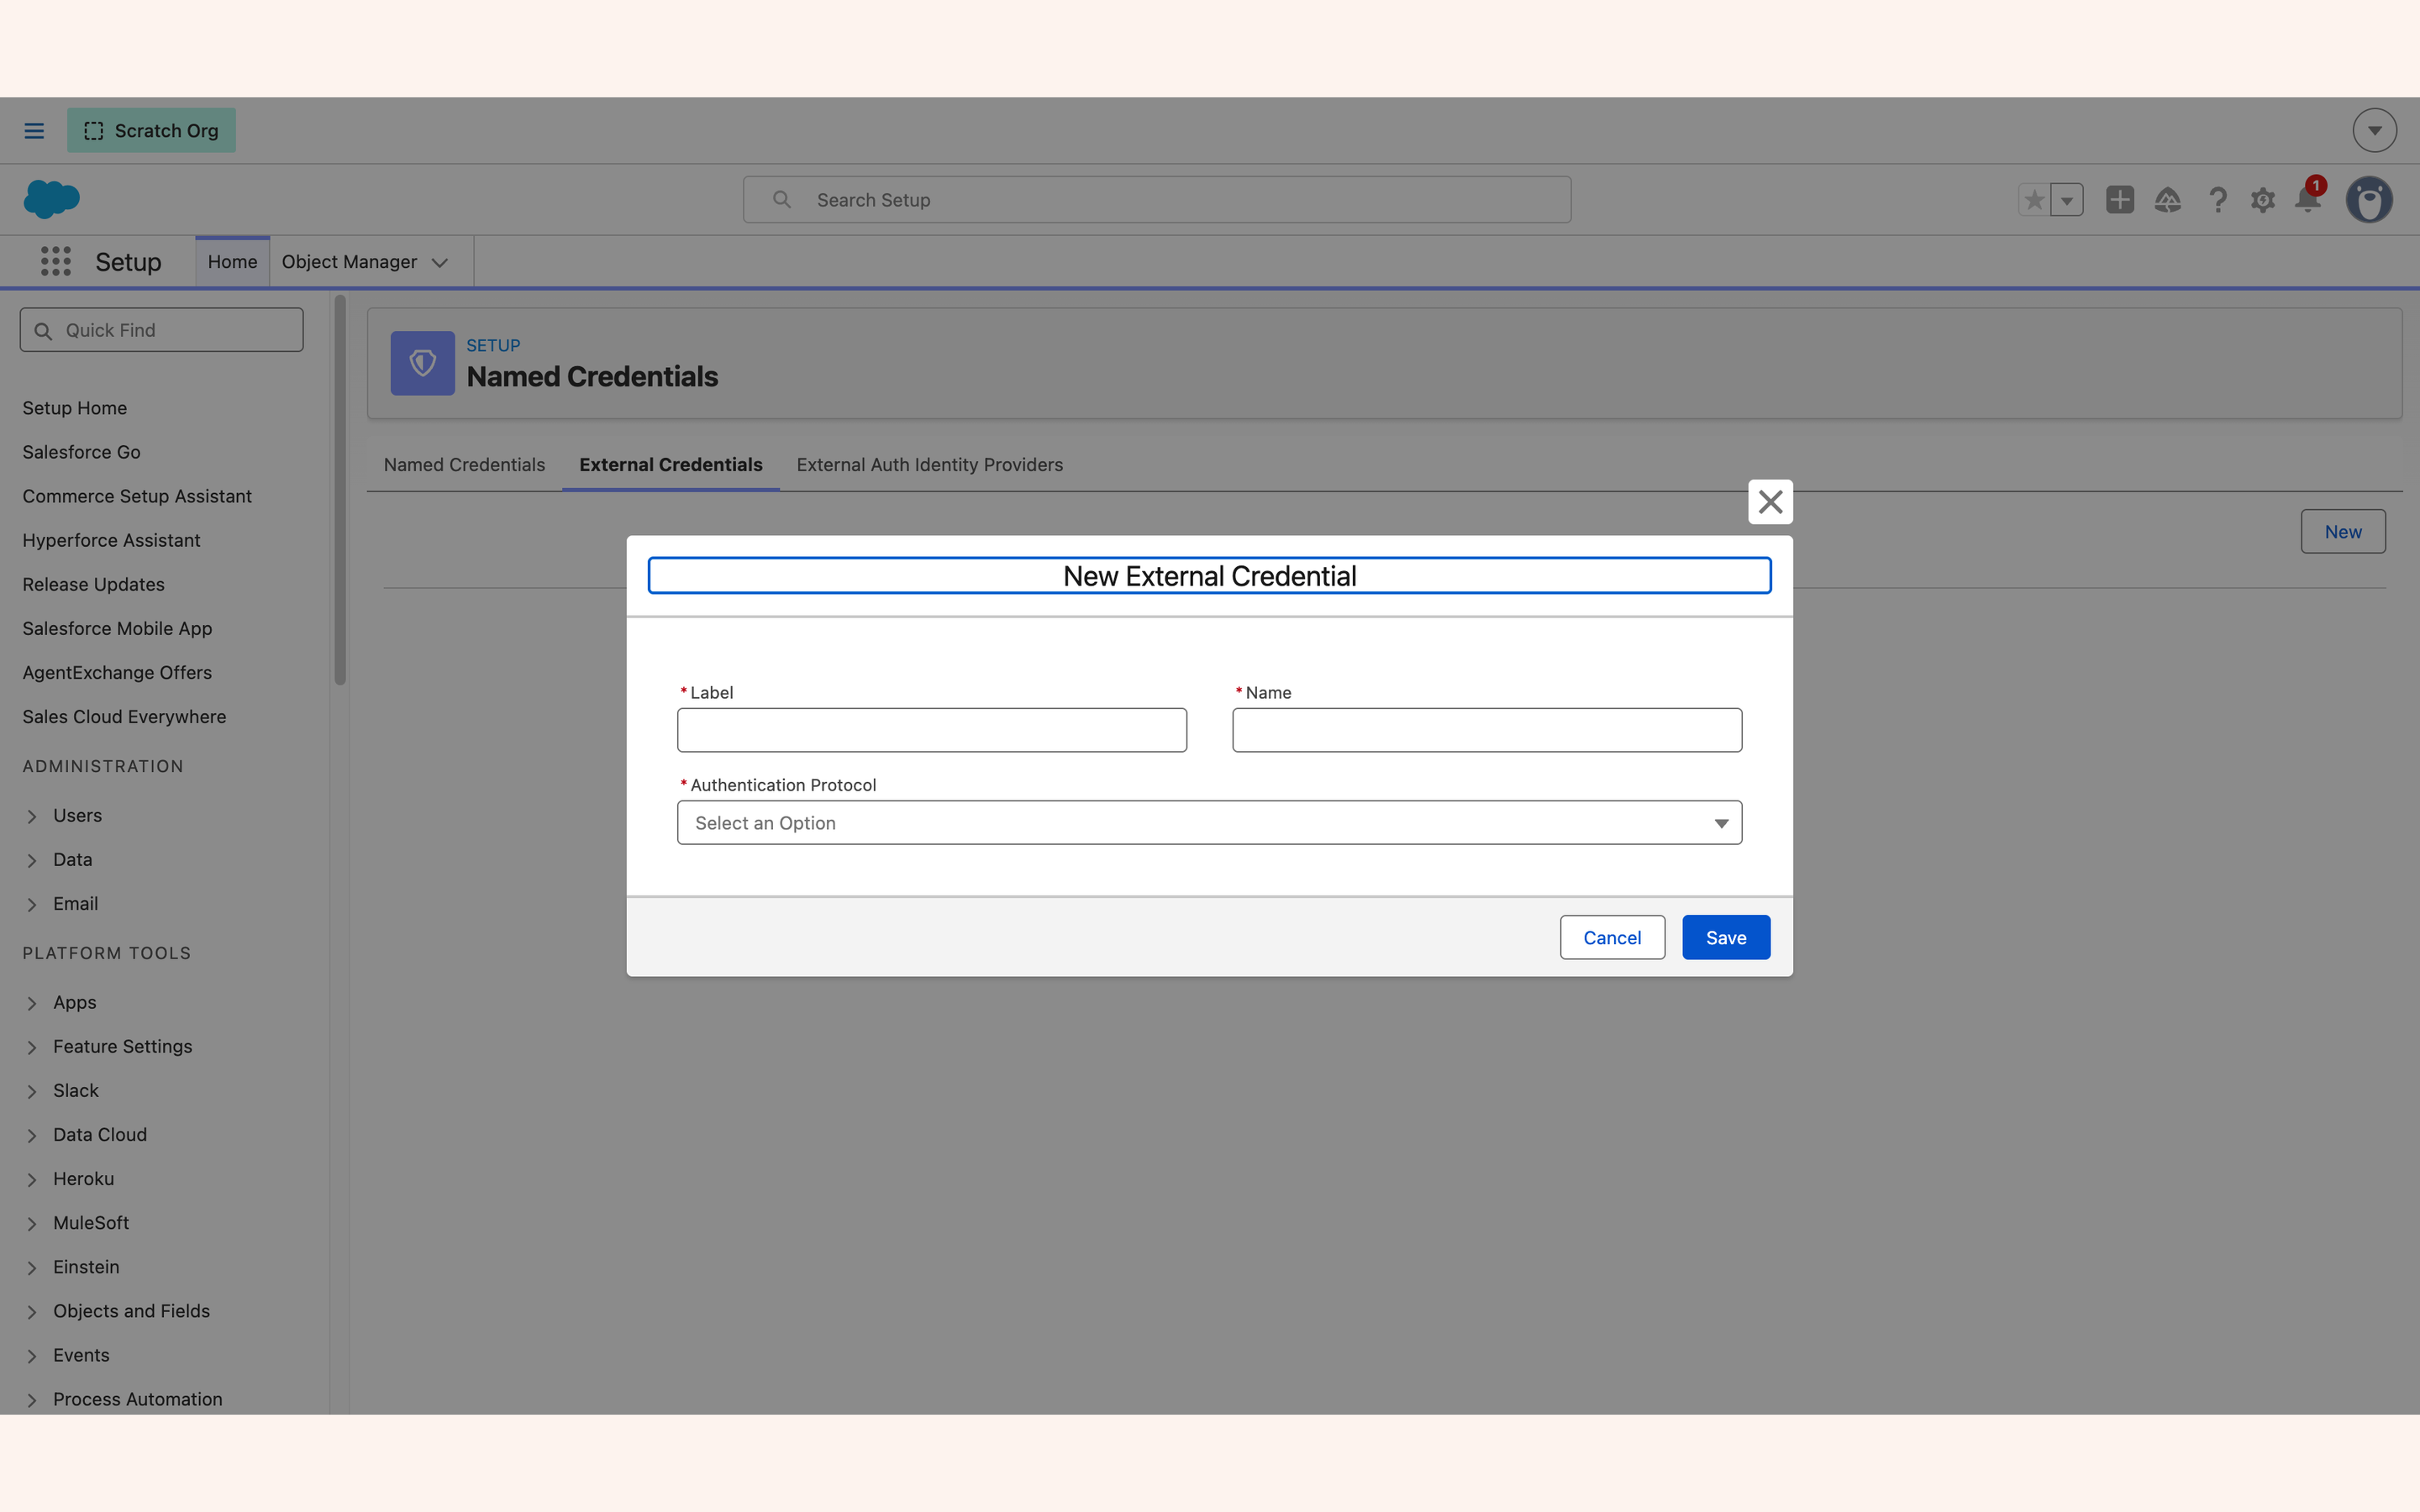
Stripe_Auth_Donor_Restricted here is the panel's suggestion, not a value the app looks for. Set Authentication Protocol to Custom, which is not optional — Stripe authenticates with a bearer token, not OAuth.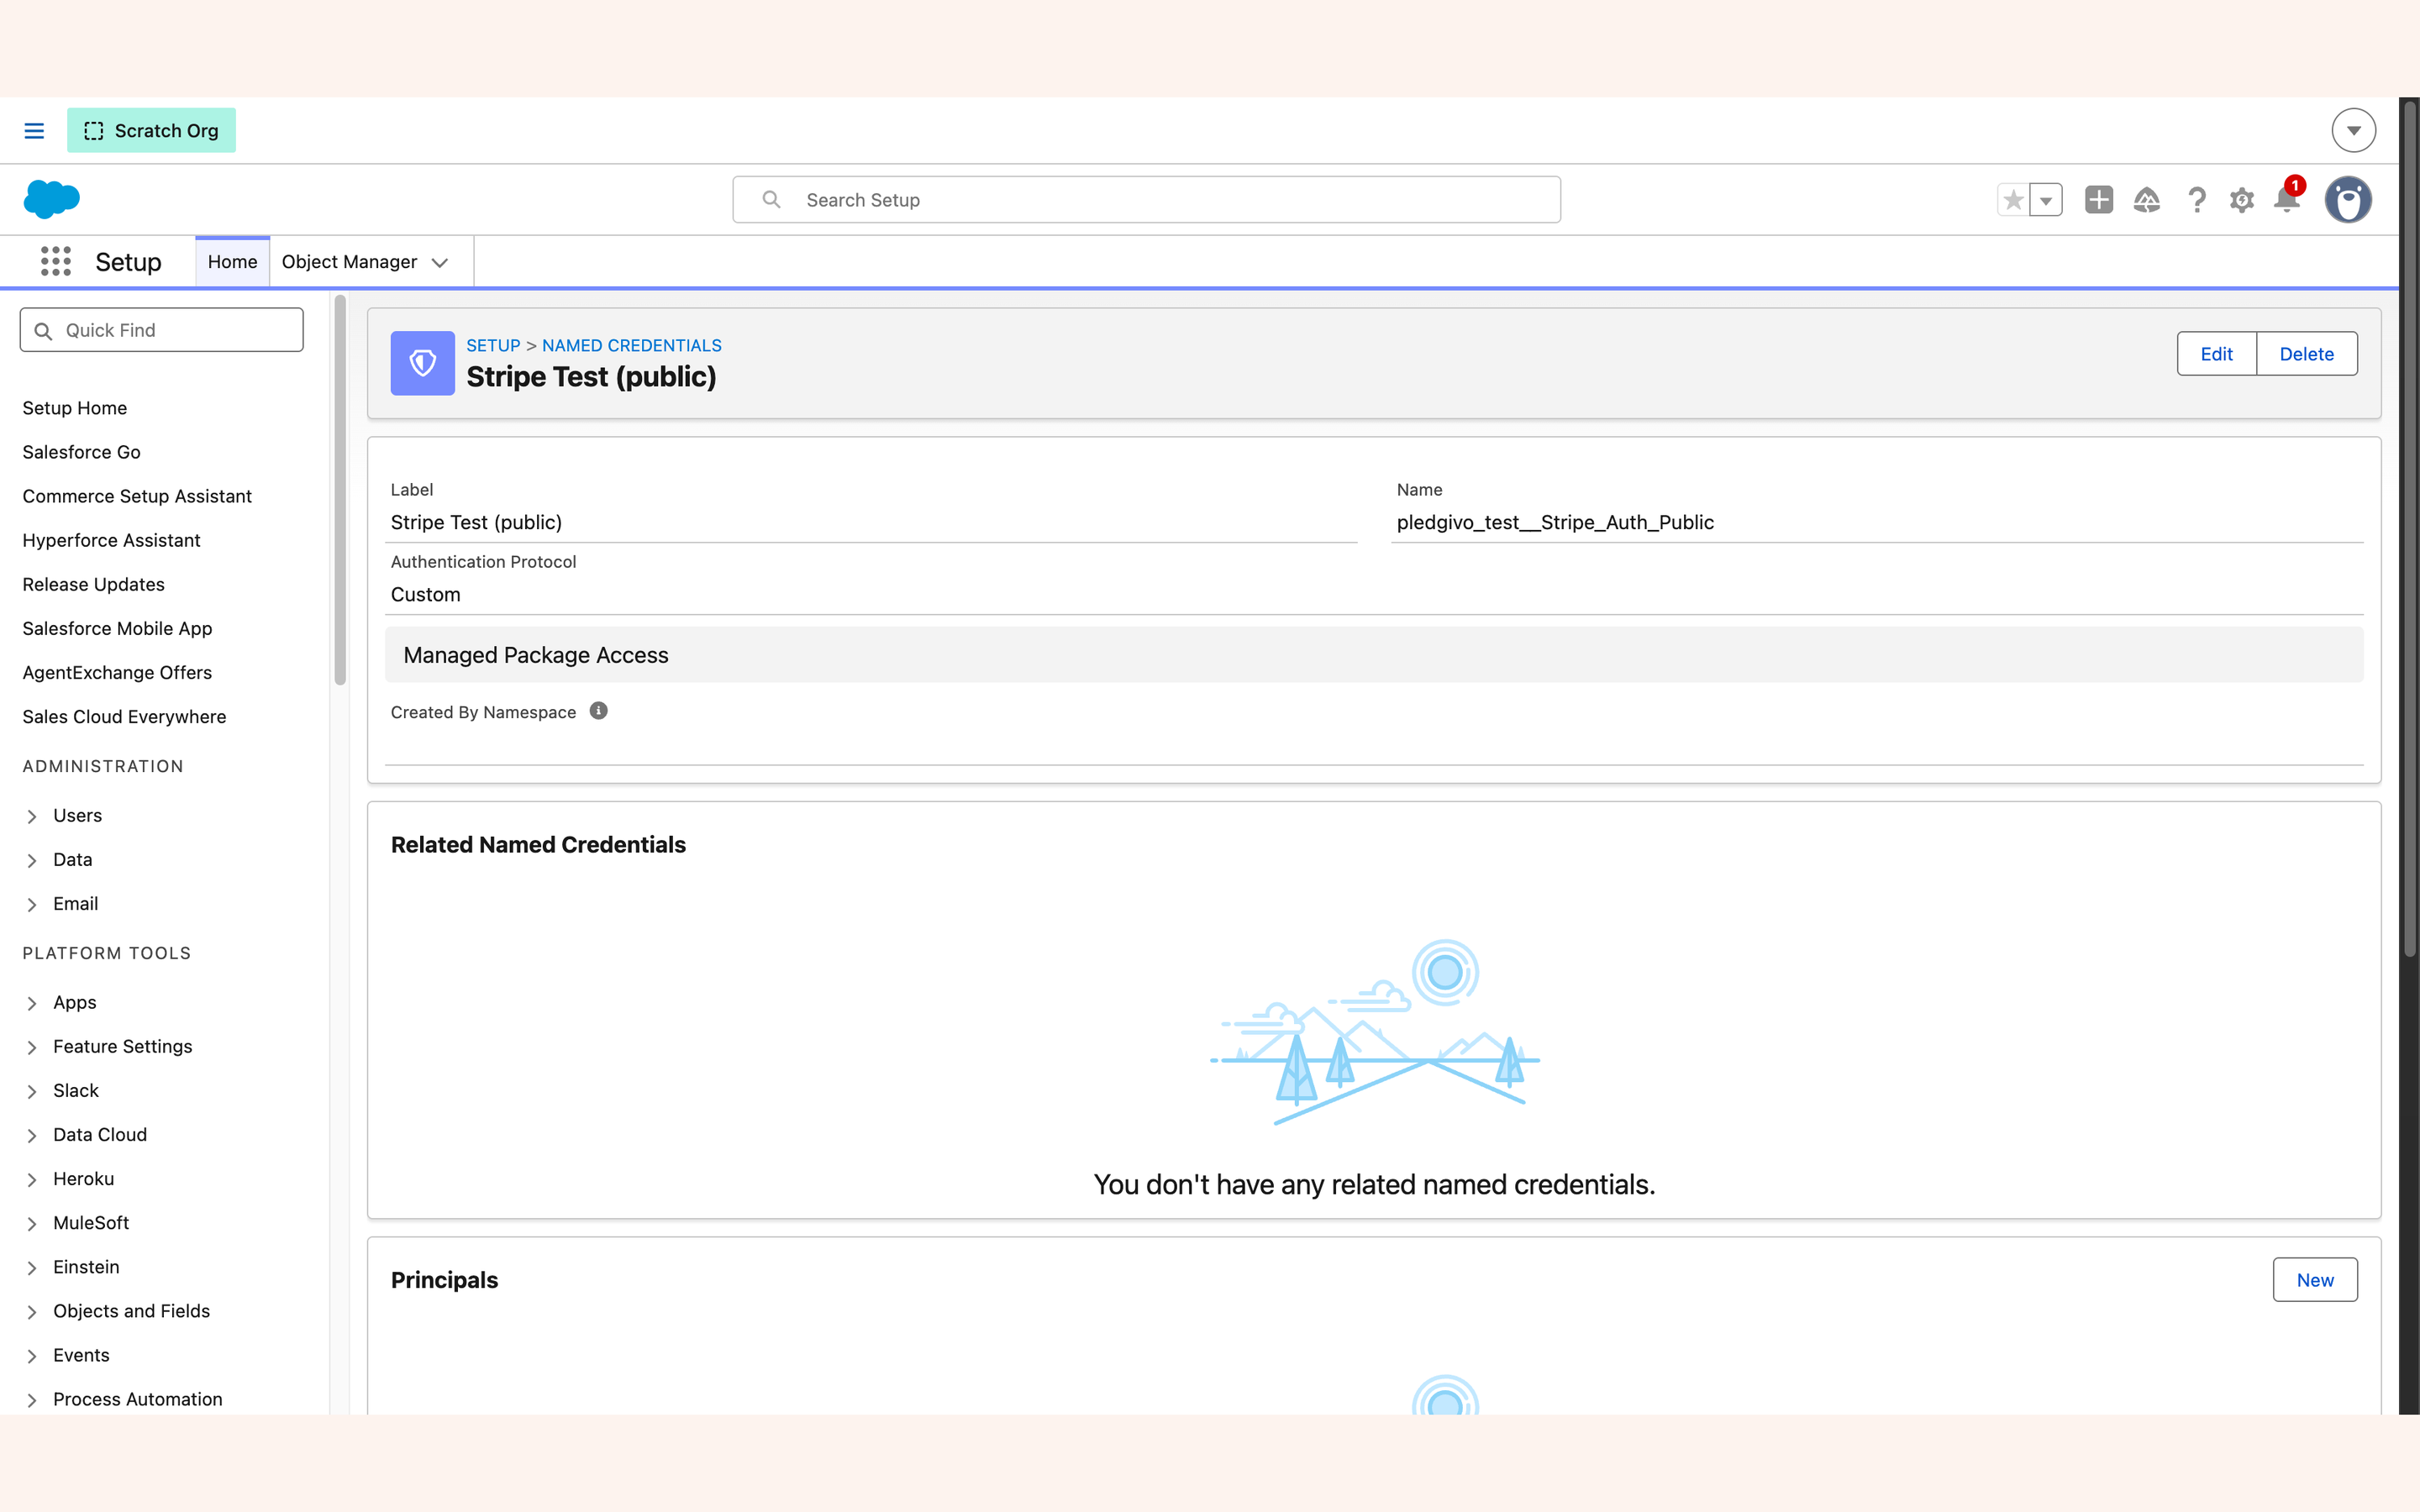
pledgivo_test__ prefix where yours would read pledgivo__; in your org the name is exactly what you typed.)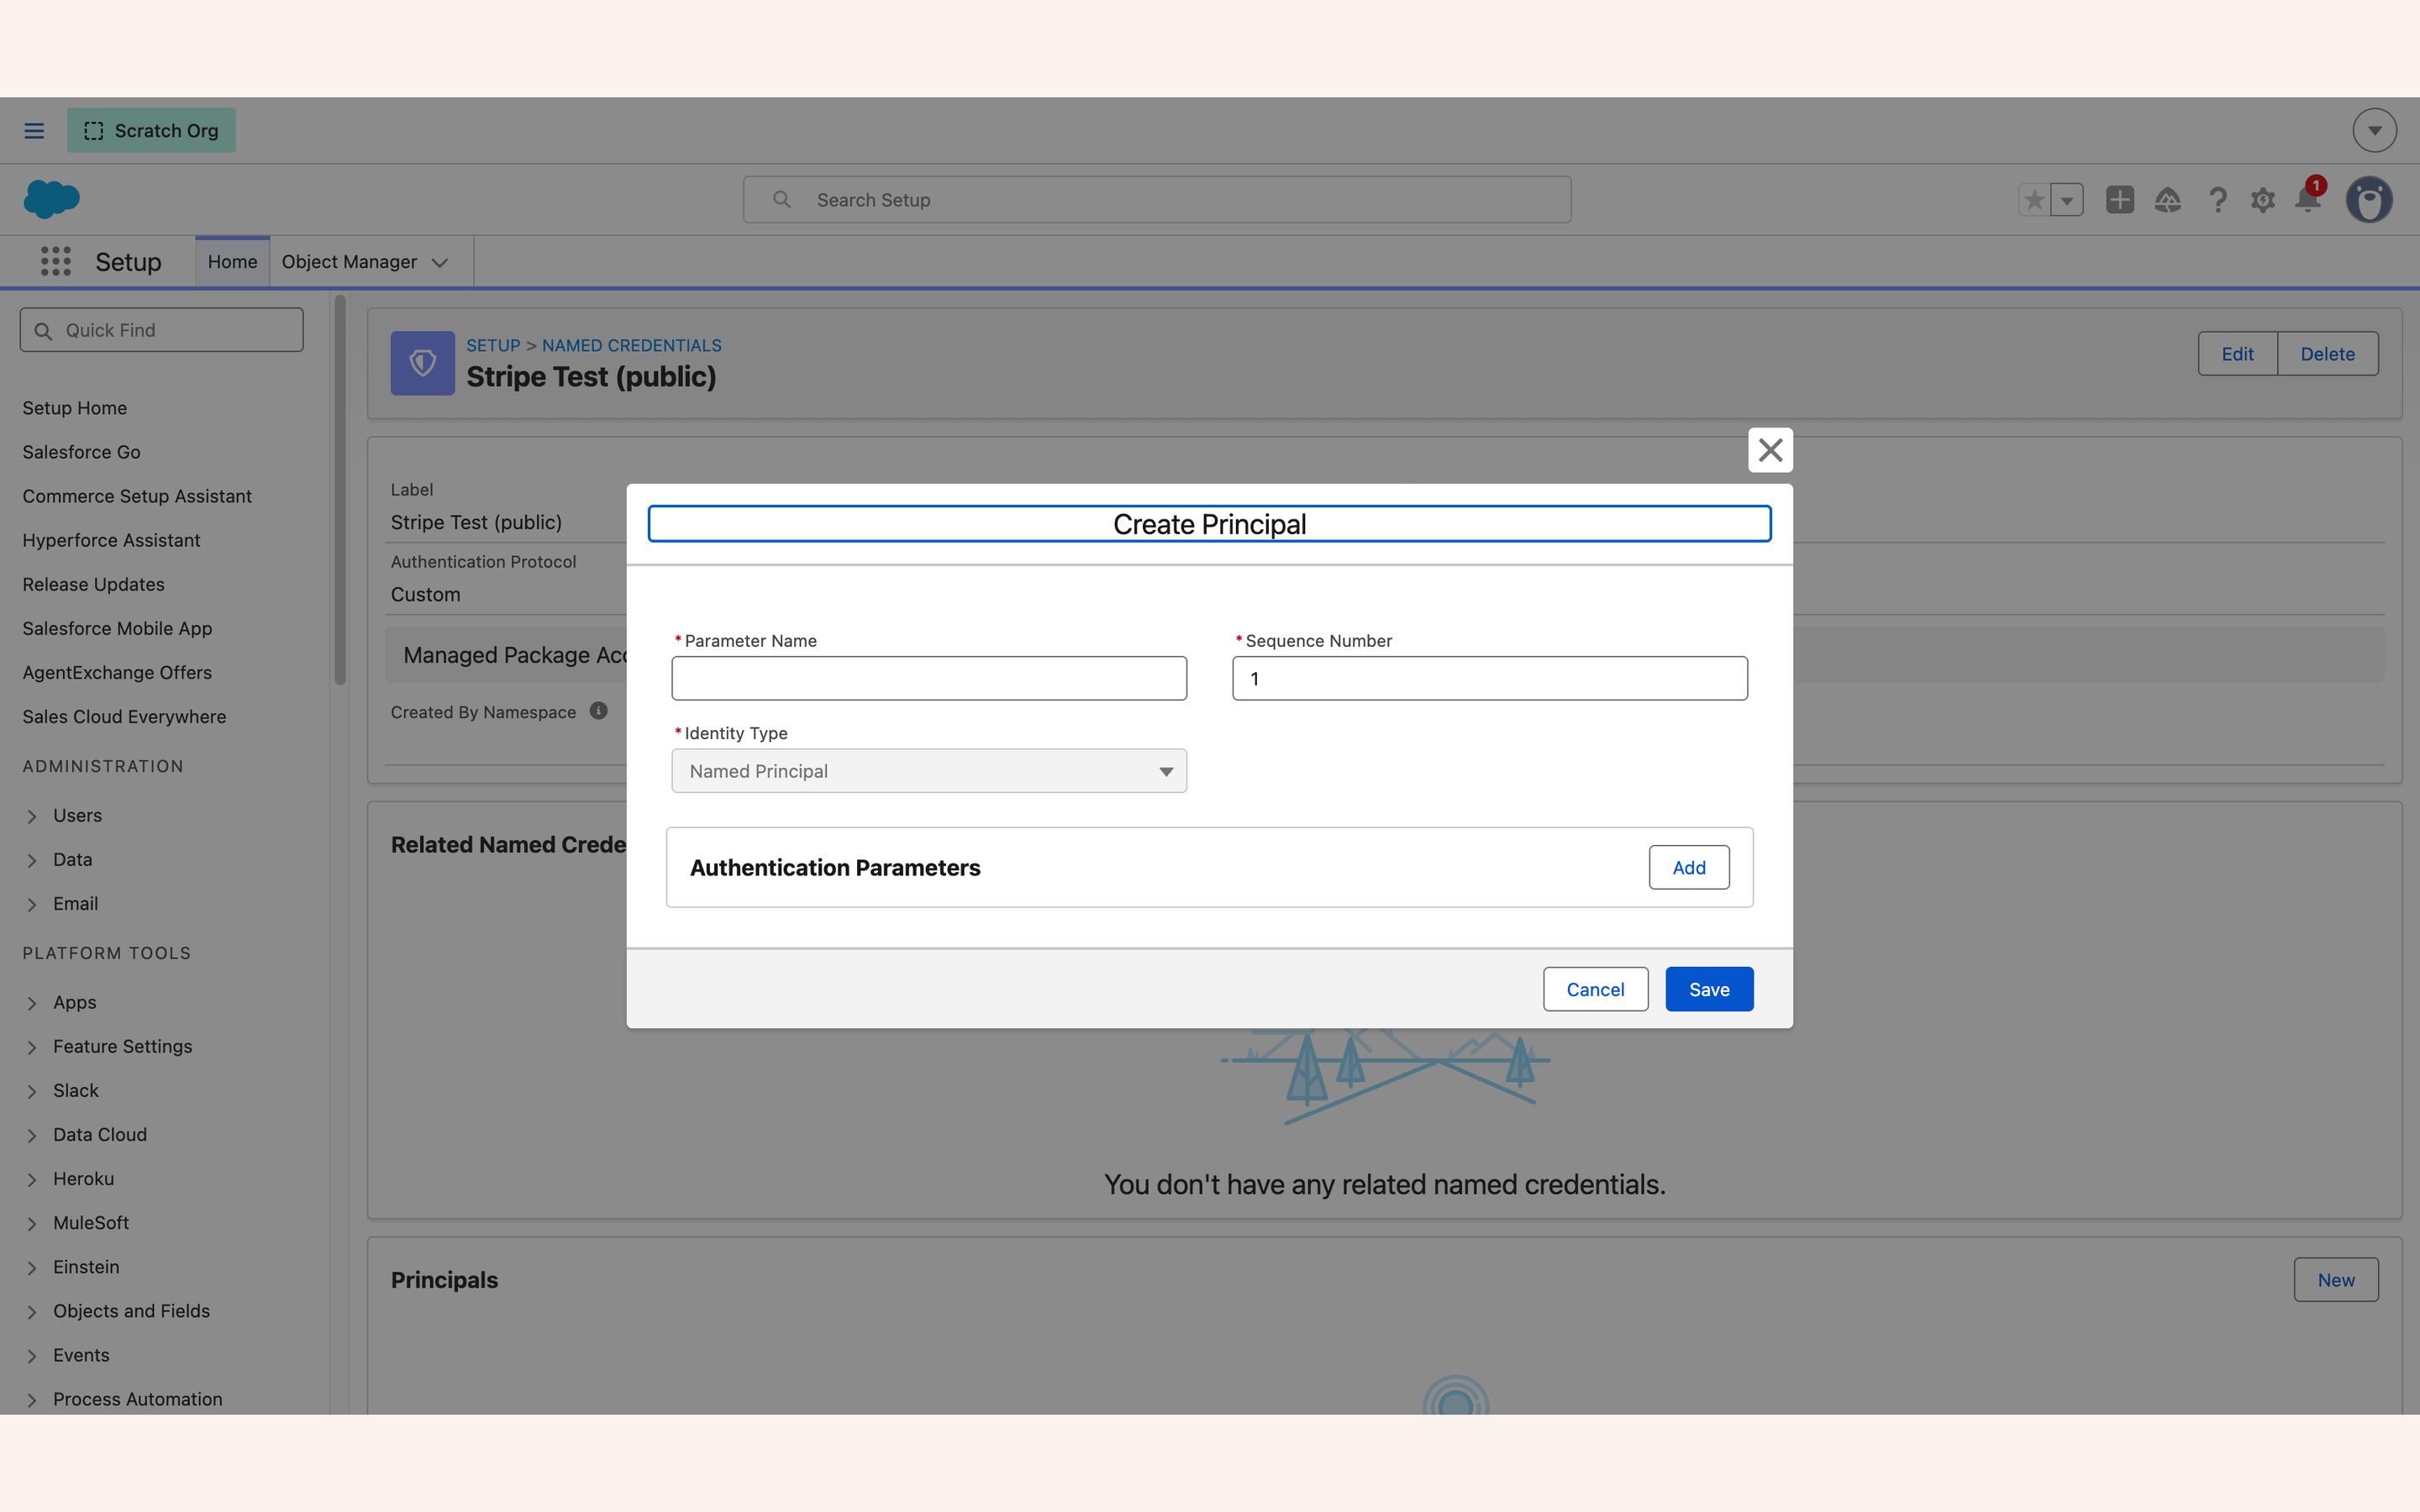
Bearer rk_… — the word Bearer and a space must precede the key, because the header is passed through verbatim. Once saved the value is write-only: Salesforce will never show it again, to you or to any Apex.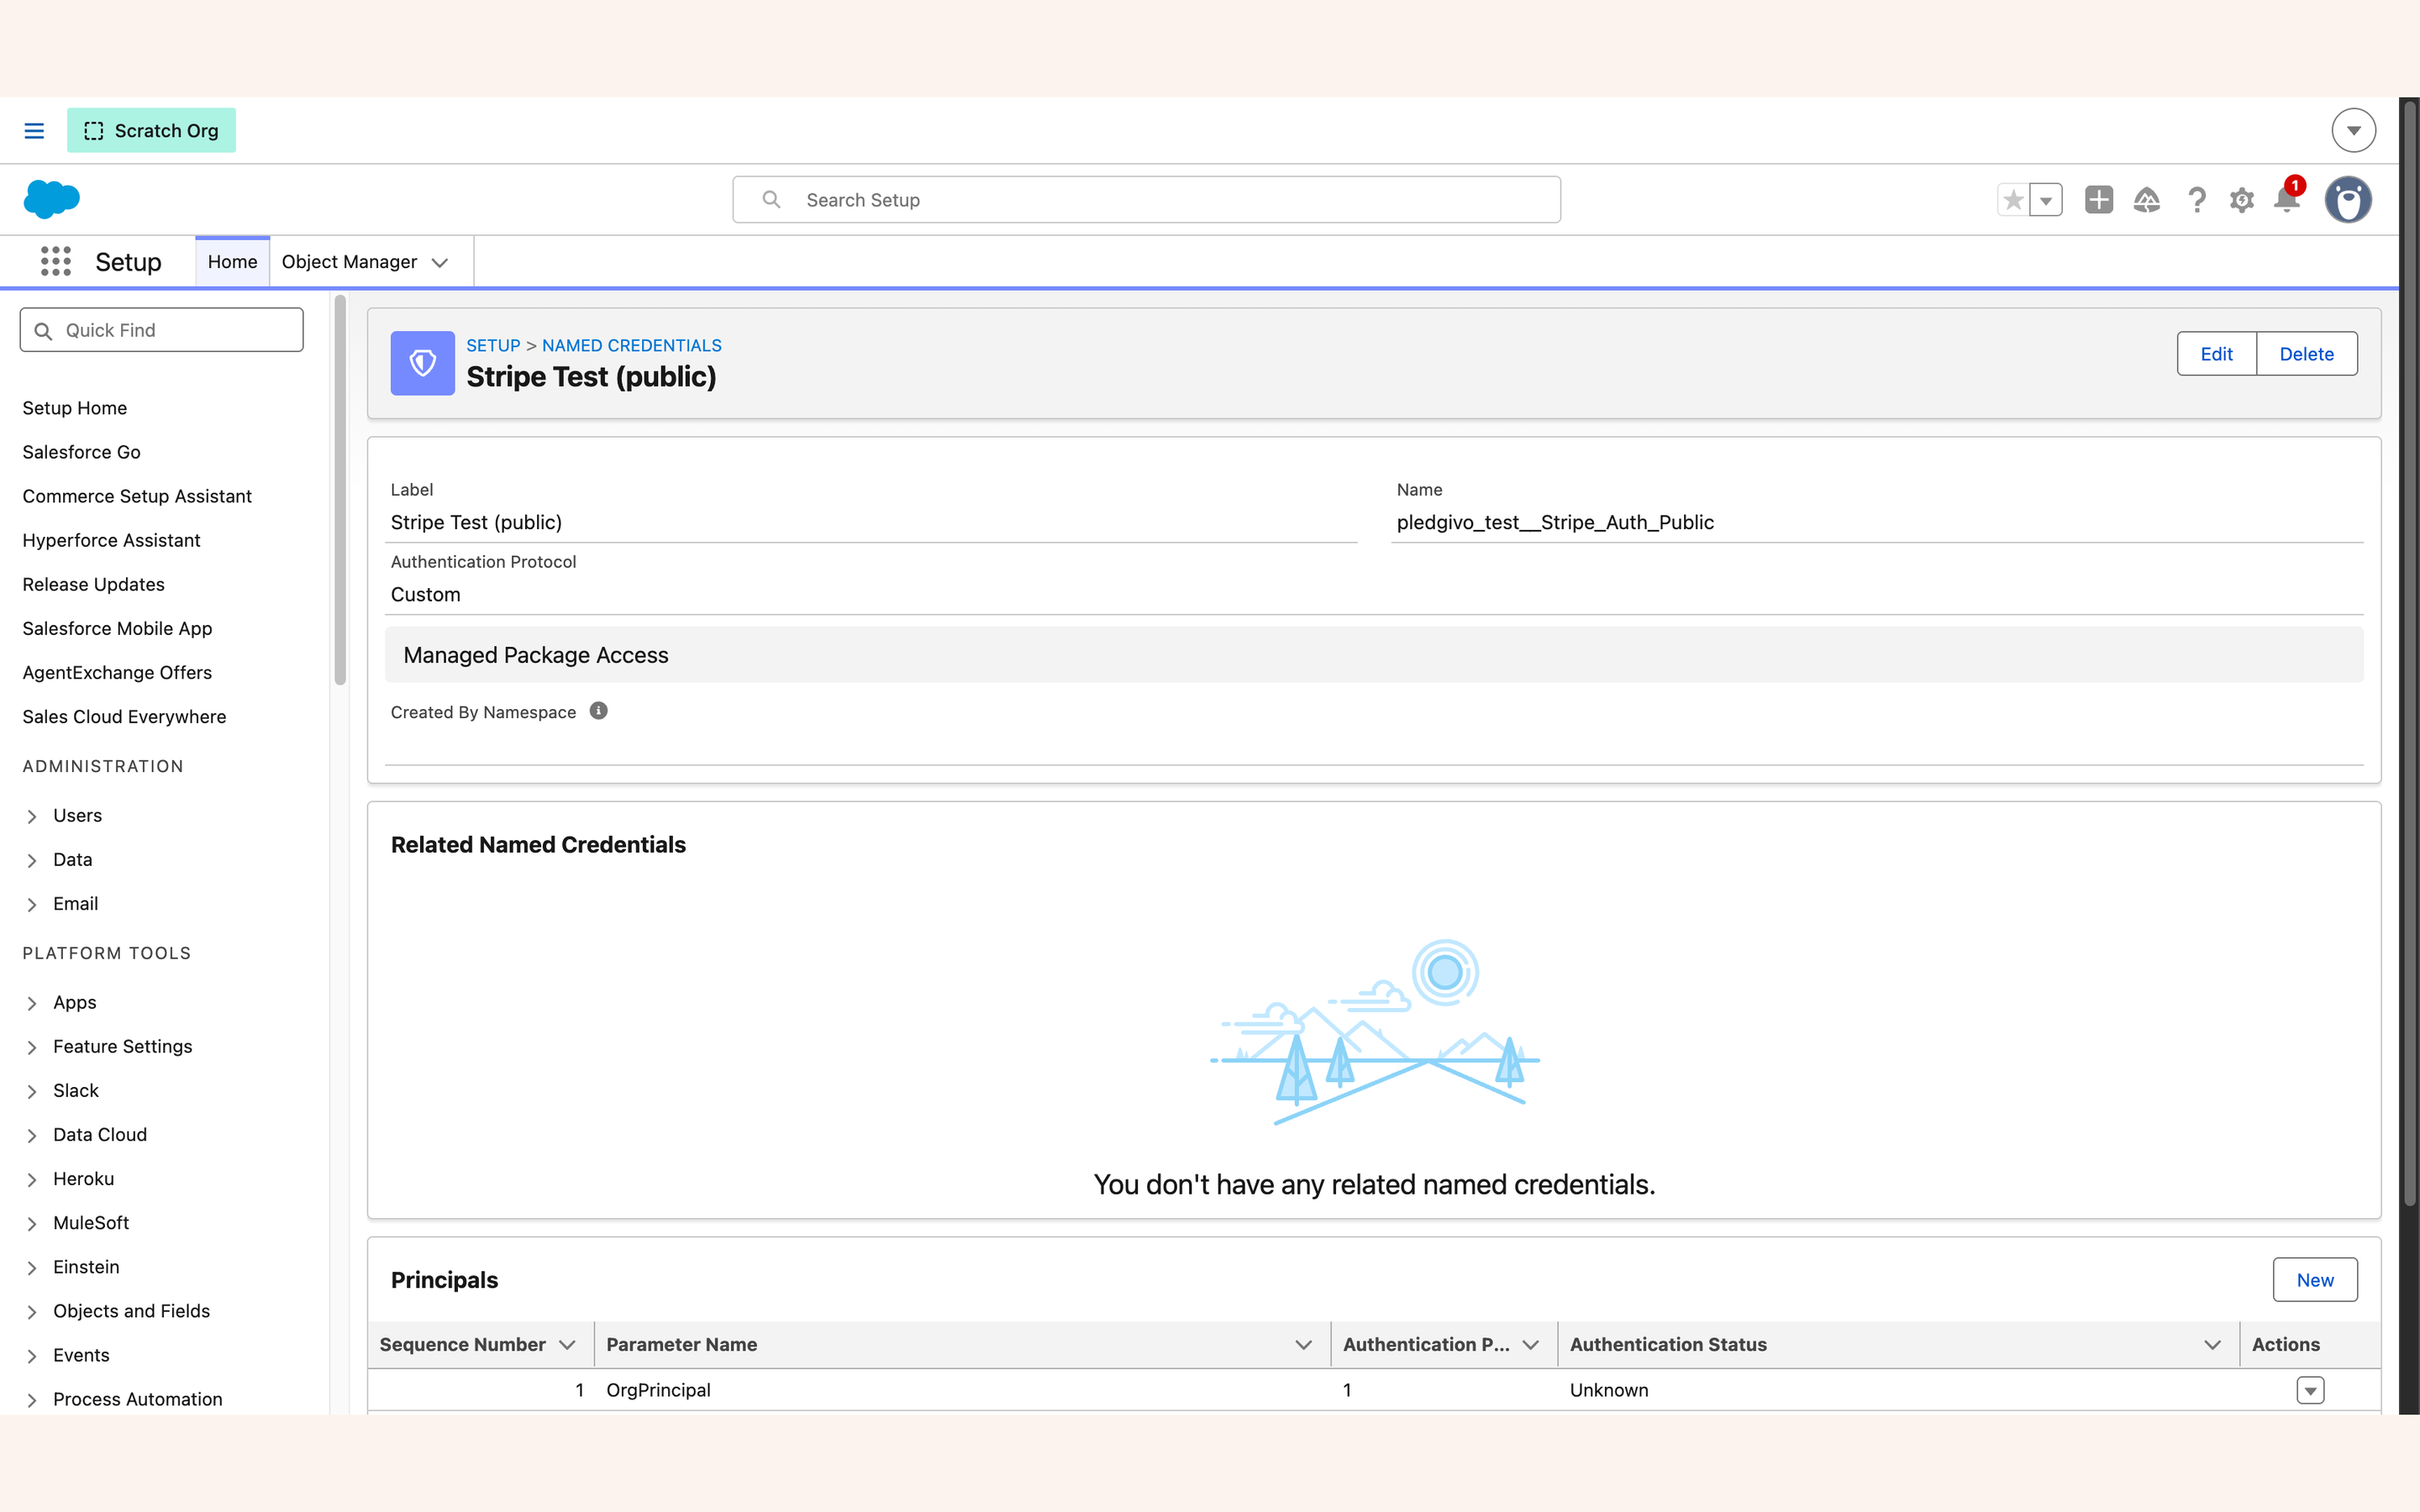
{!$Credential.YourCredentialName.YourParameterName}. The header name Authorization is fixed — Stripe requires it and the setup guide looks for it. Both halves inside the braces are names you chose: the credential's saved API name and the authentication parameter you stored the key in. Copy them from the record rather than retyping them. A formula pointing at a name that does not exist saves without complaint and fails silently at the first live donation. The dialog has a third field, Sequence Number: it is required, Salesforce prefills it with the next free number, and on a credential holding one header there is nothing to change.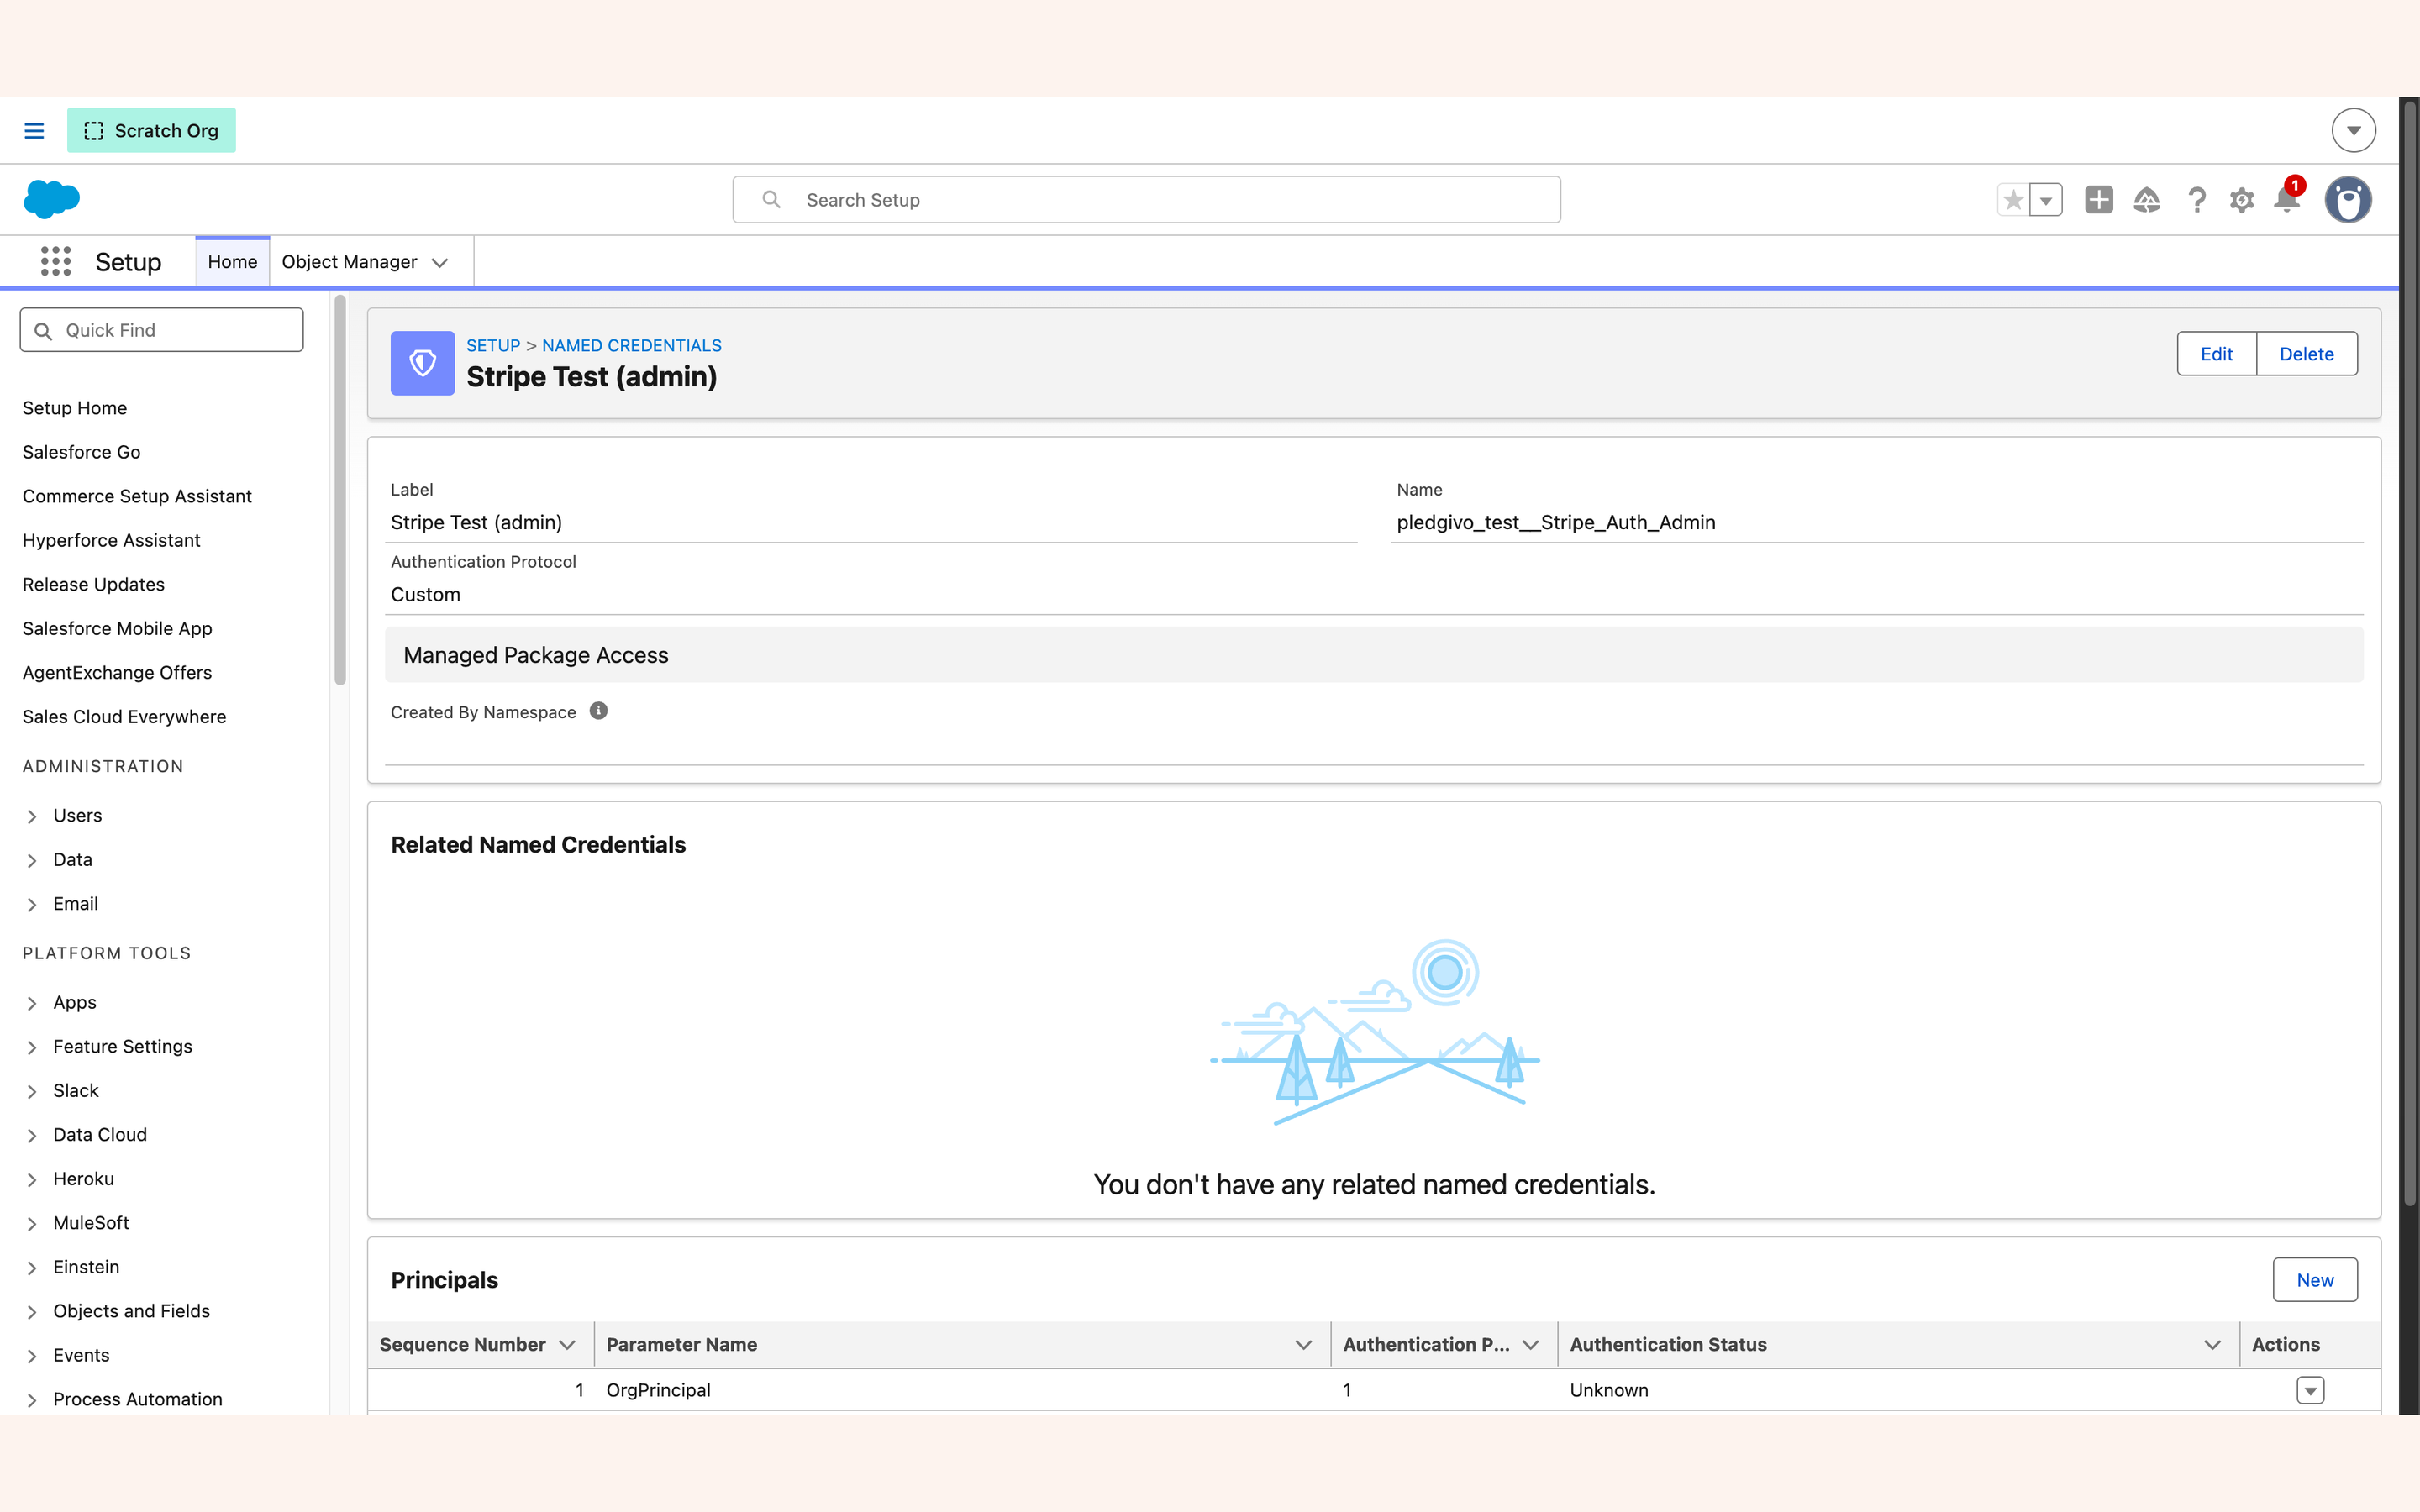
Stripe_Auth_Admin_Restricted — identical in shape, different key, its own OrgPrincipal. The two share no state, which is the point: a leak of one does not expose the other.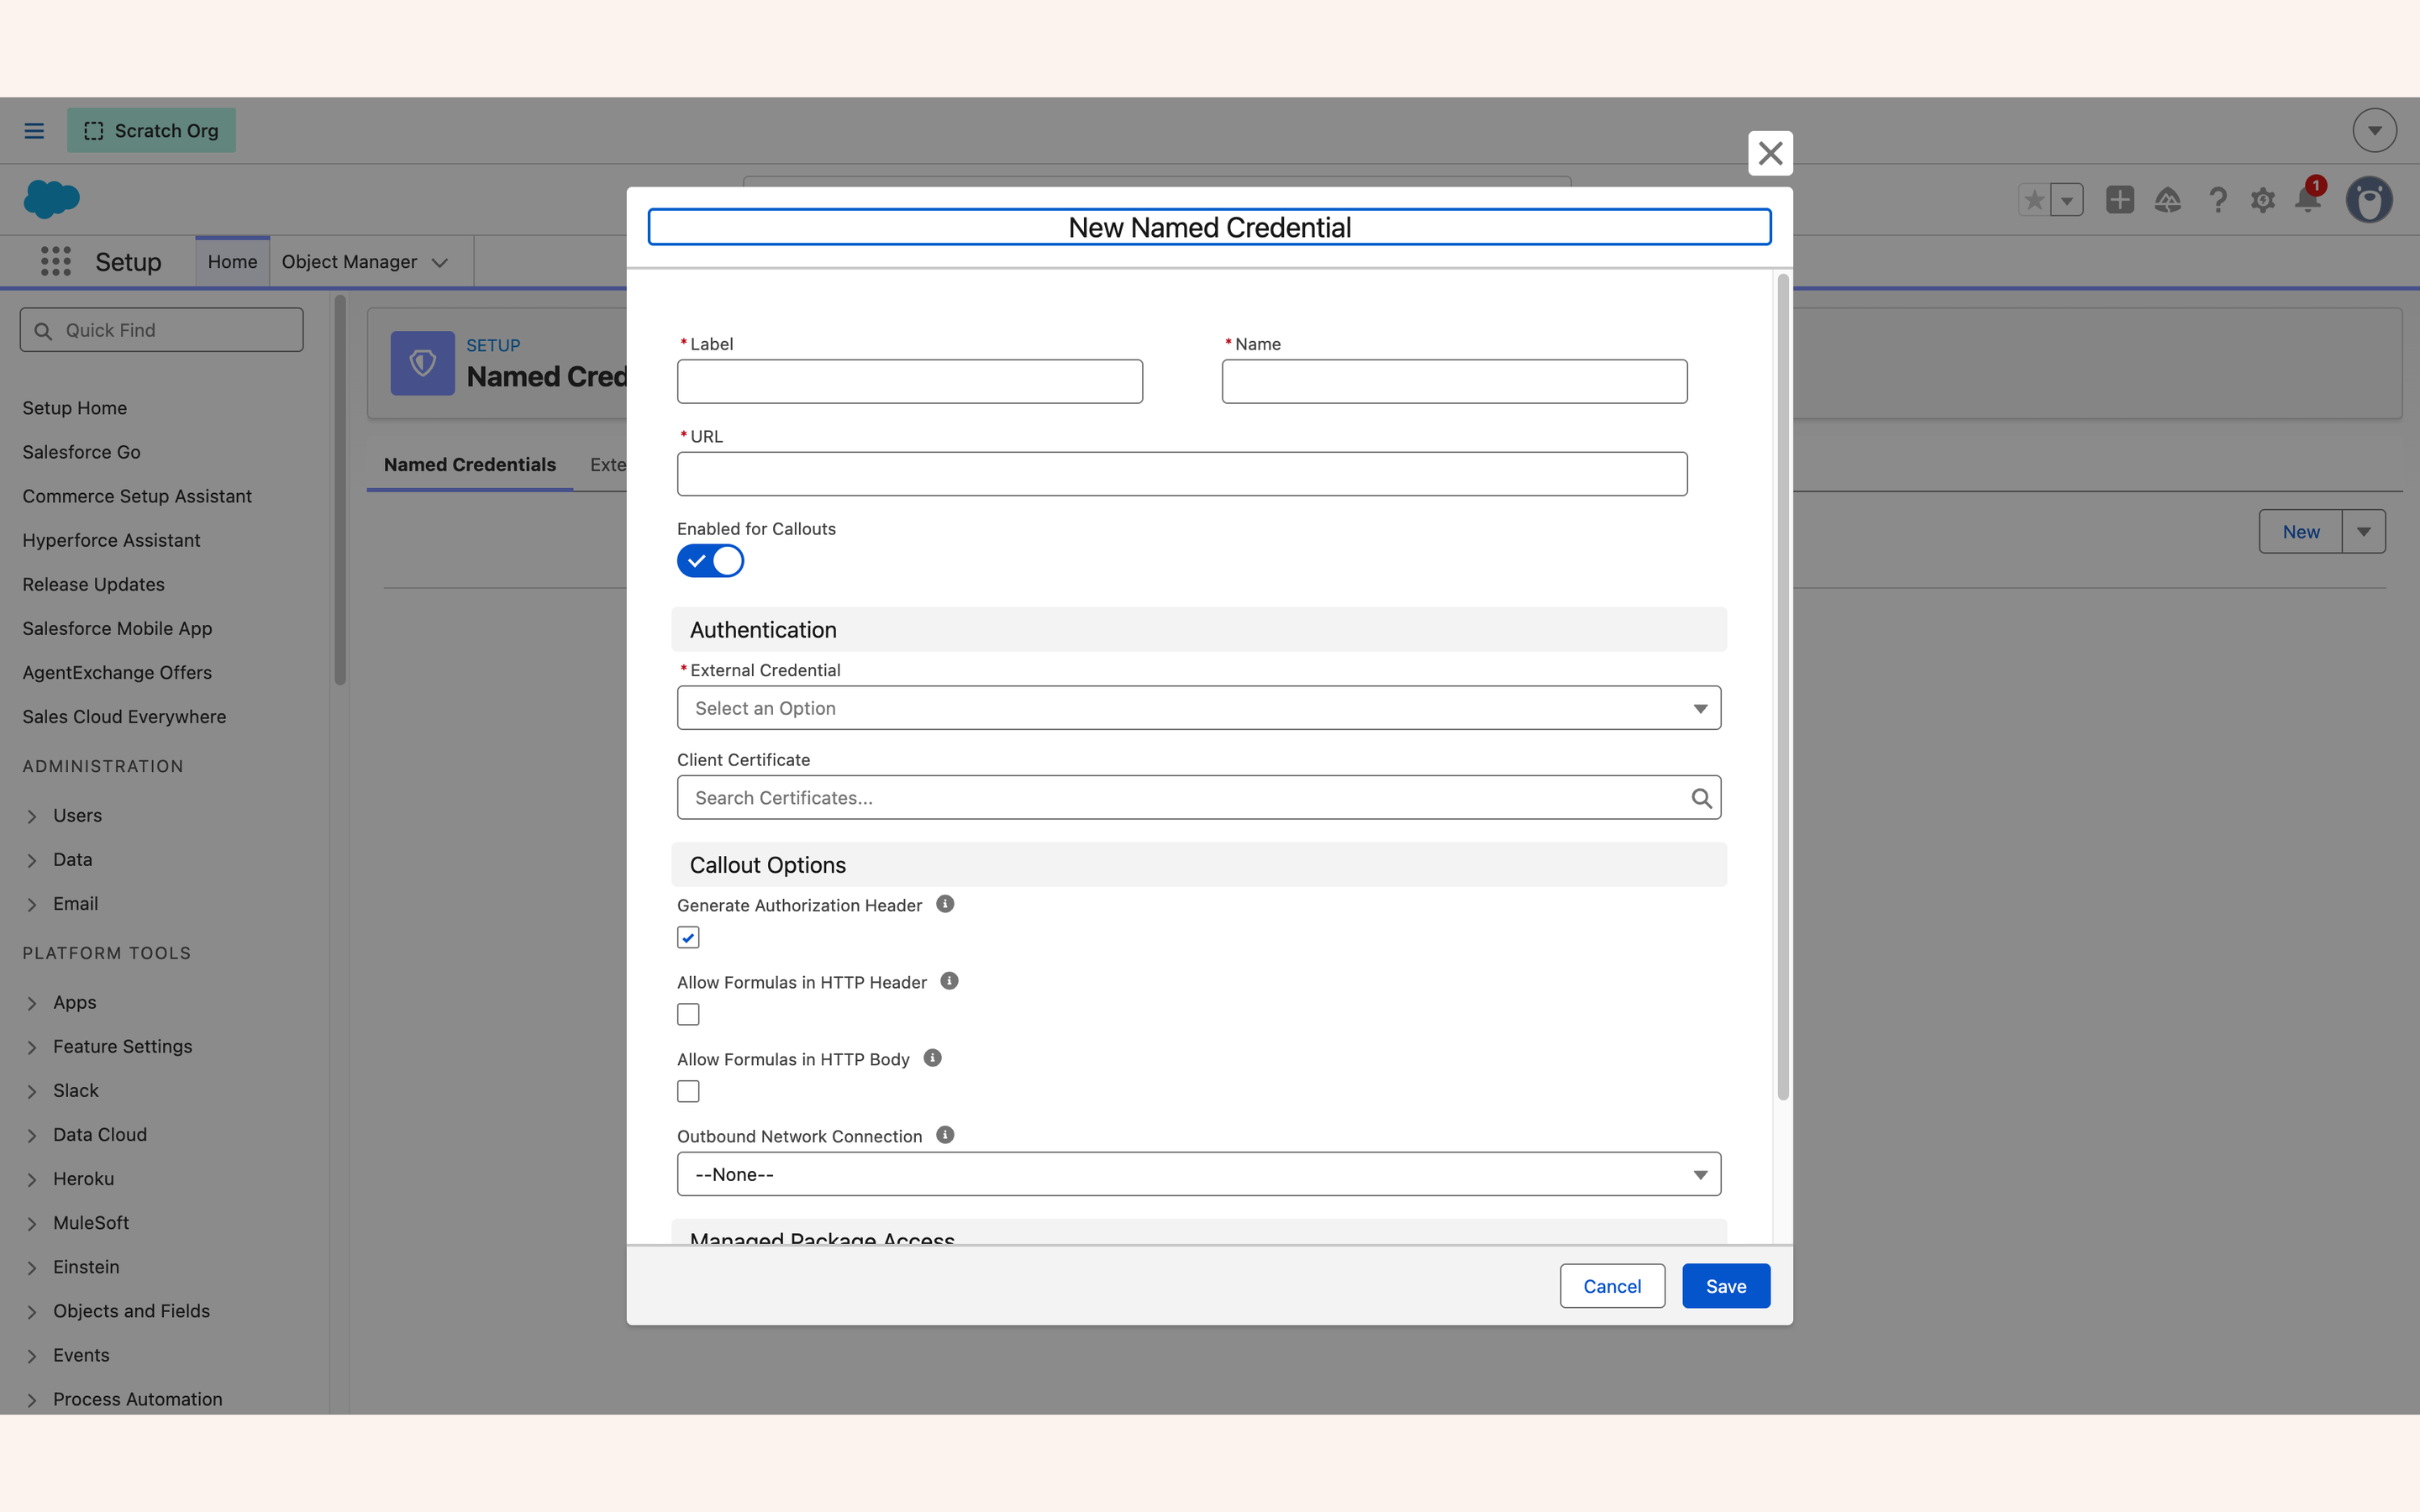
https://api.stripe.com, no trailing path, and the external credential you just built. Everything else you need is on this same form — you do not have to save and re-edit.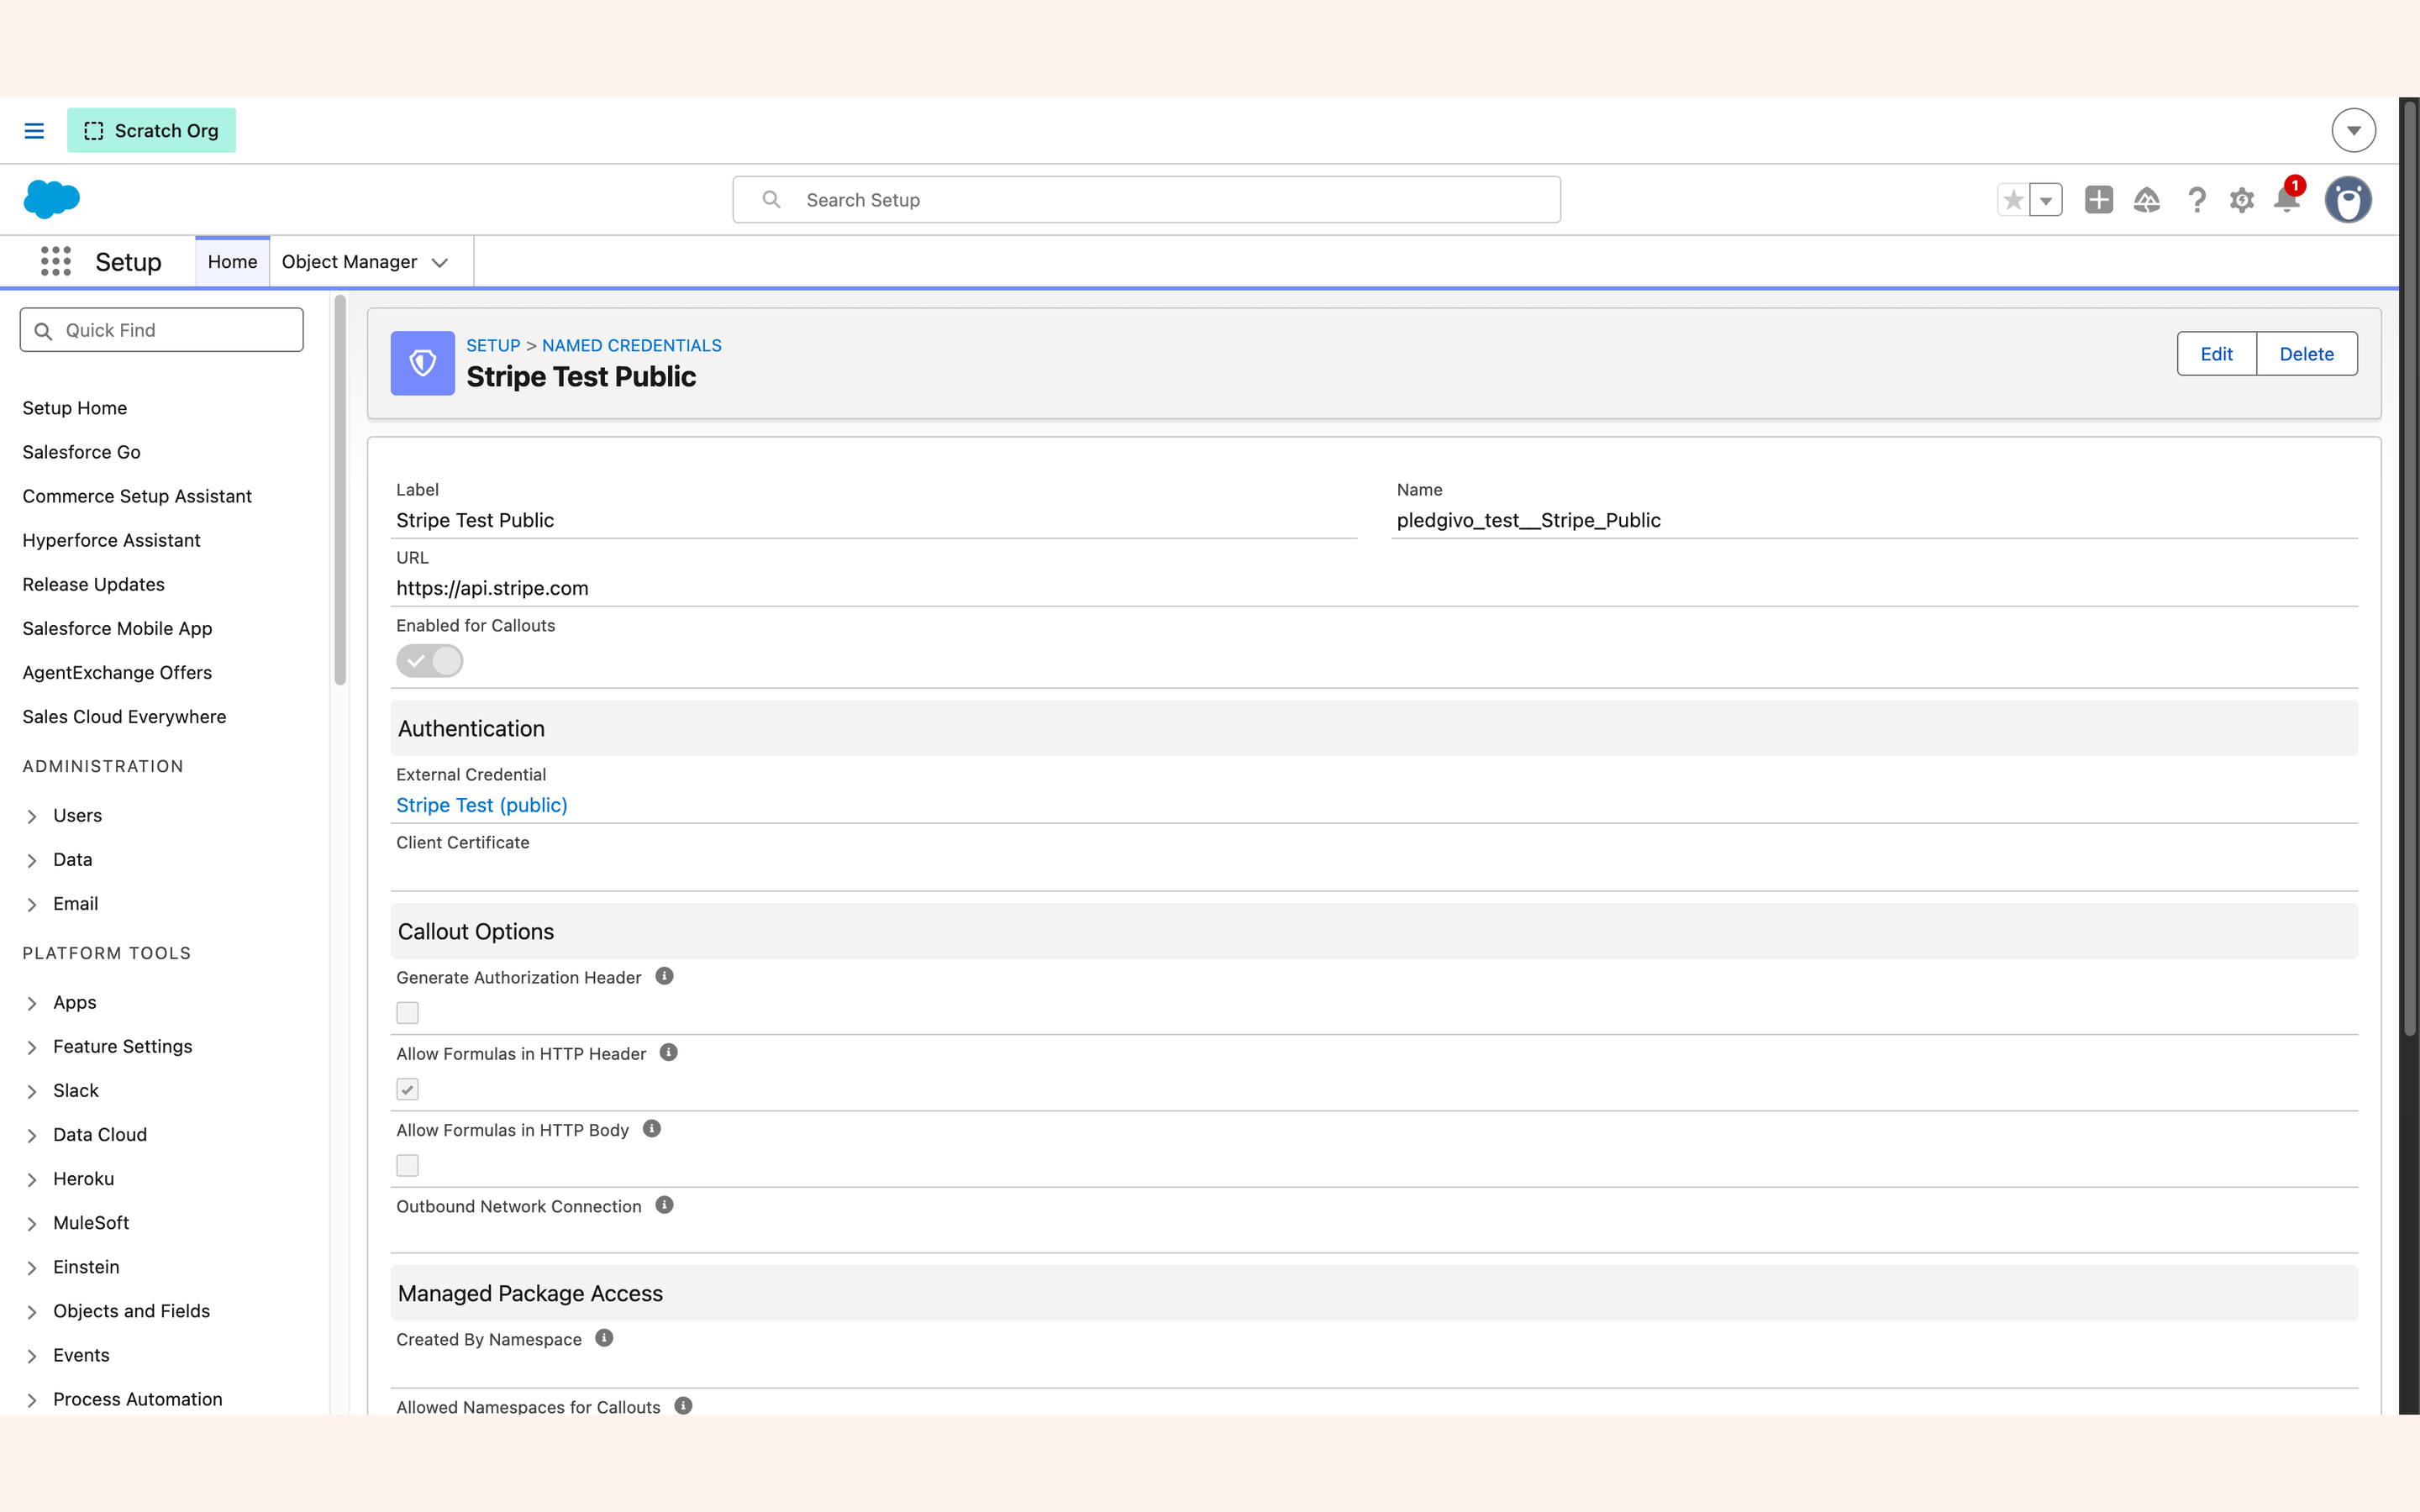
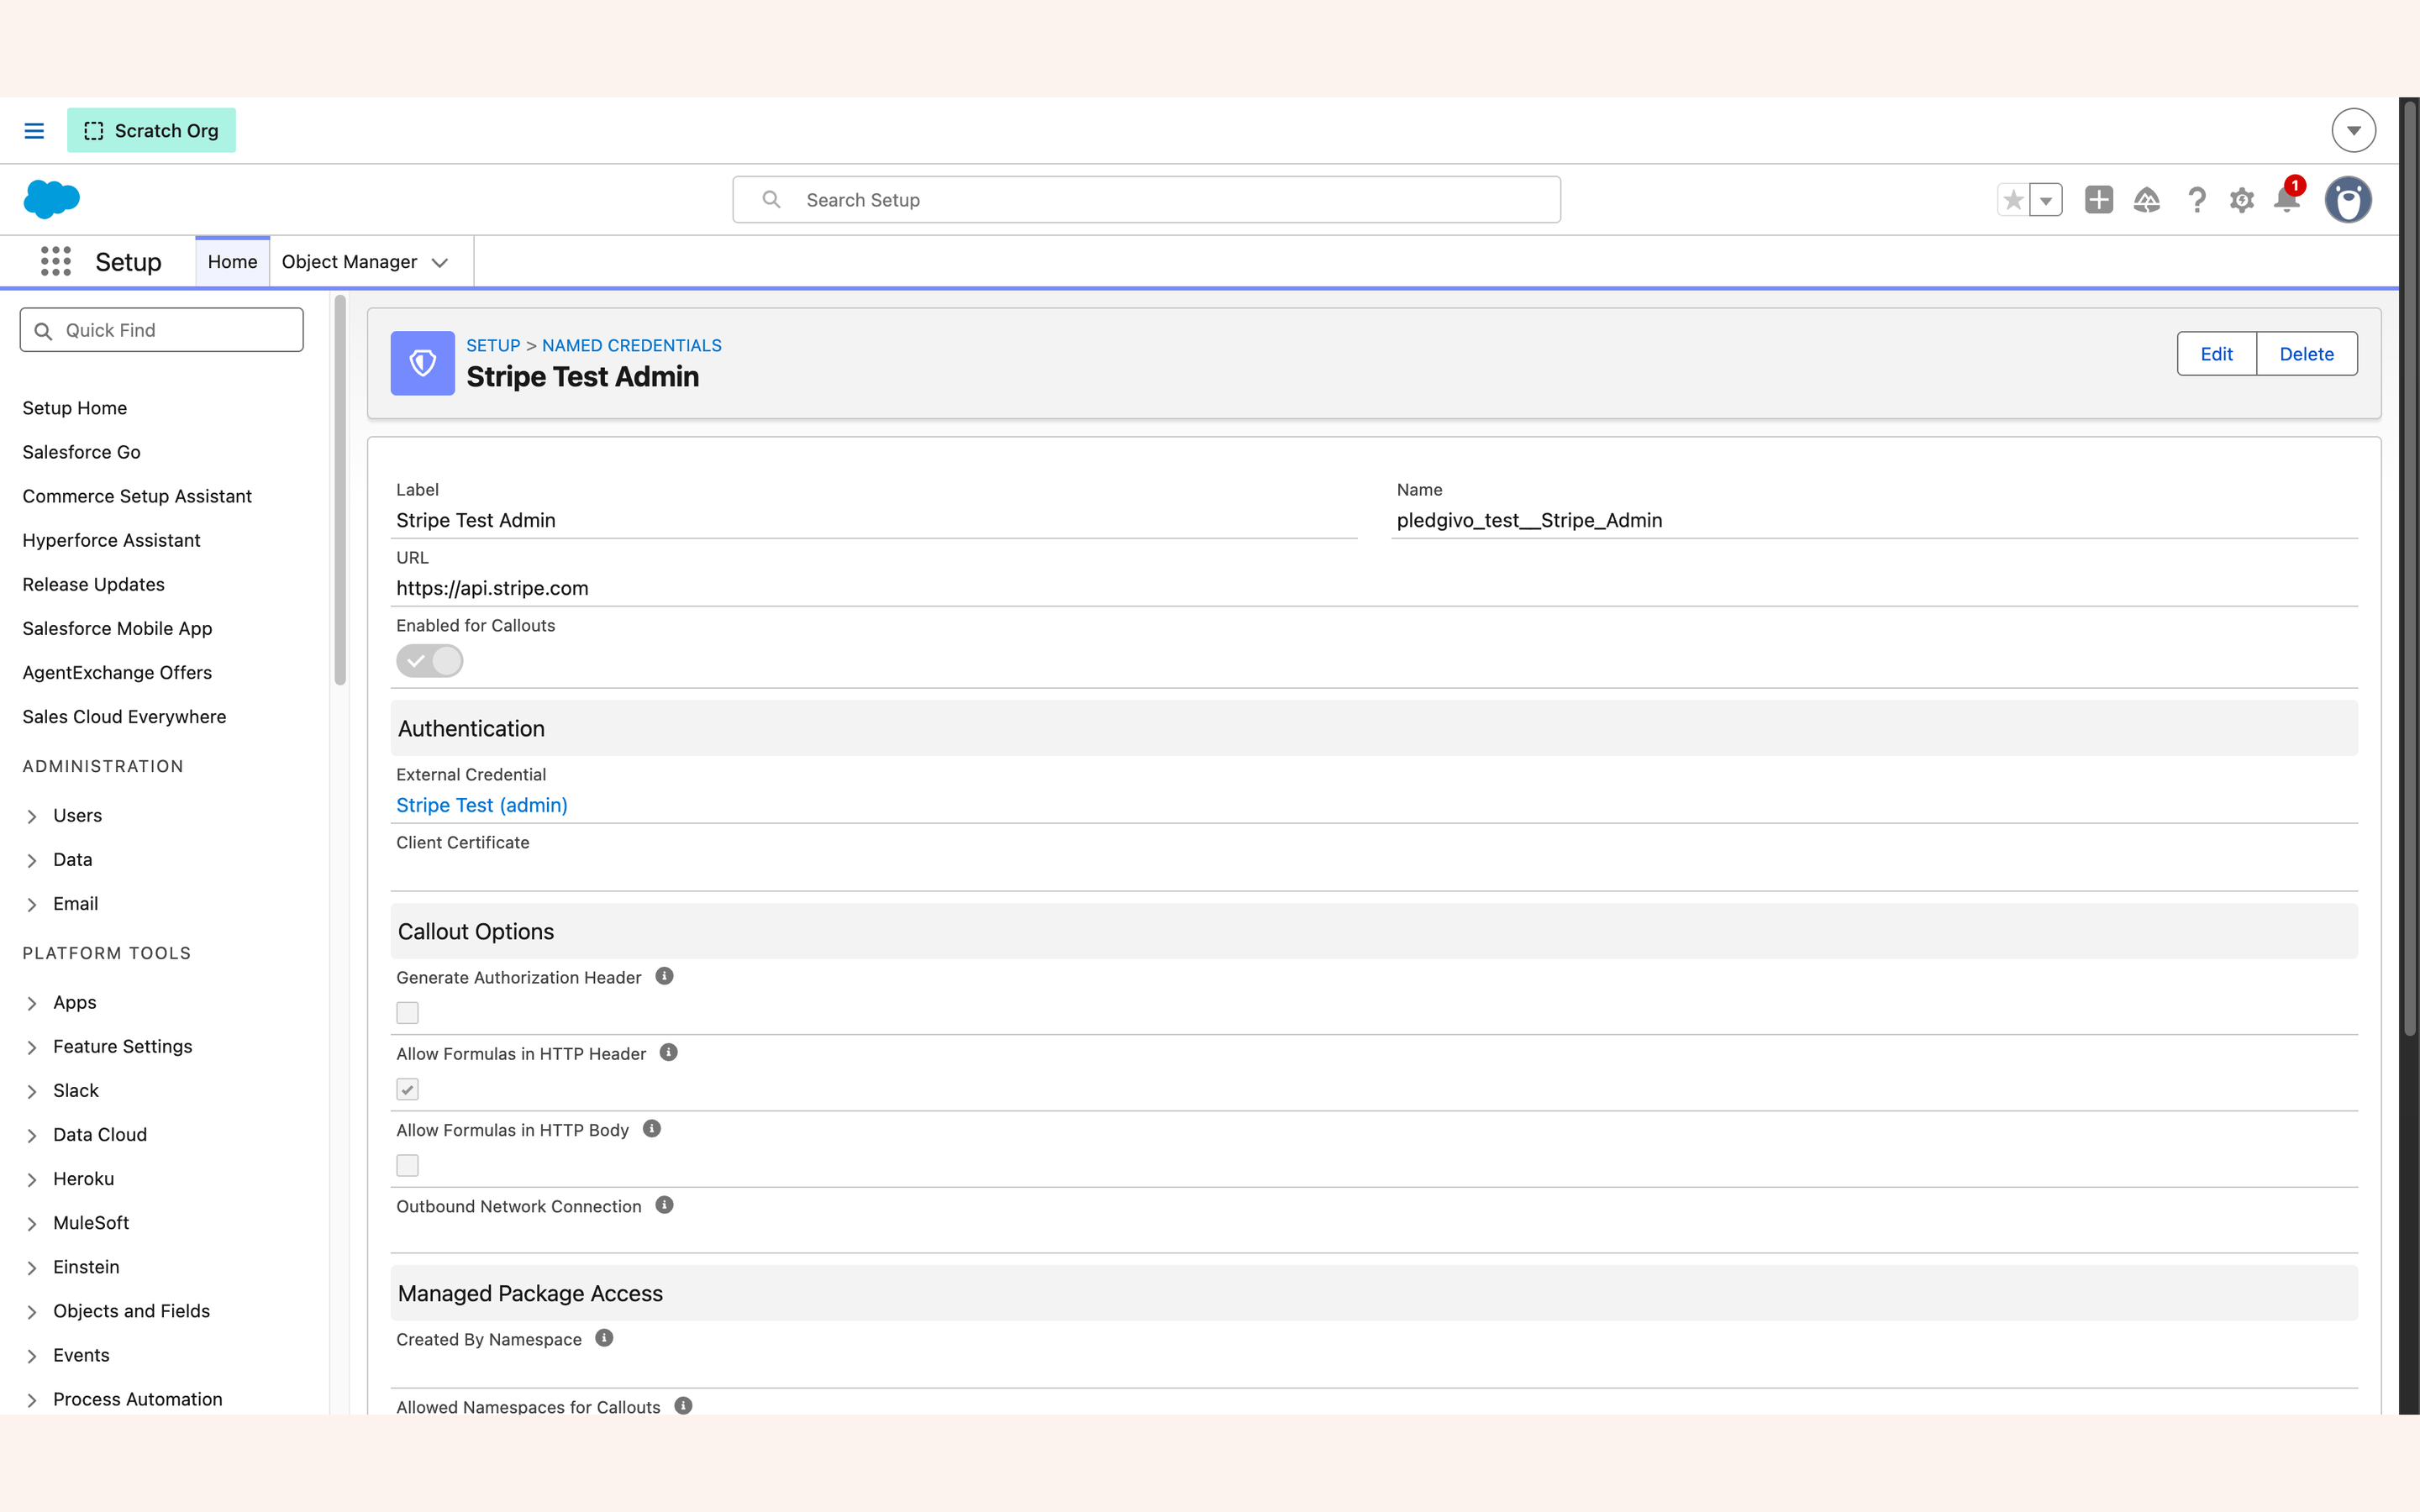
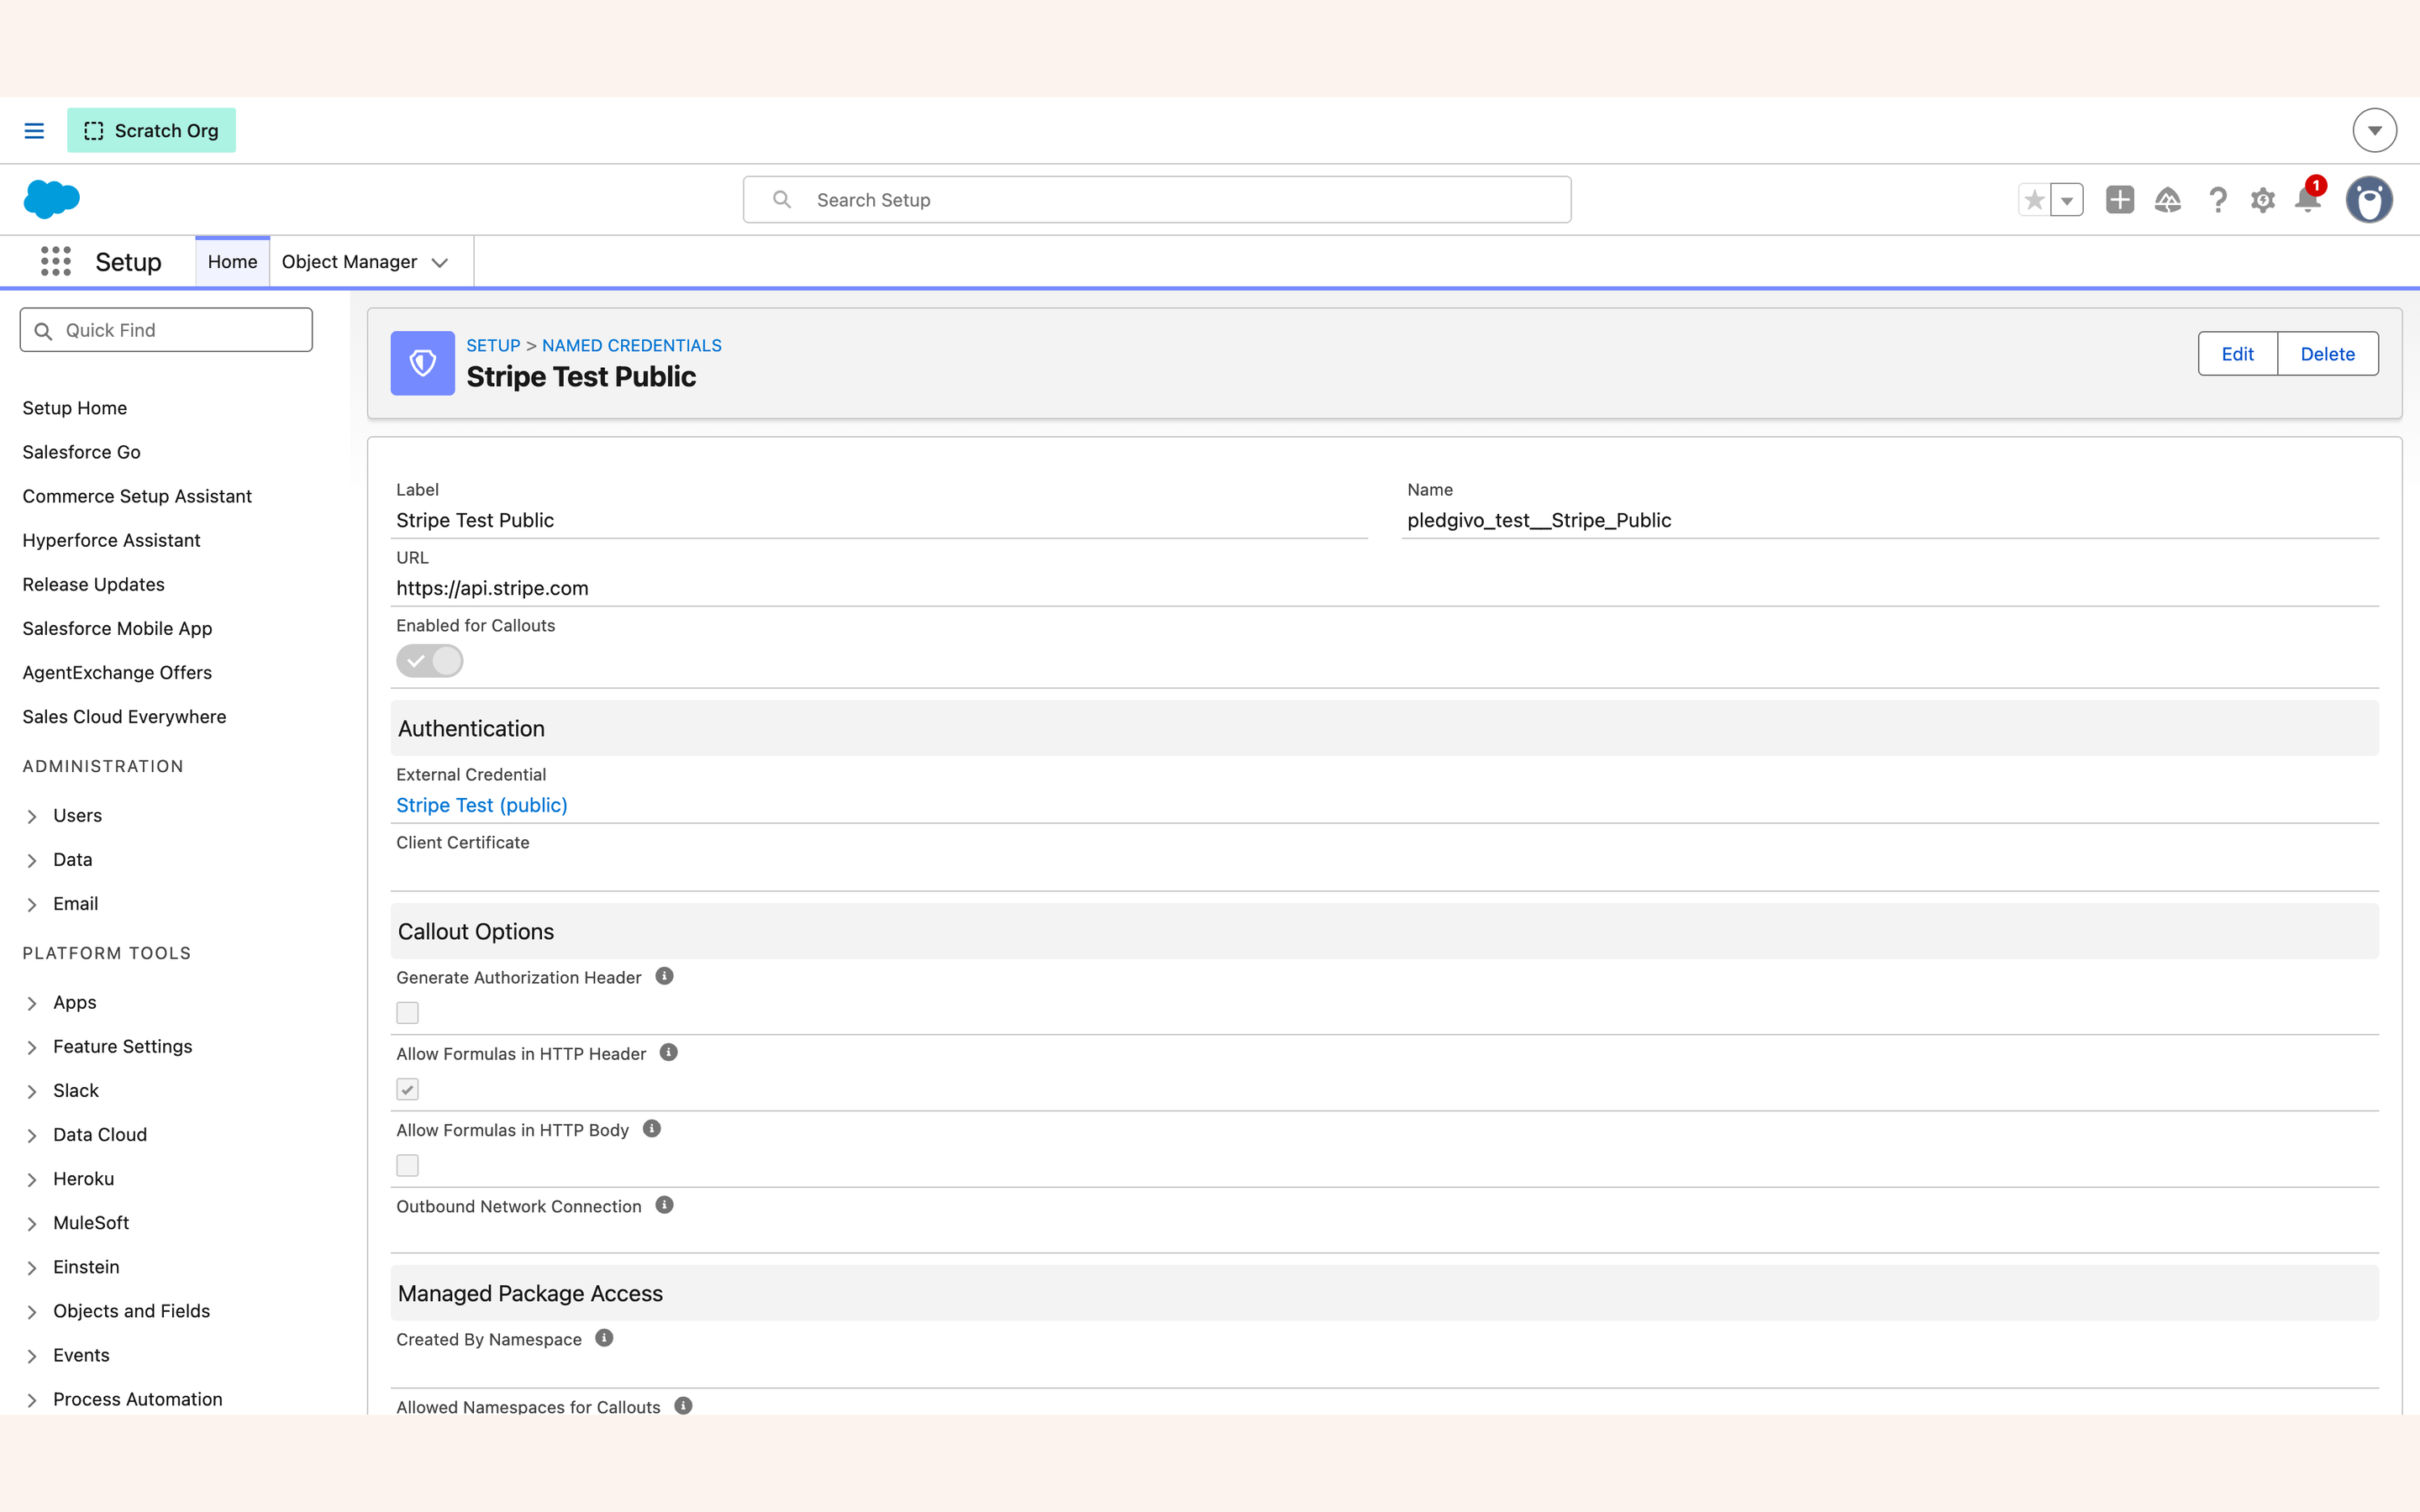
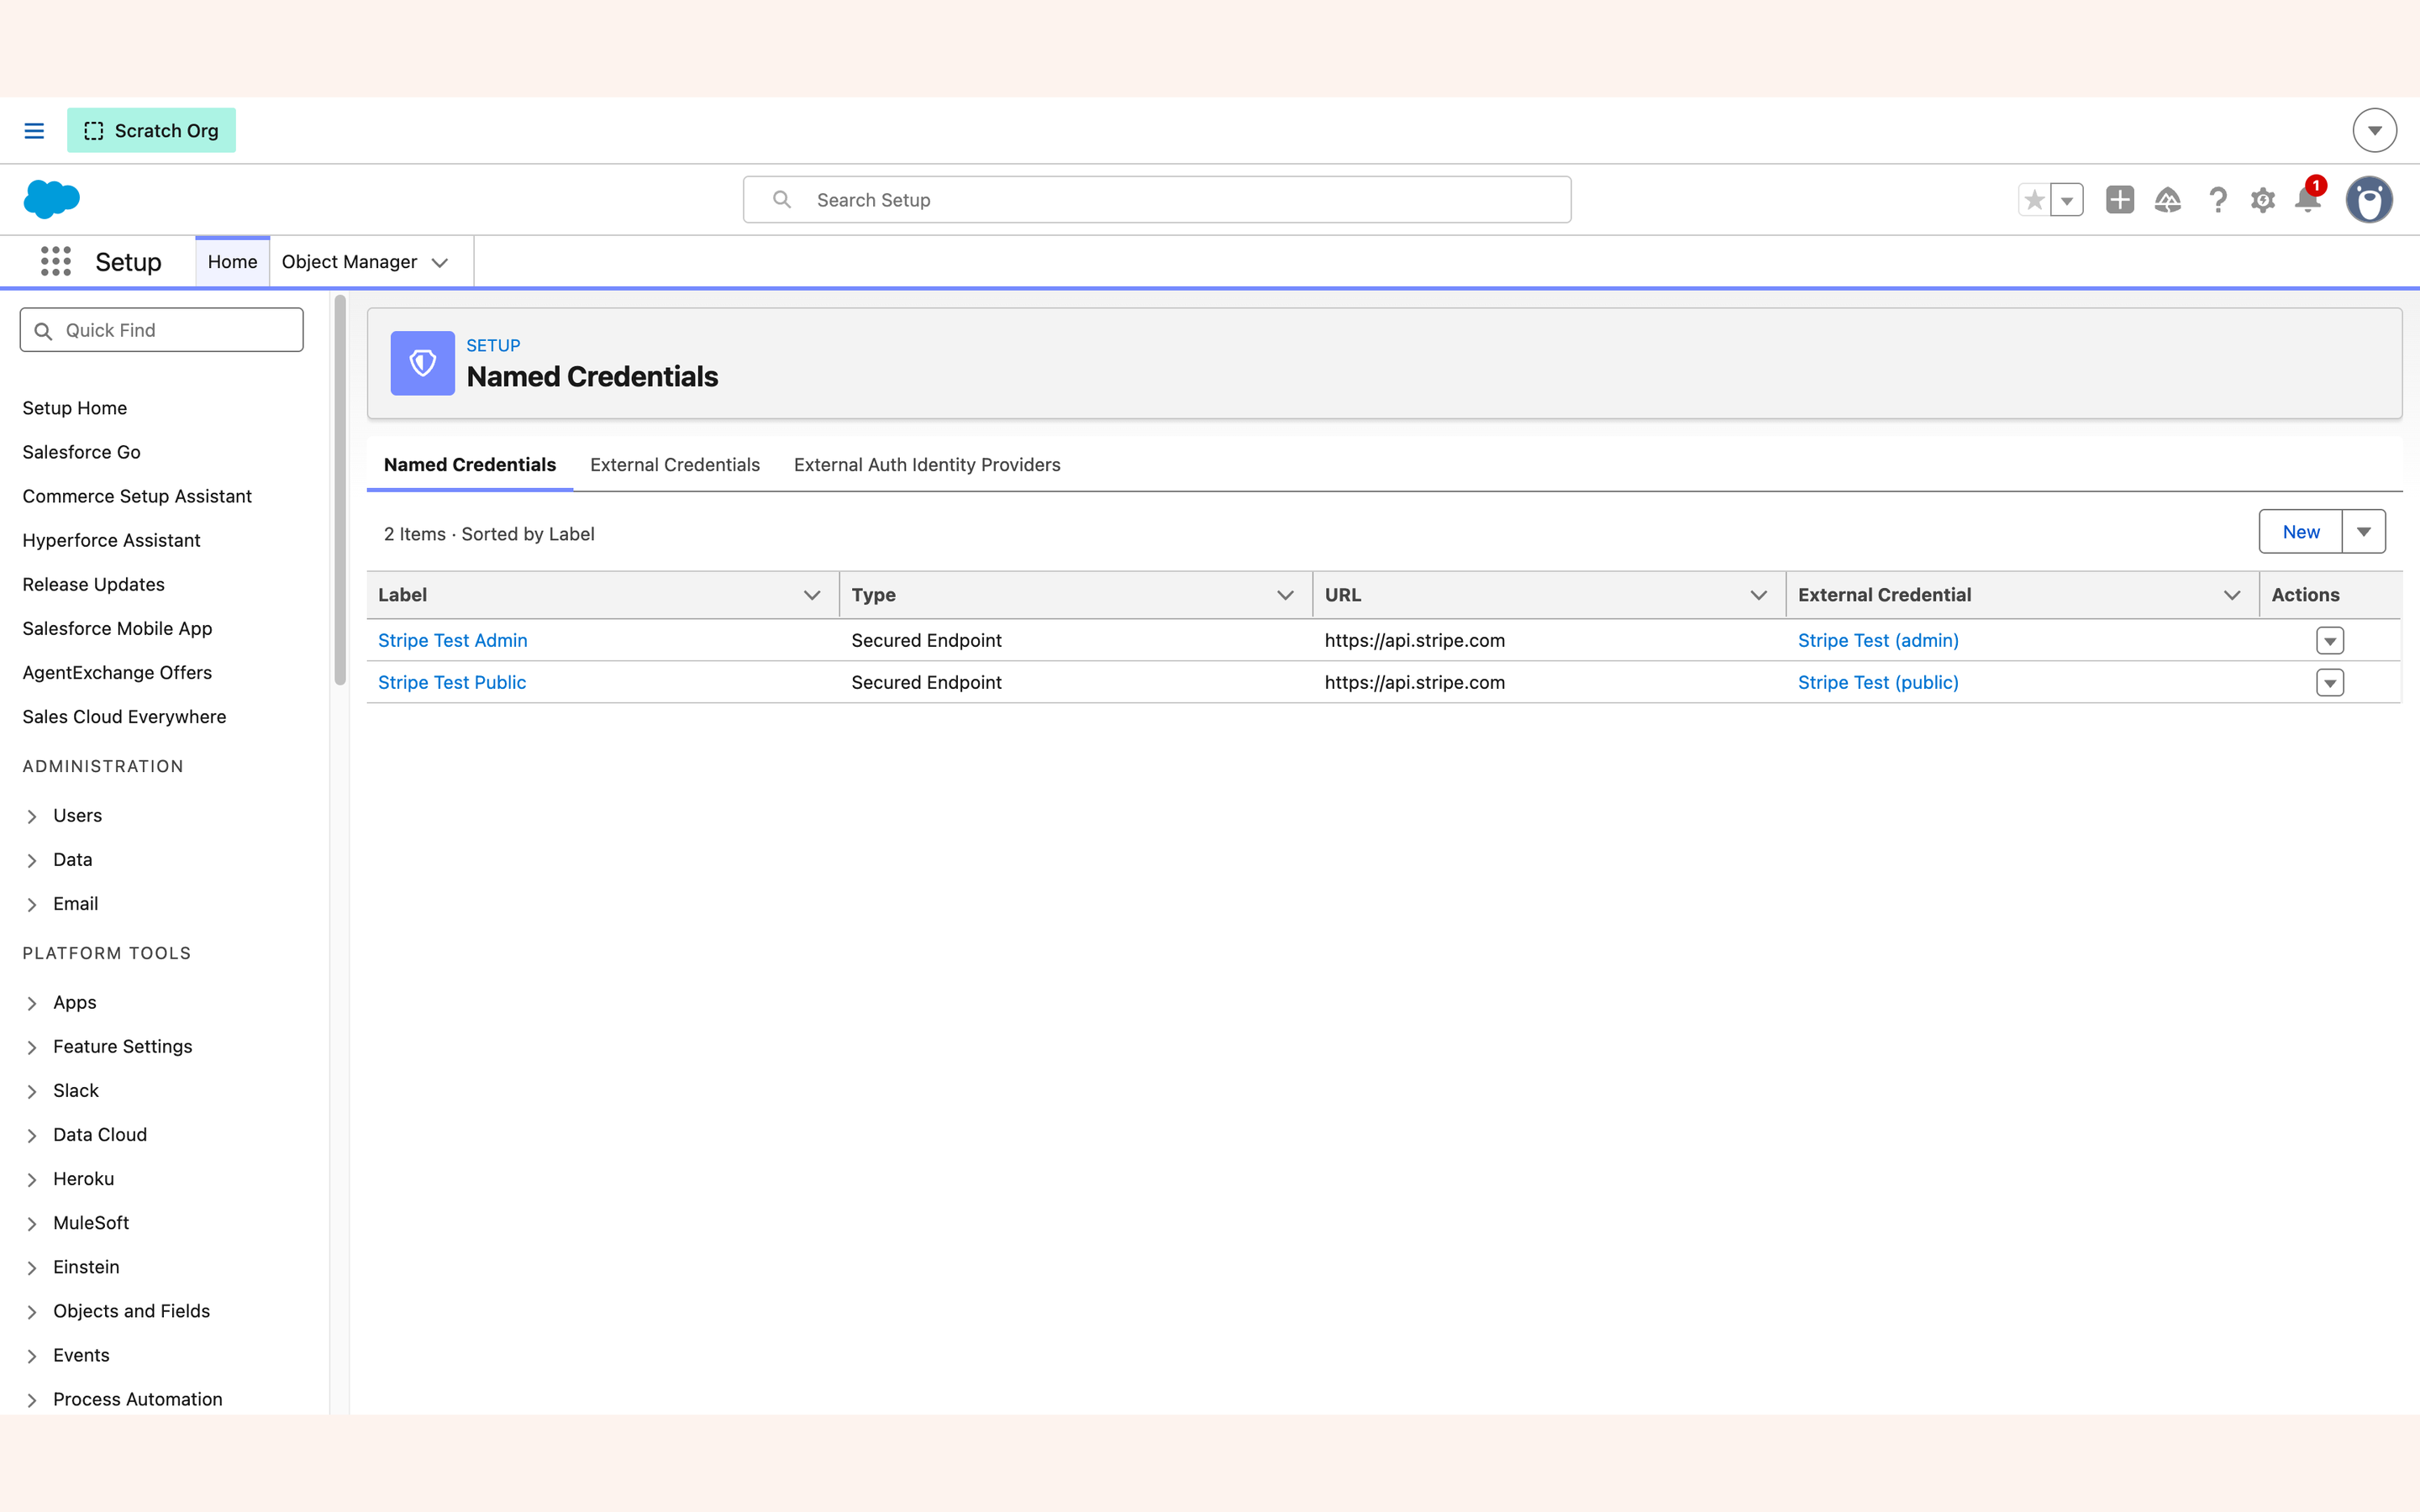
https://api.stripe.com. This is the finished state of stage 2 — and the state that unlocks the Add account button back in the console.6. Grant the credential#
Get Started step 5 · Payments stage 3
This is the step that catches people out. A credential nobody is granted is a credential nobody can use — including the staff who issue refunds from a donation record. And granting it to your site's guest user widens what an anonymous visitor can reach, so it stays your decision. The package never makes it for you.
Public donations fail at the payment step until you do this. Everything else on the page works, which is exactly what makes it easy to miss.
Why the permission set can't be part of the package
Salesforce does not allow a managed permission set to grant access to an external credential
principal — the API rejects it outright. That is why these sets have to be ones you create in
your own org, and why Fundraising_Admin can never ship with the grant on it.
Build two permission sets, because two audiences hold them — not one per credential. The
site set carries the donor credential's principal and goes to your site guest user and to
staff who take payments; its License must stay --None--, because a set with a license on it
cannot be assigned to a guest user. The admin set carries the admin credential's principal and
goes to staff who issue refunds and to every user who owns a scheduled job, and never to the guest
user. Name these sets whatever you like — the app never looks for them by name; it
discovers which of your permission sets carries the grant and reports it back to you. Something
like Fundraising_Site_Guest_Access / Fundraising_Payments_Admin will read better in six months
than anything generic:
- Setup → Permission Sets → New. Set License as above — the site set must stay
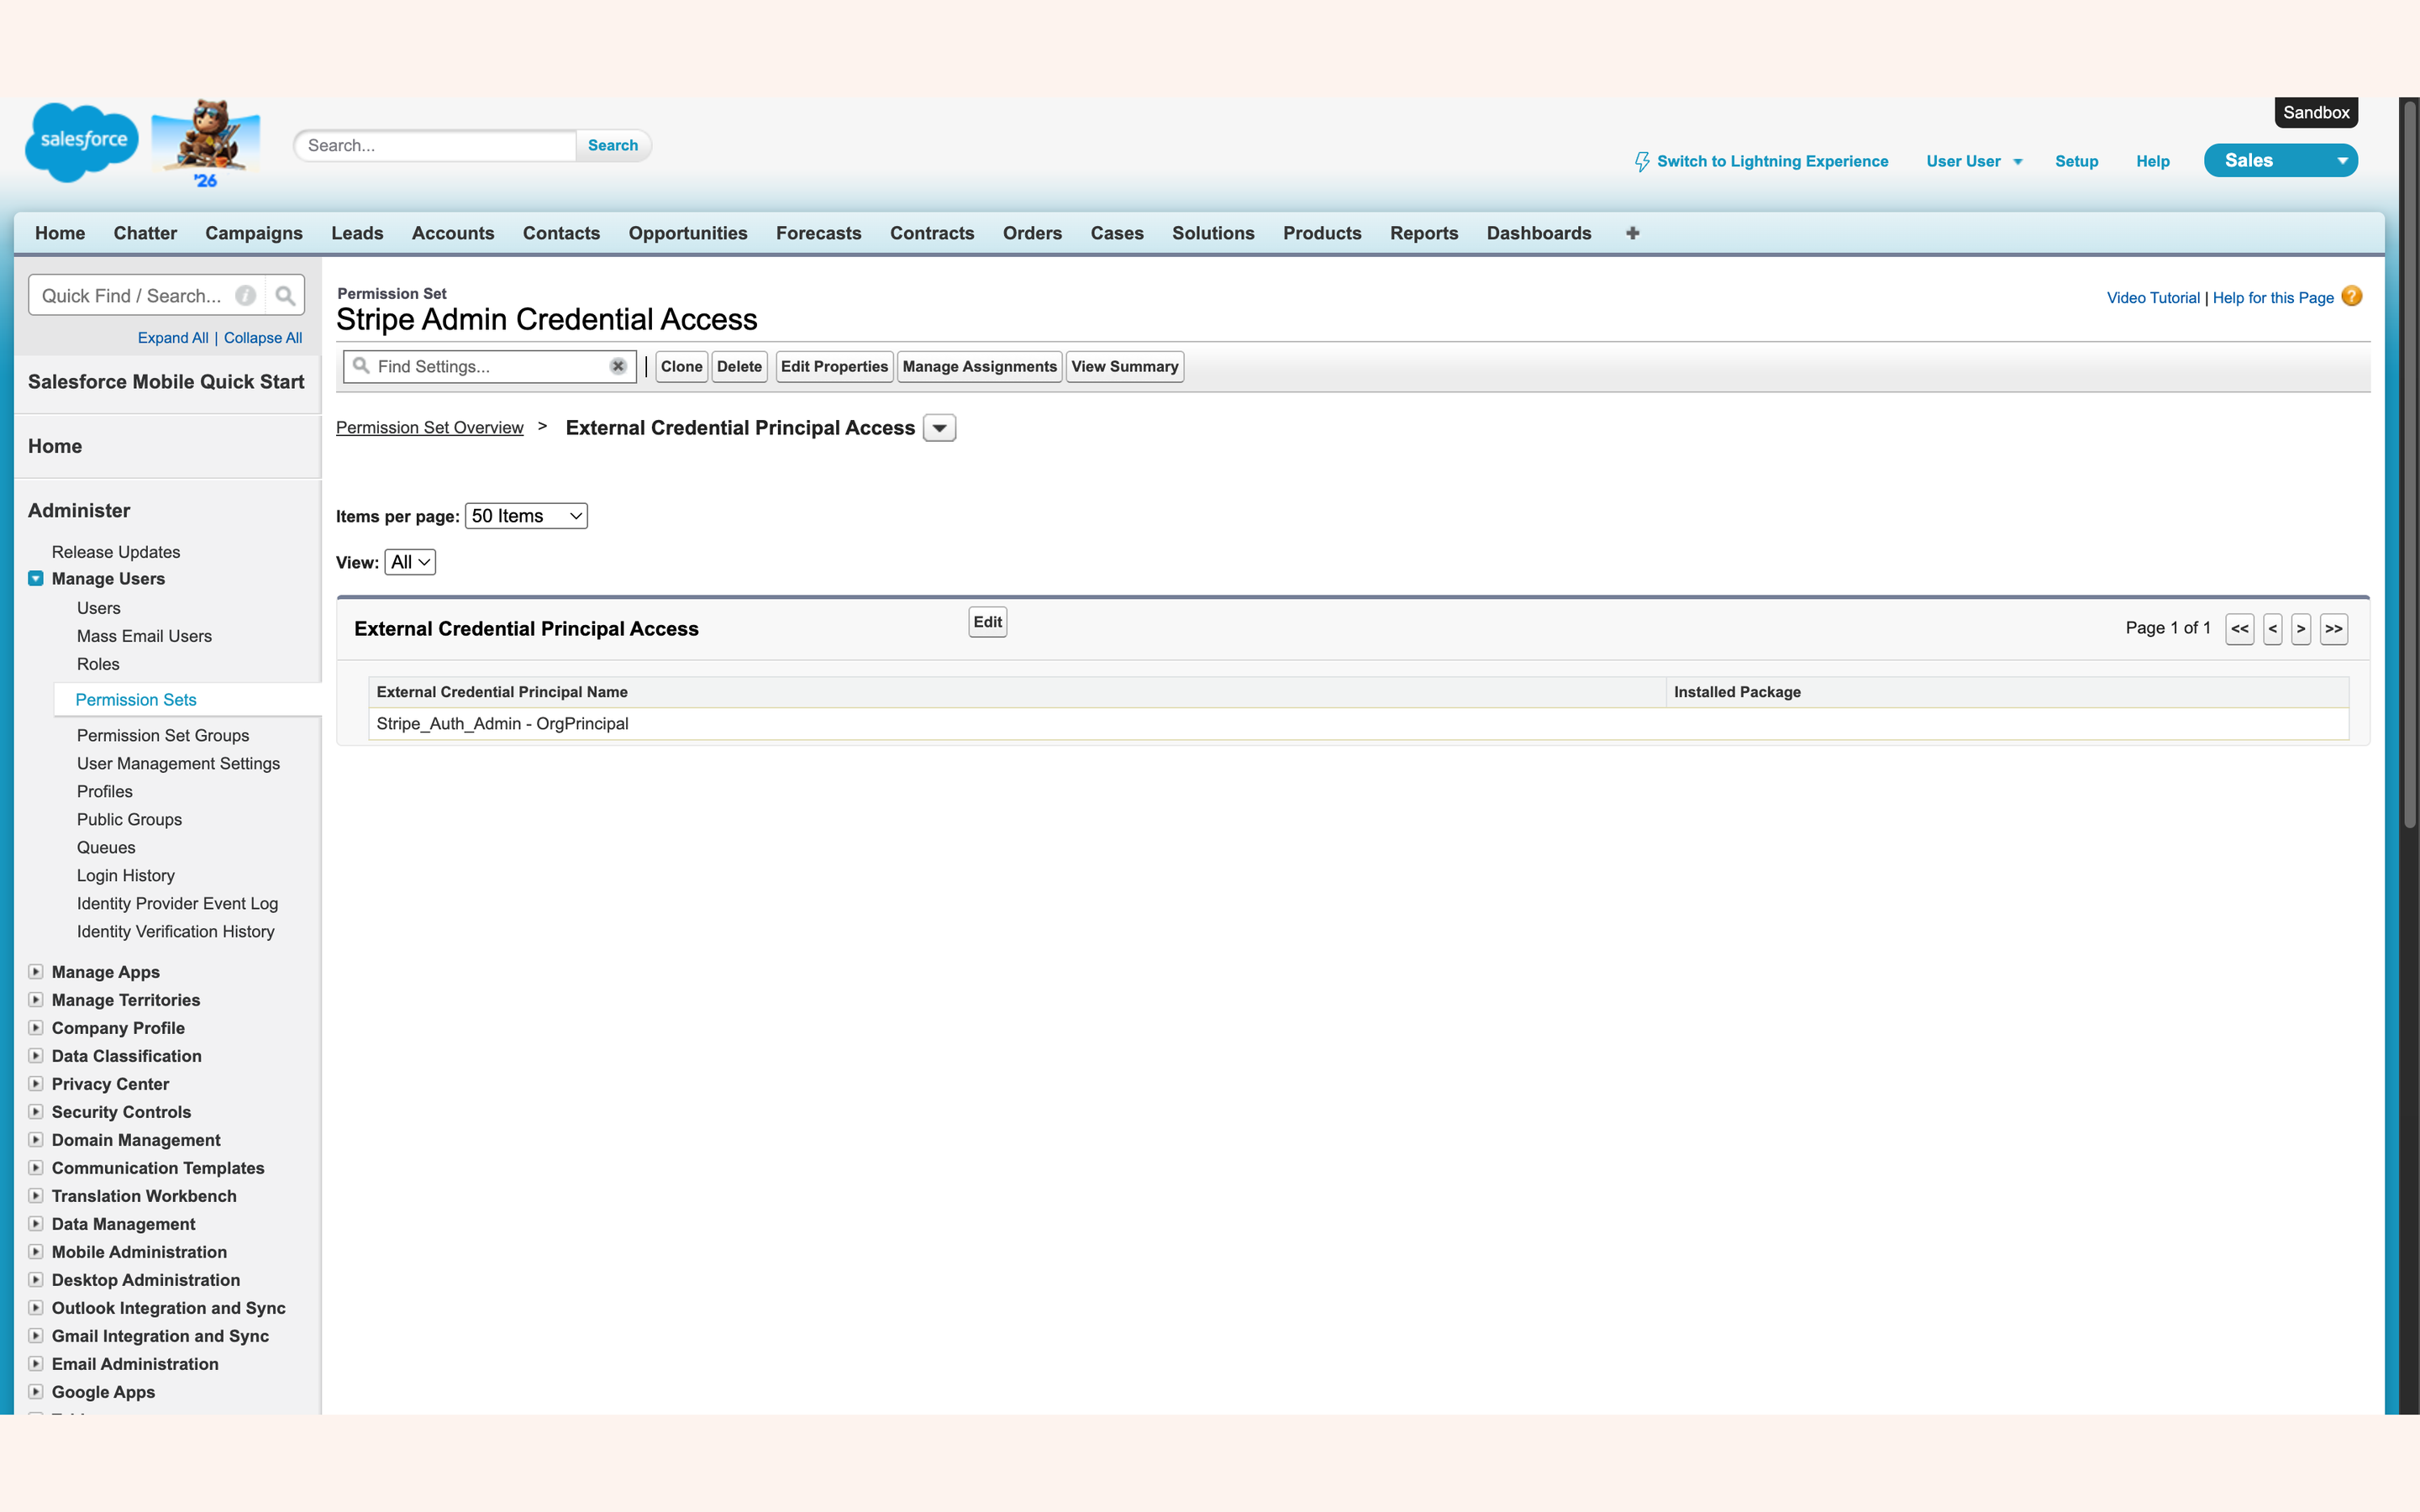
--None--, the admin set can be Any. - On the set: Apps → External Credential Principal Access → Edit.
- Enable the entry for that set's credential principal — it reads like
Stripe_Auth_Donor_Restricted - OrgPrincipalon the site set, or whatever you named yours → Save. - On the same set: Object Settings → User External Credentials → Edit, tick Read and Create → Save.
- Manage Assignments → site set: add anyone who takes payments. Admin set: add anyone who issues refunds and every user who owns a scheduled job — a job authenticates as its owner, so a reconciler scheduled by someone without the set fails quietly.
- Assign the site set — and only the site set — to the site guest user, via the Public Access Settings route.
Step 4 is not optional, and it is a different page from step 3
A credential callout needs two grants: the principal (step 3) and Read + Create on the standard User External Credential object (step 4). Miss the second and the donation fails at exactly the same point as missing the first — the donor sees a generic apology and the real error only appears in Diagnostic Logs:
You don't have read permissions on the User External Credential object.
The package ships this grant in its own permission set, and Salesforce strips it during packaging: a managed permission set cannot carry standard-object permissions, and the build reports success anyway. That is why it has to be yours. All three places in the Settings console that grade this step check for it — Get Started step 5, the Payments panel's Let your public site use the credential, and the Site & domain panel — and each names the object by name when it is missing, so none of them can show green on an org where donations still fail.
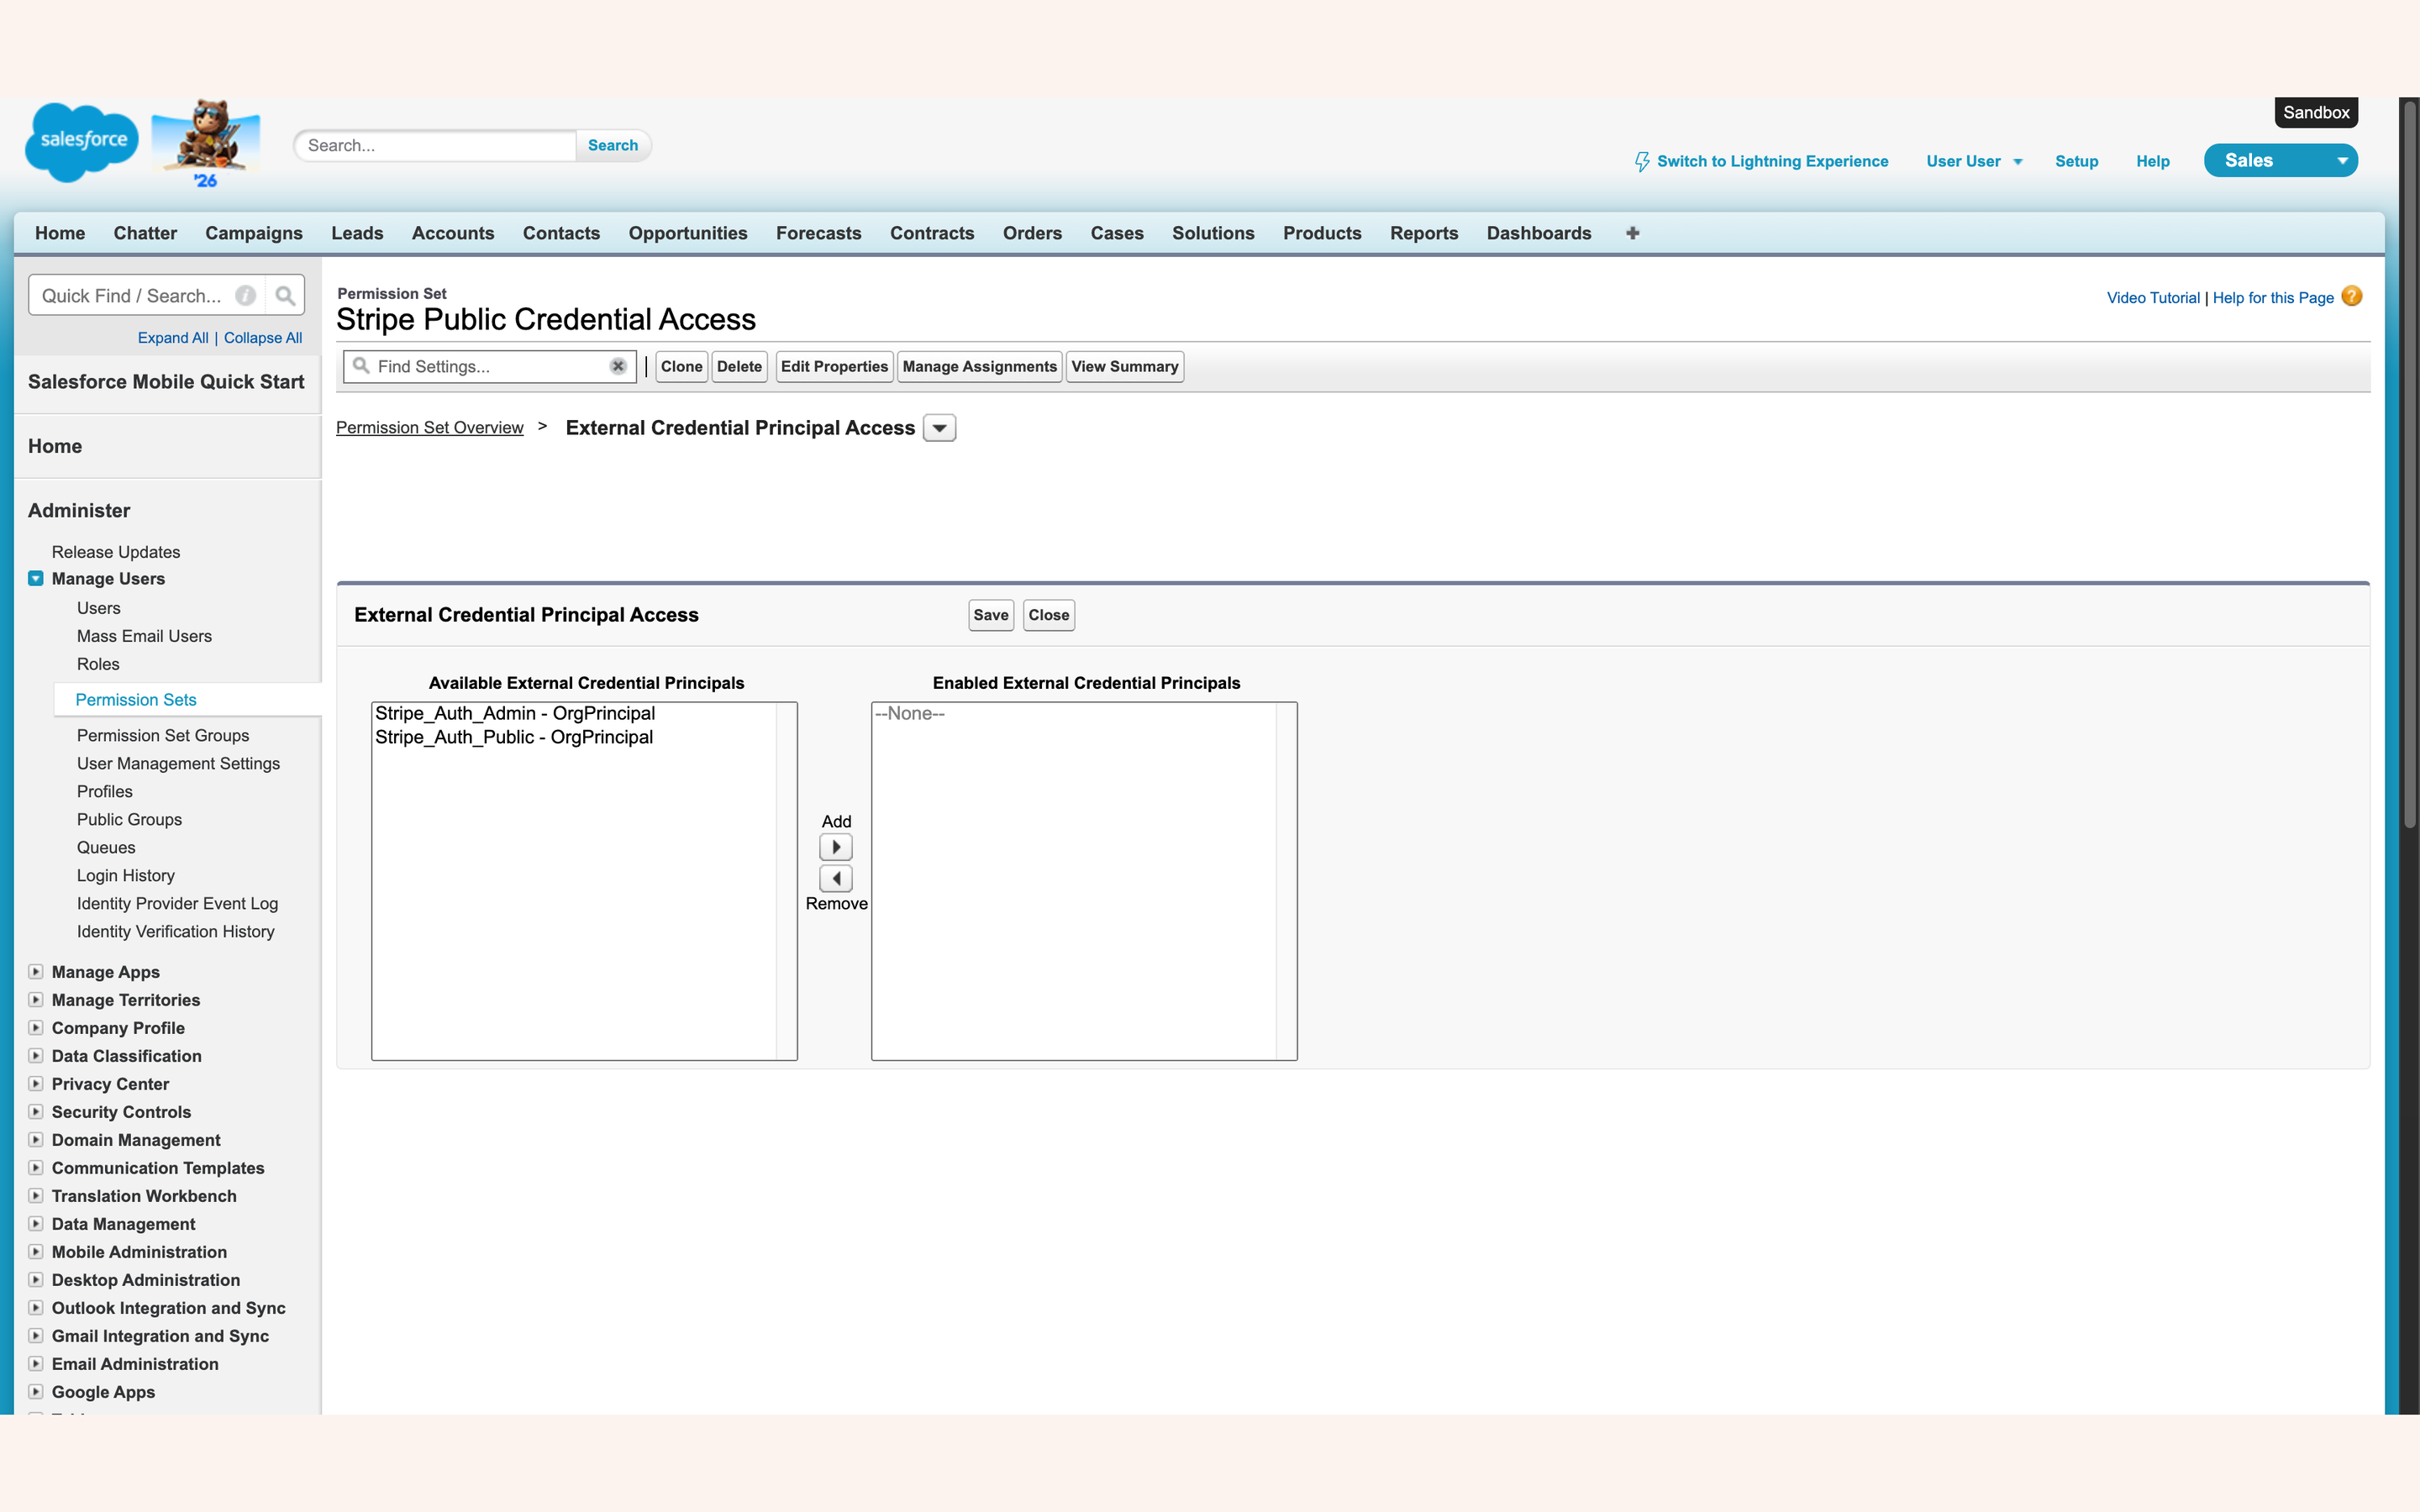
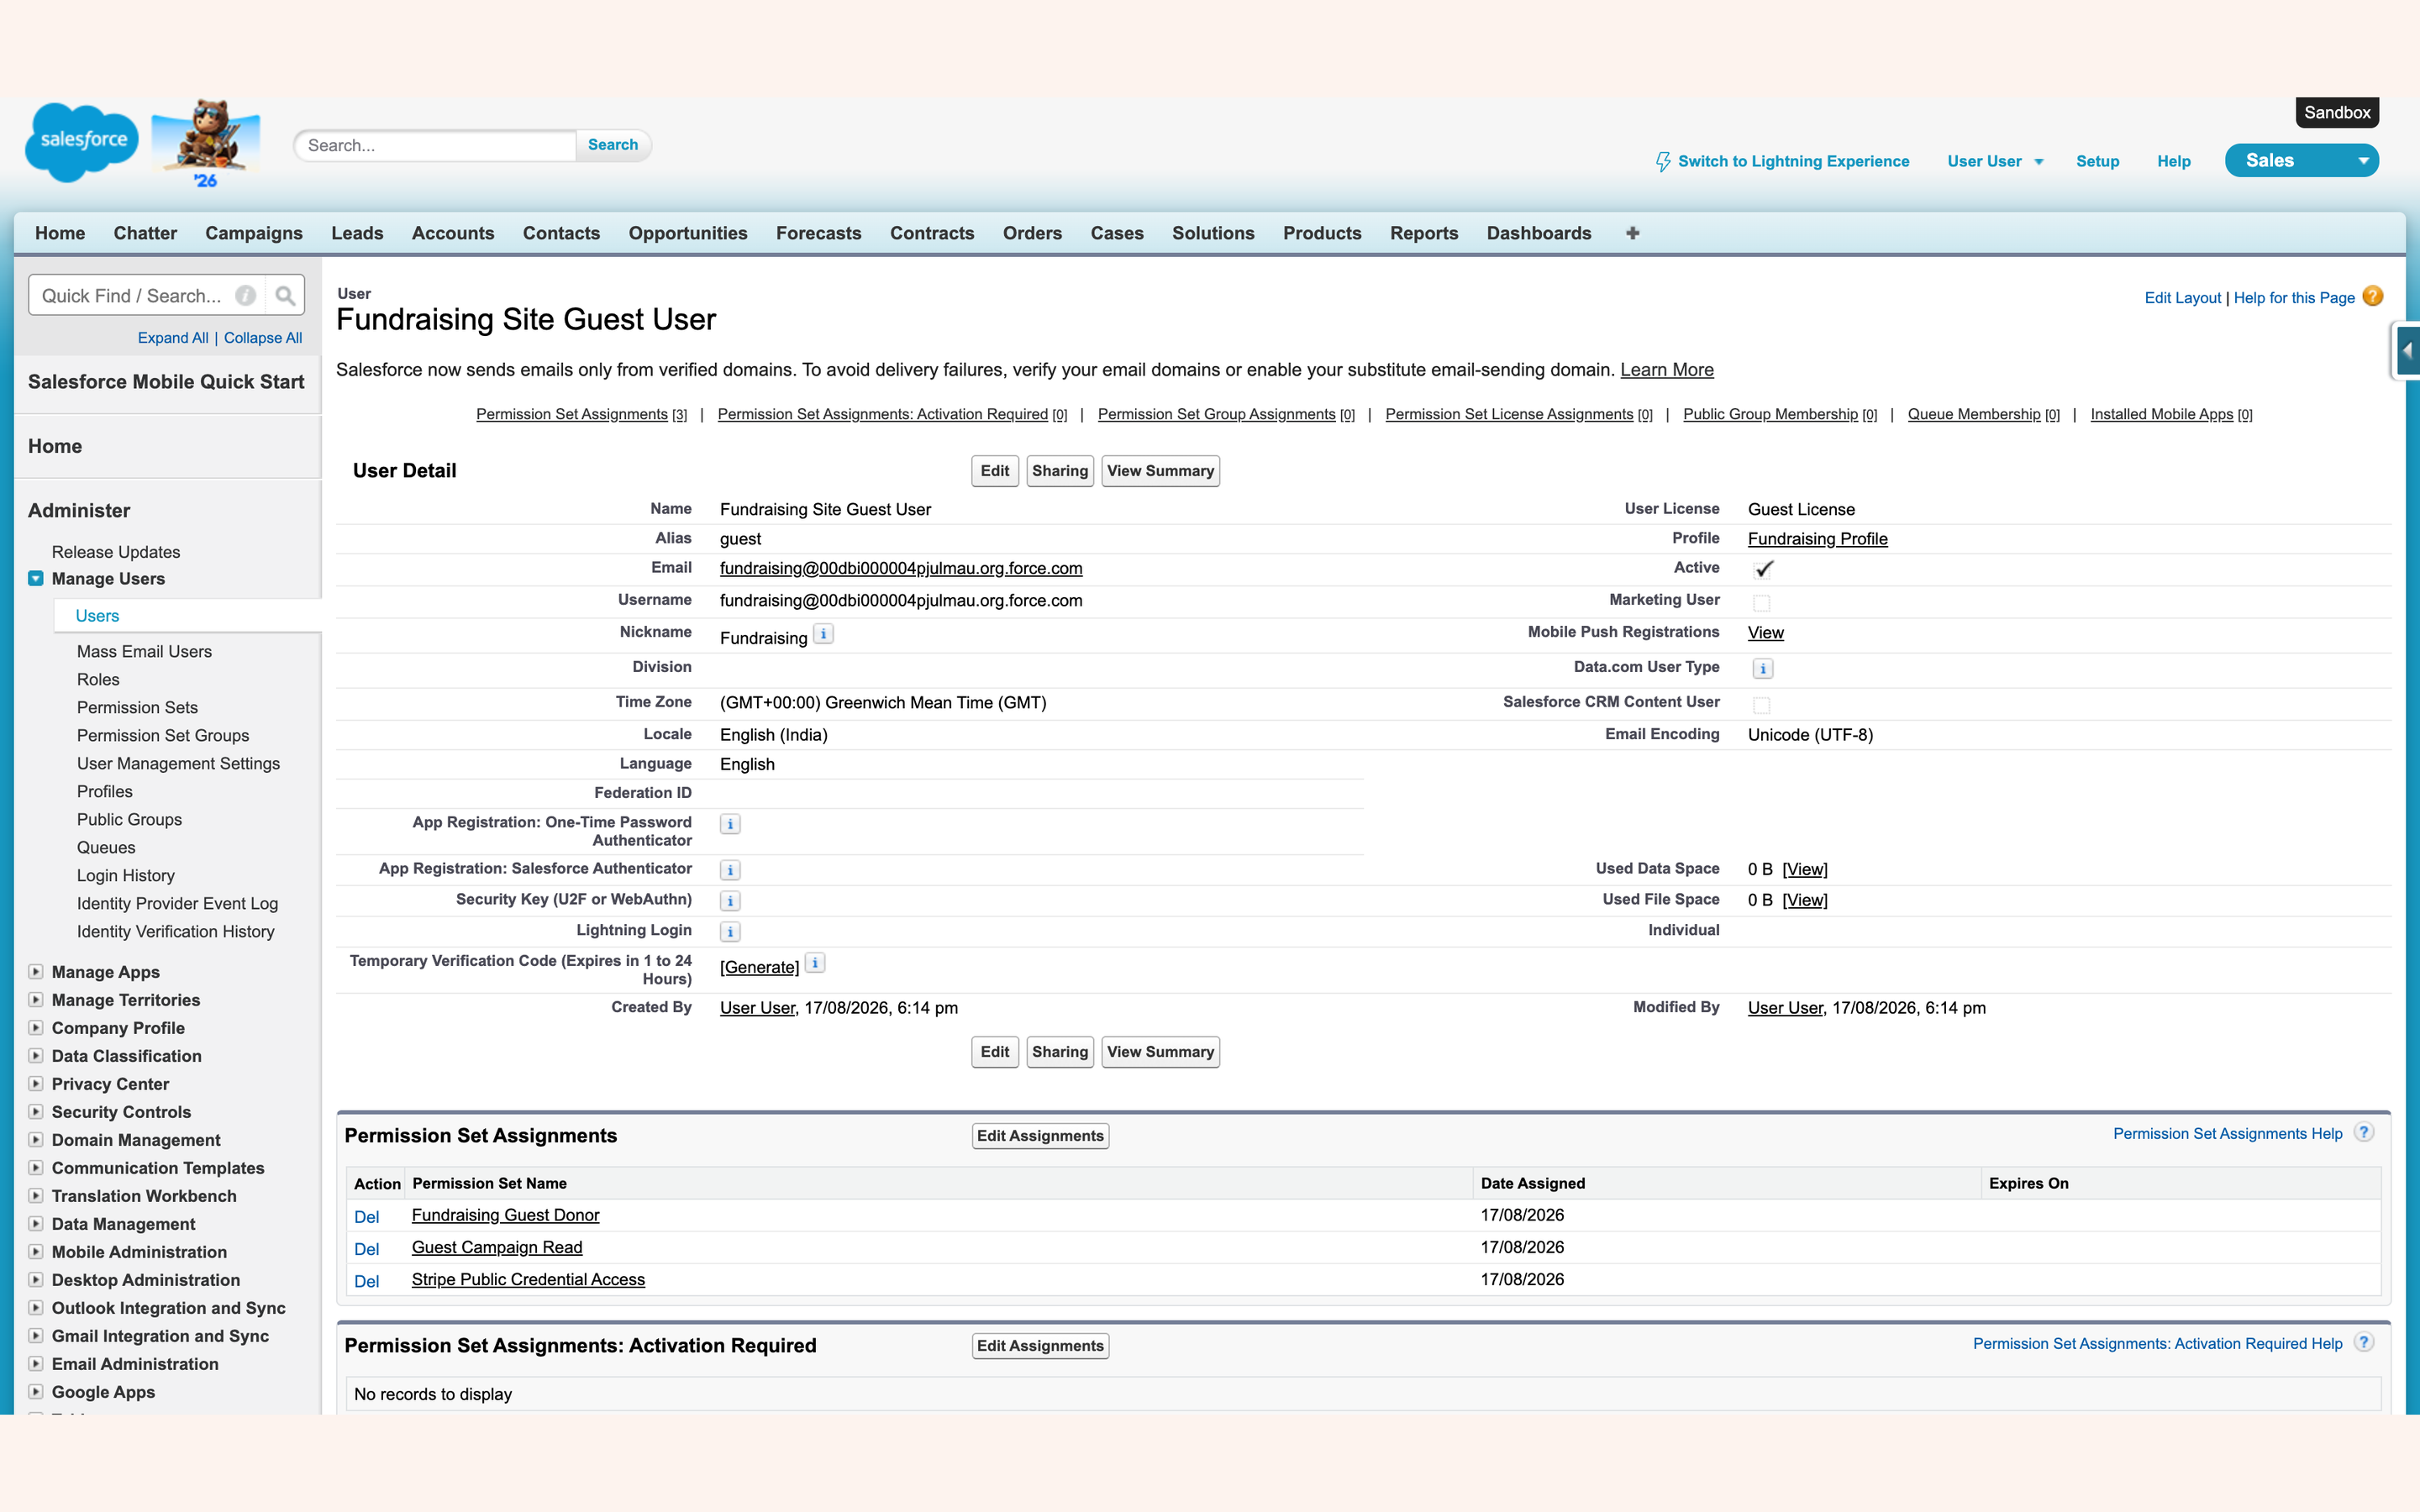
Don't forget the guest user — and don't give it the admin credential
Assigning to staff but not to the site guest user is the failure mode that looks healthiest: internal testing works and every public donation fails at payment.
The opposite mistake is worse and just as quiet. Putting the guest user on the set that grants the admin credential lets an anonymous visitor's session reach the back-office key, refunds included.
7. Add the payment account and prove it works#
Payments stage 4 — this is what closes Get Started step 4
A named credential is plumbing. The Payment Account record is what a campaign actually charges through, and it is the record every one of the ten checks is graded against. Until an active one exists, the donation form cannot take money and the guide cannot grade itself.
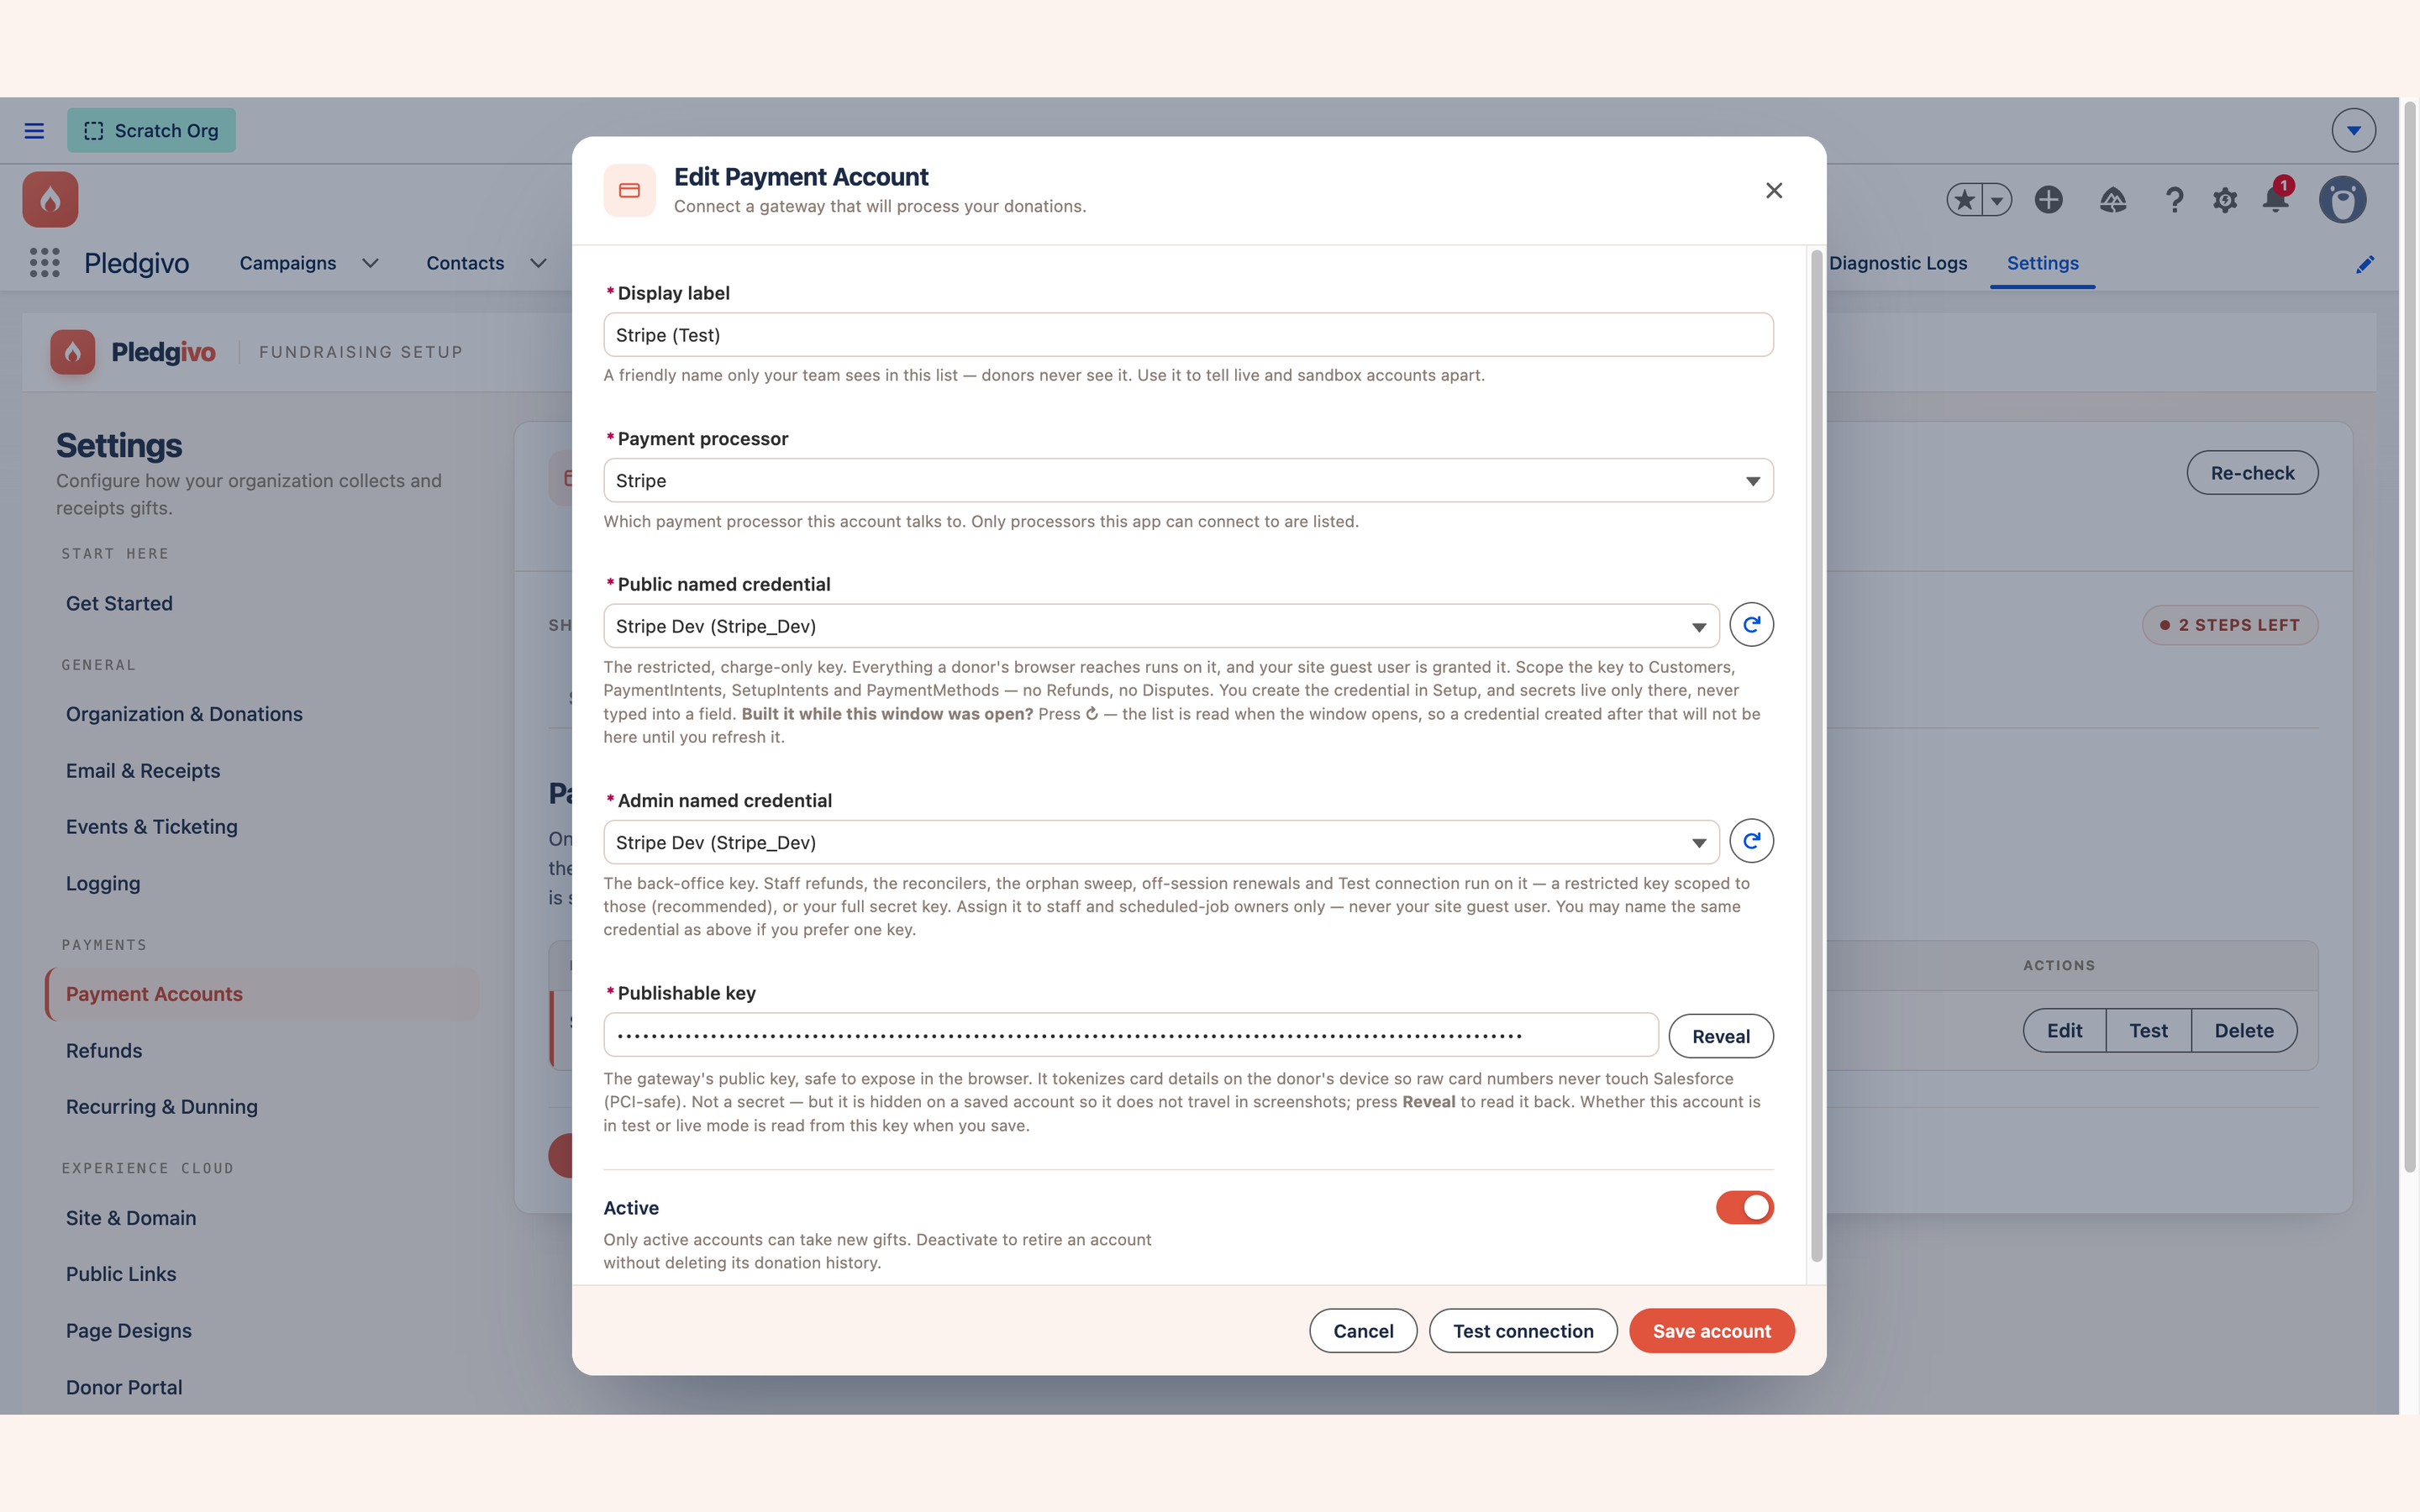
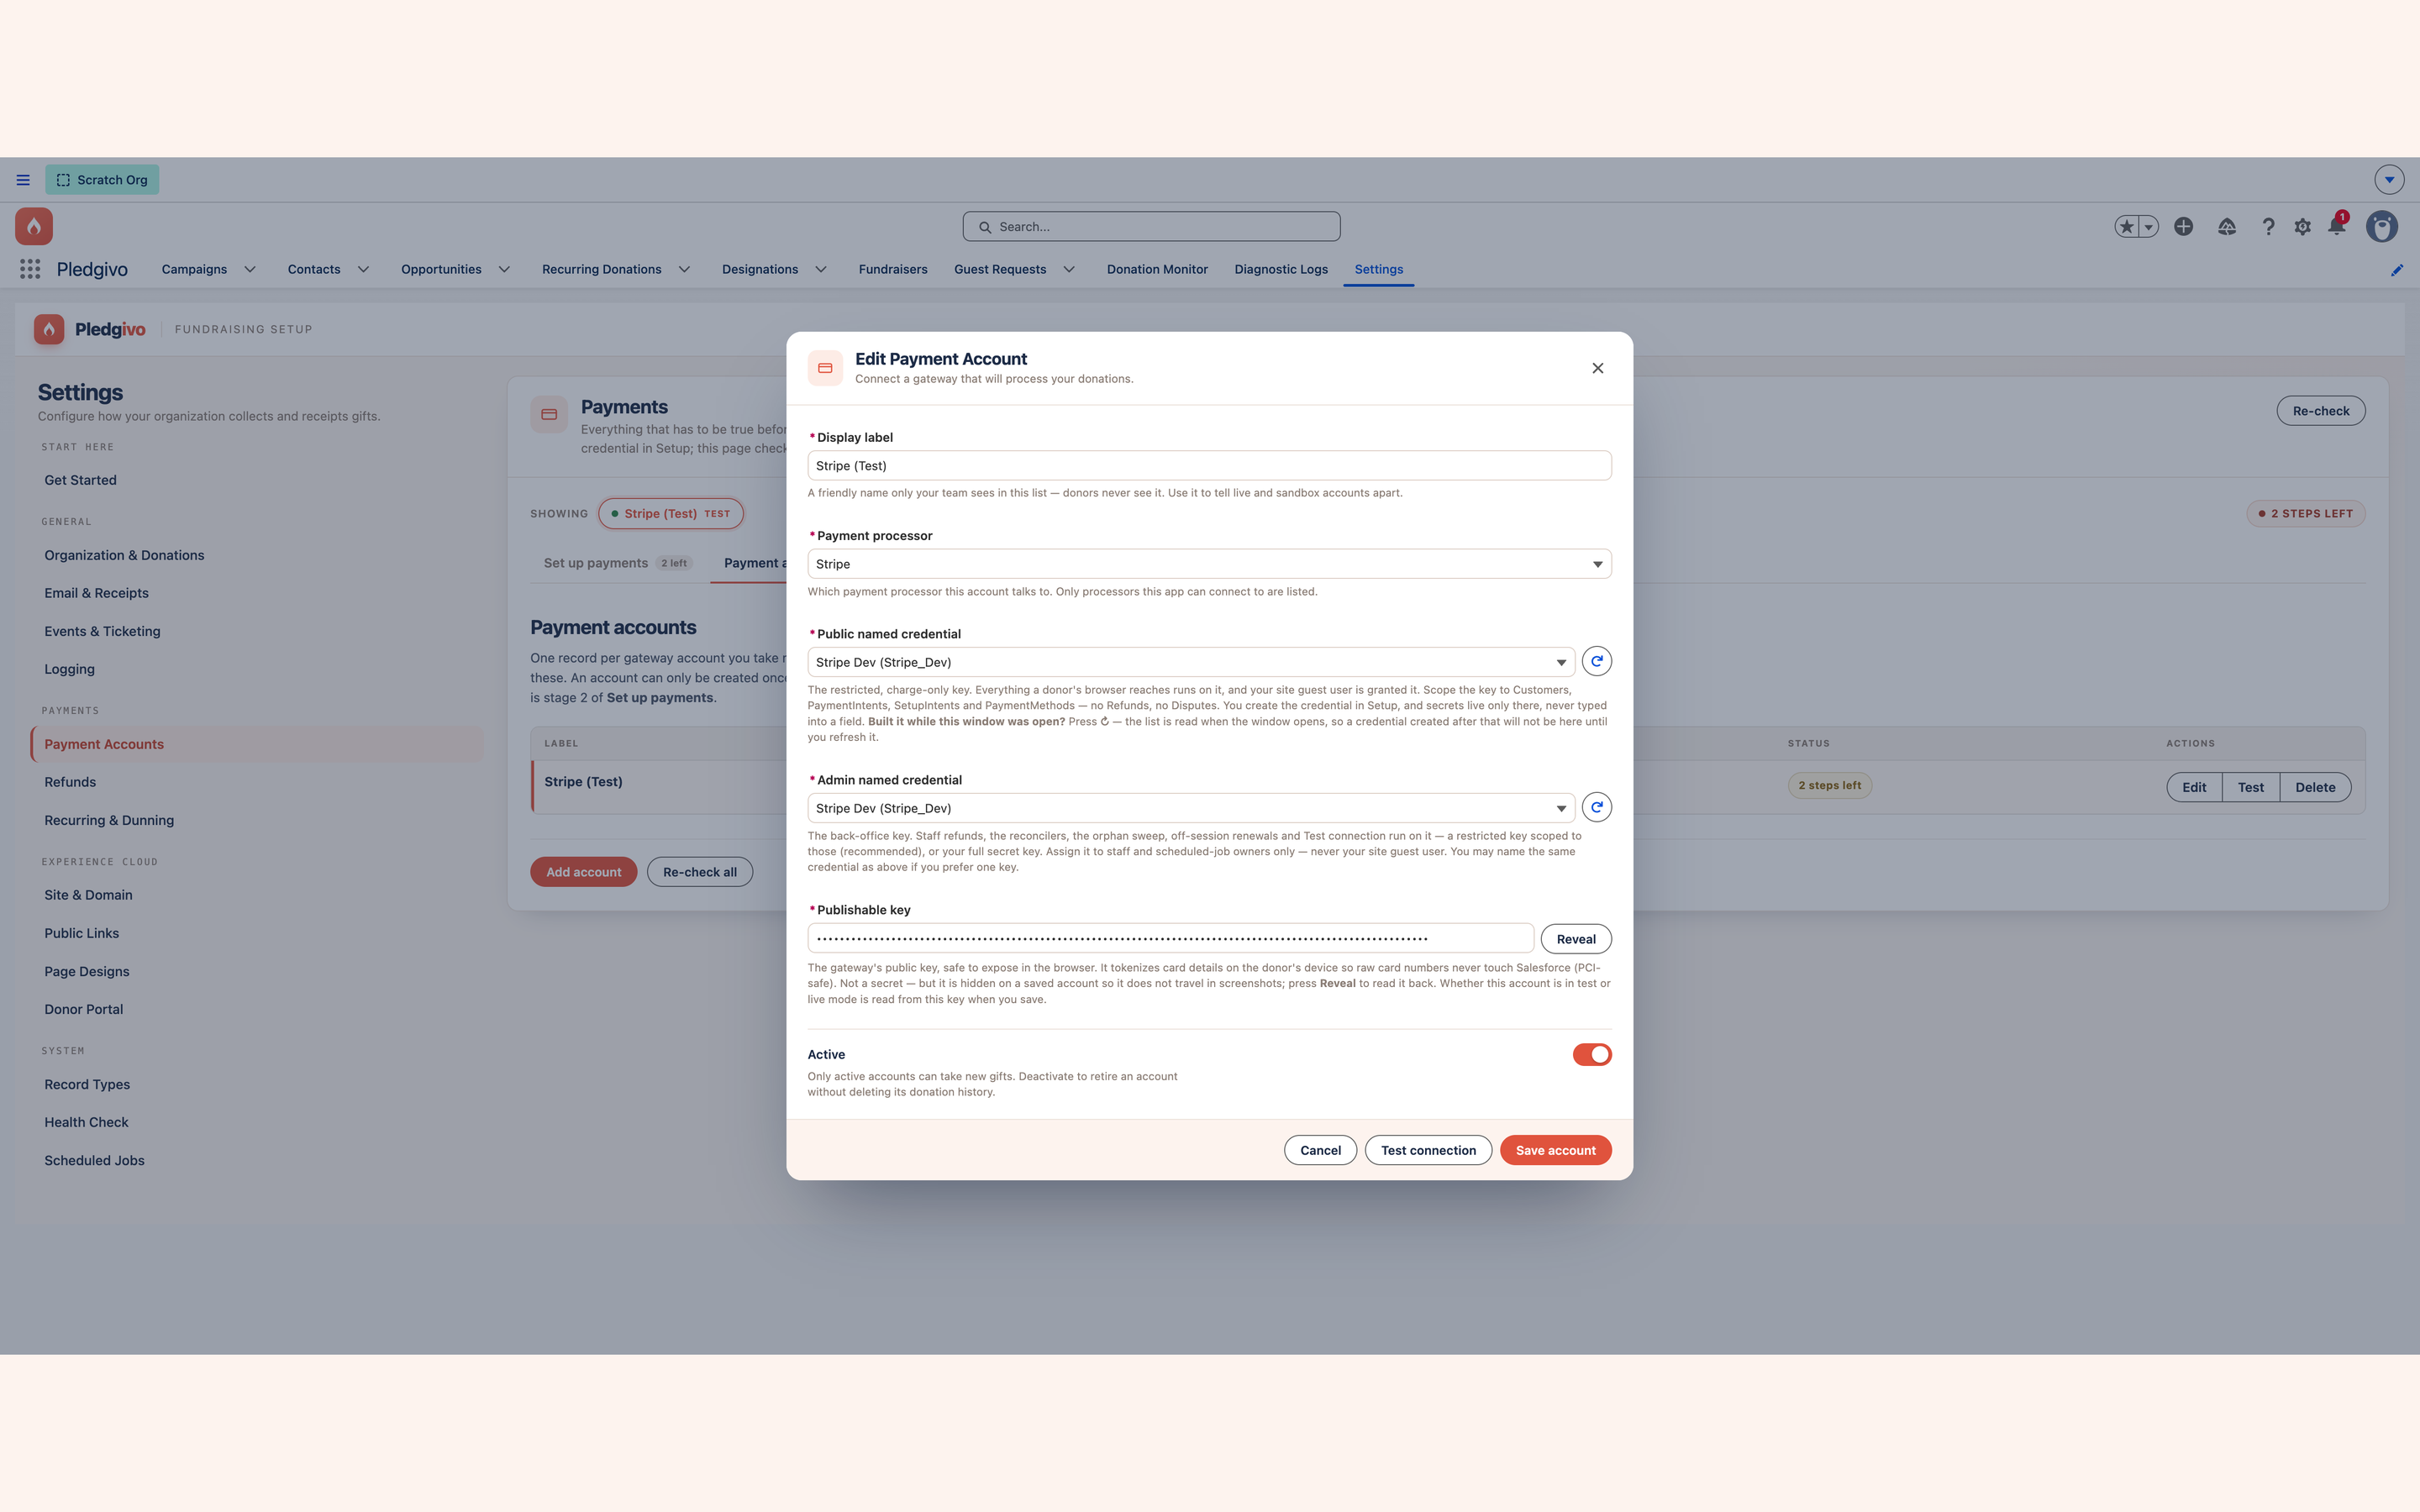
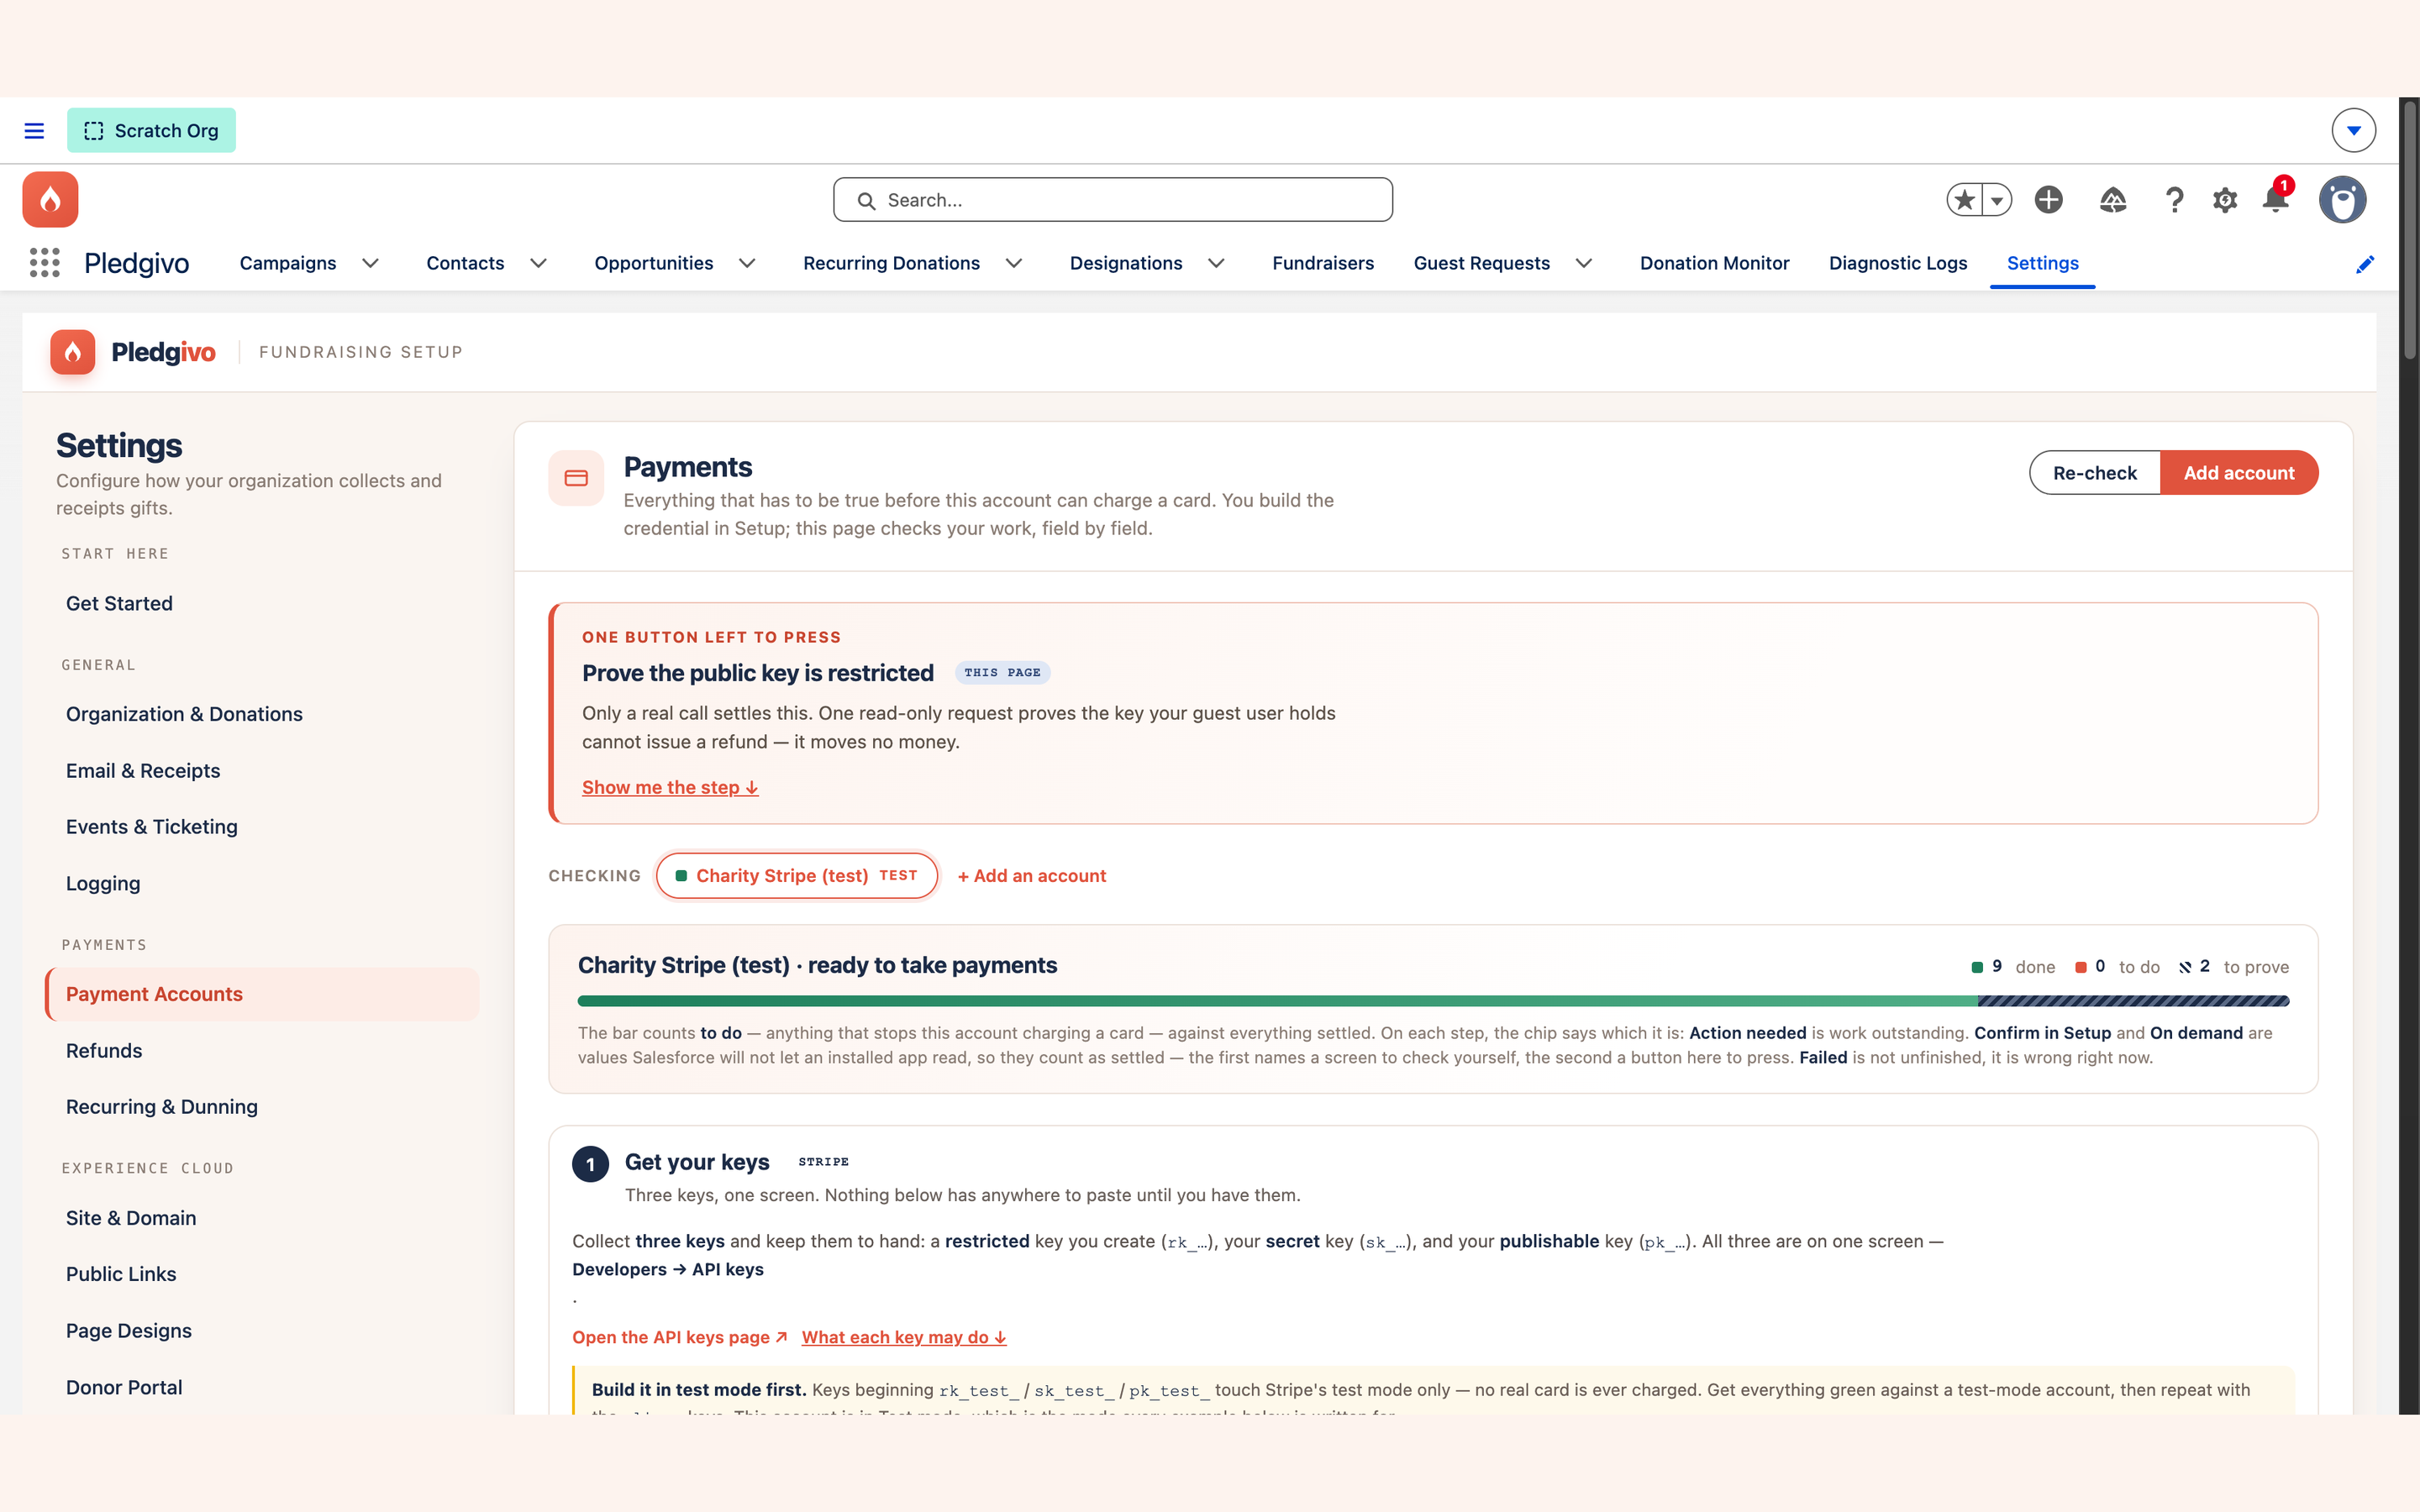
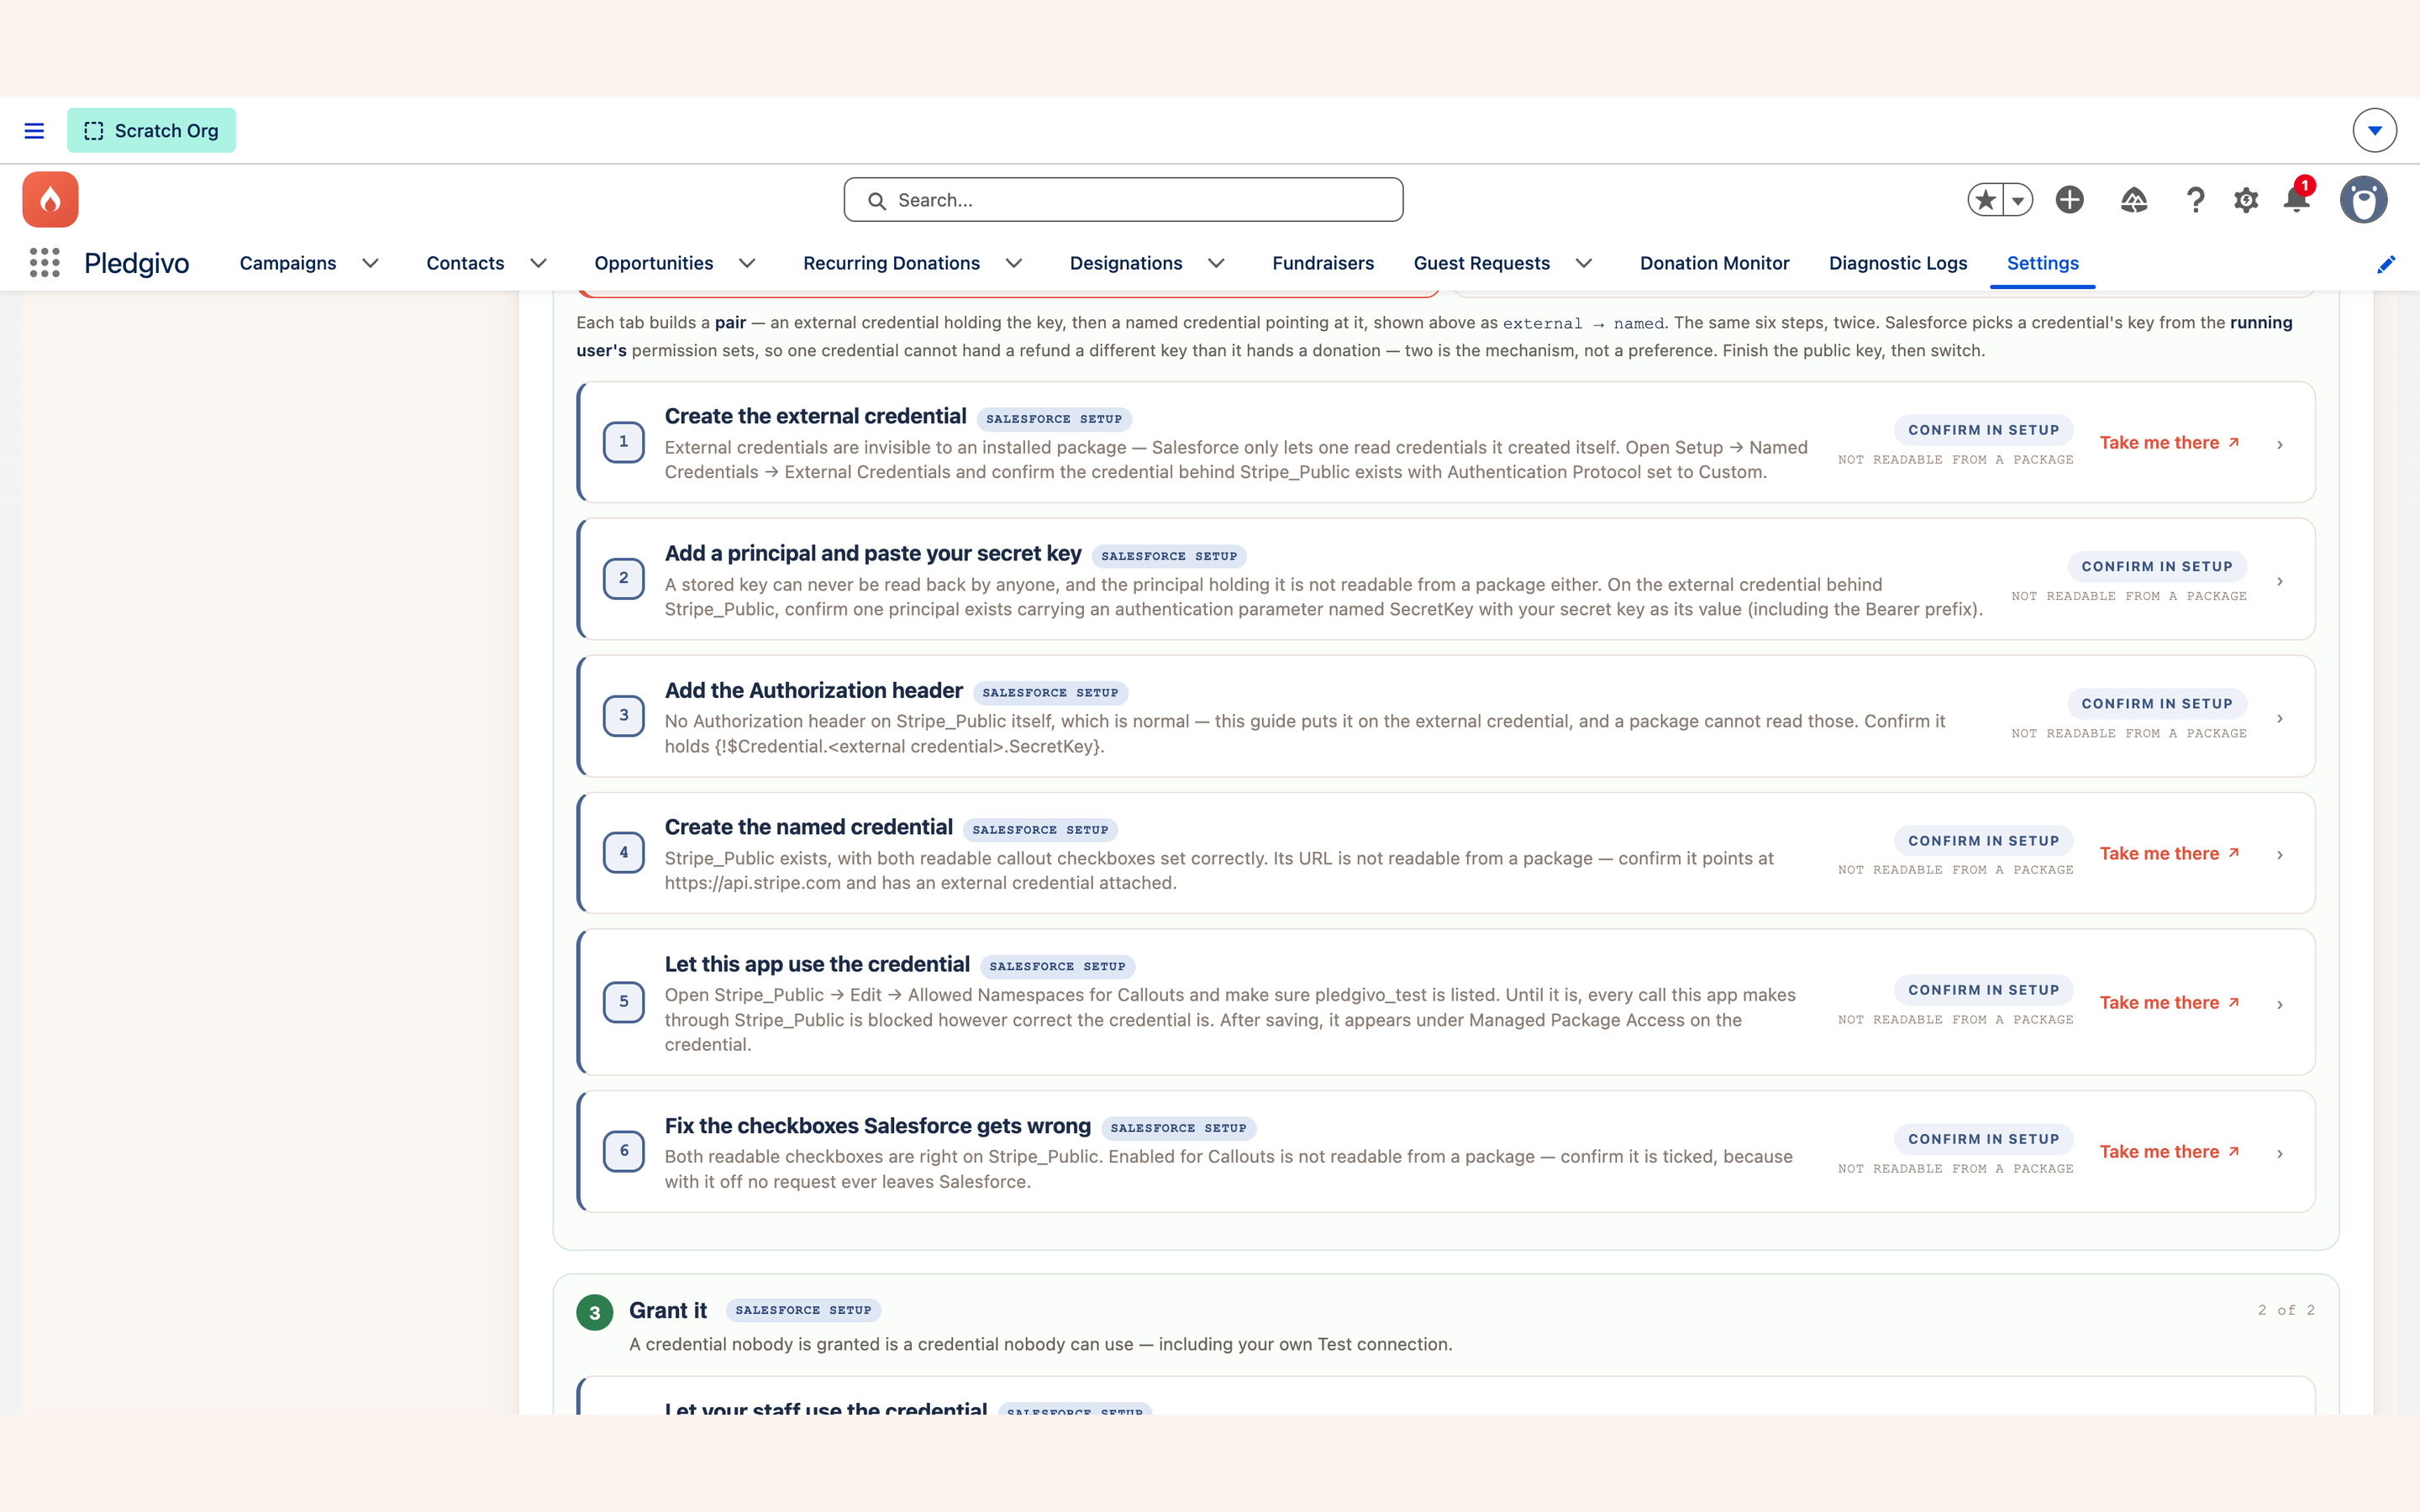
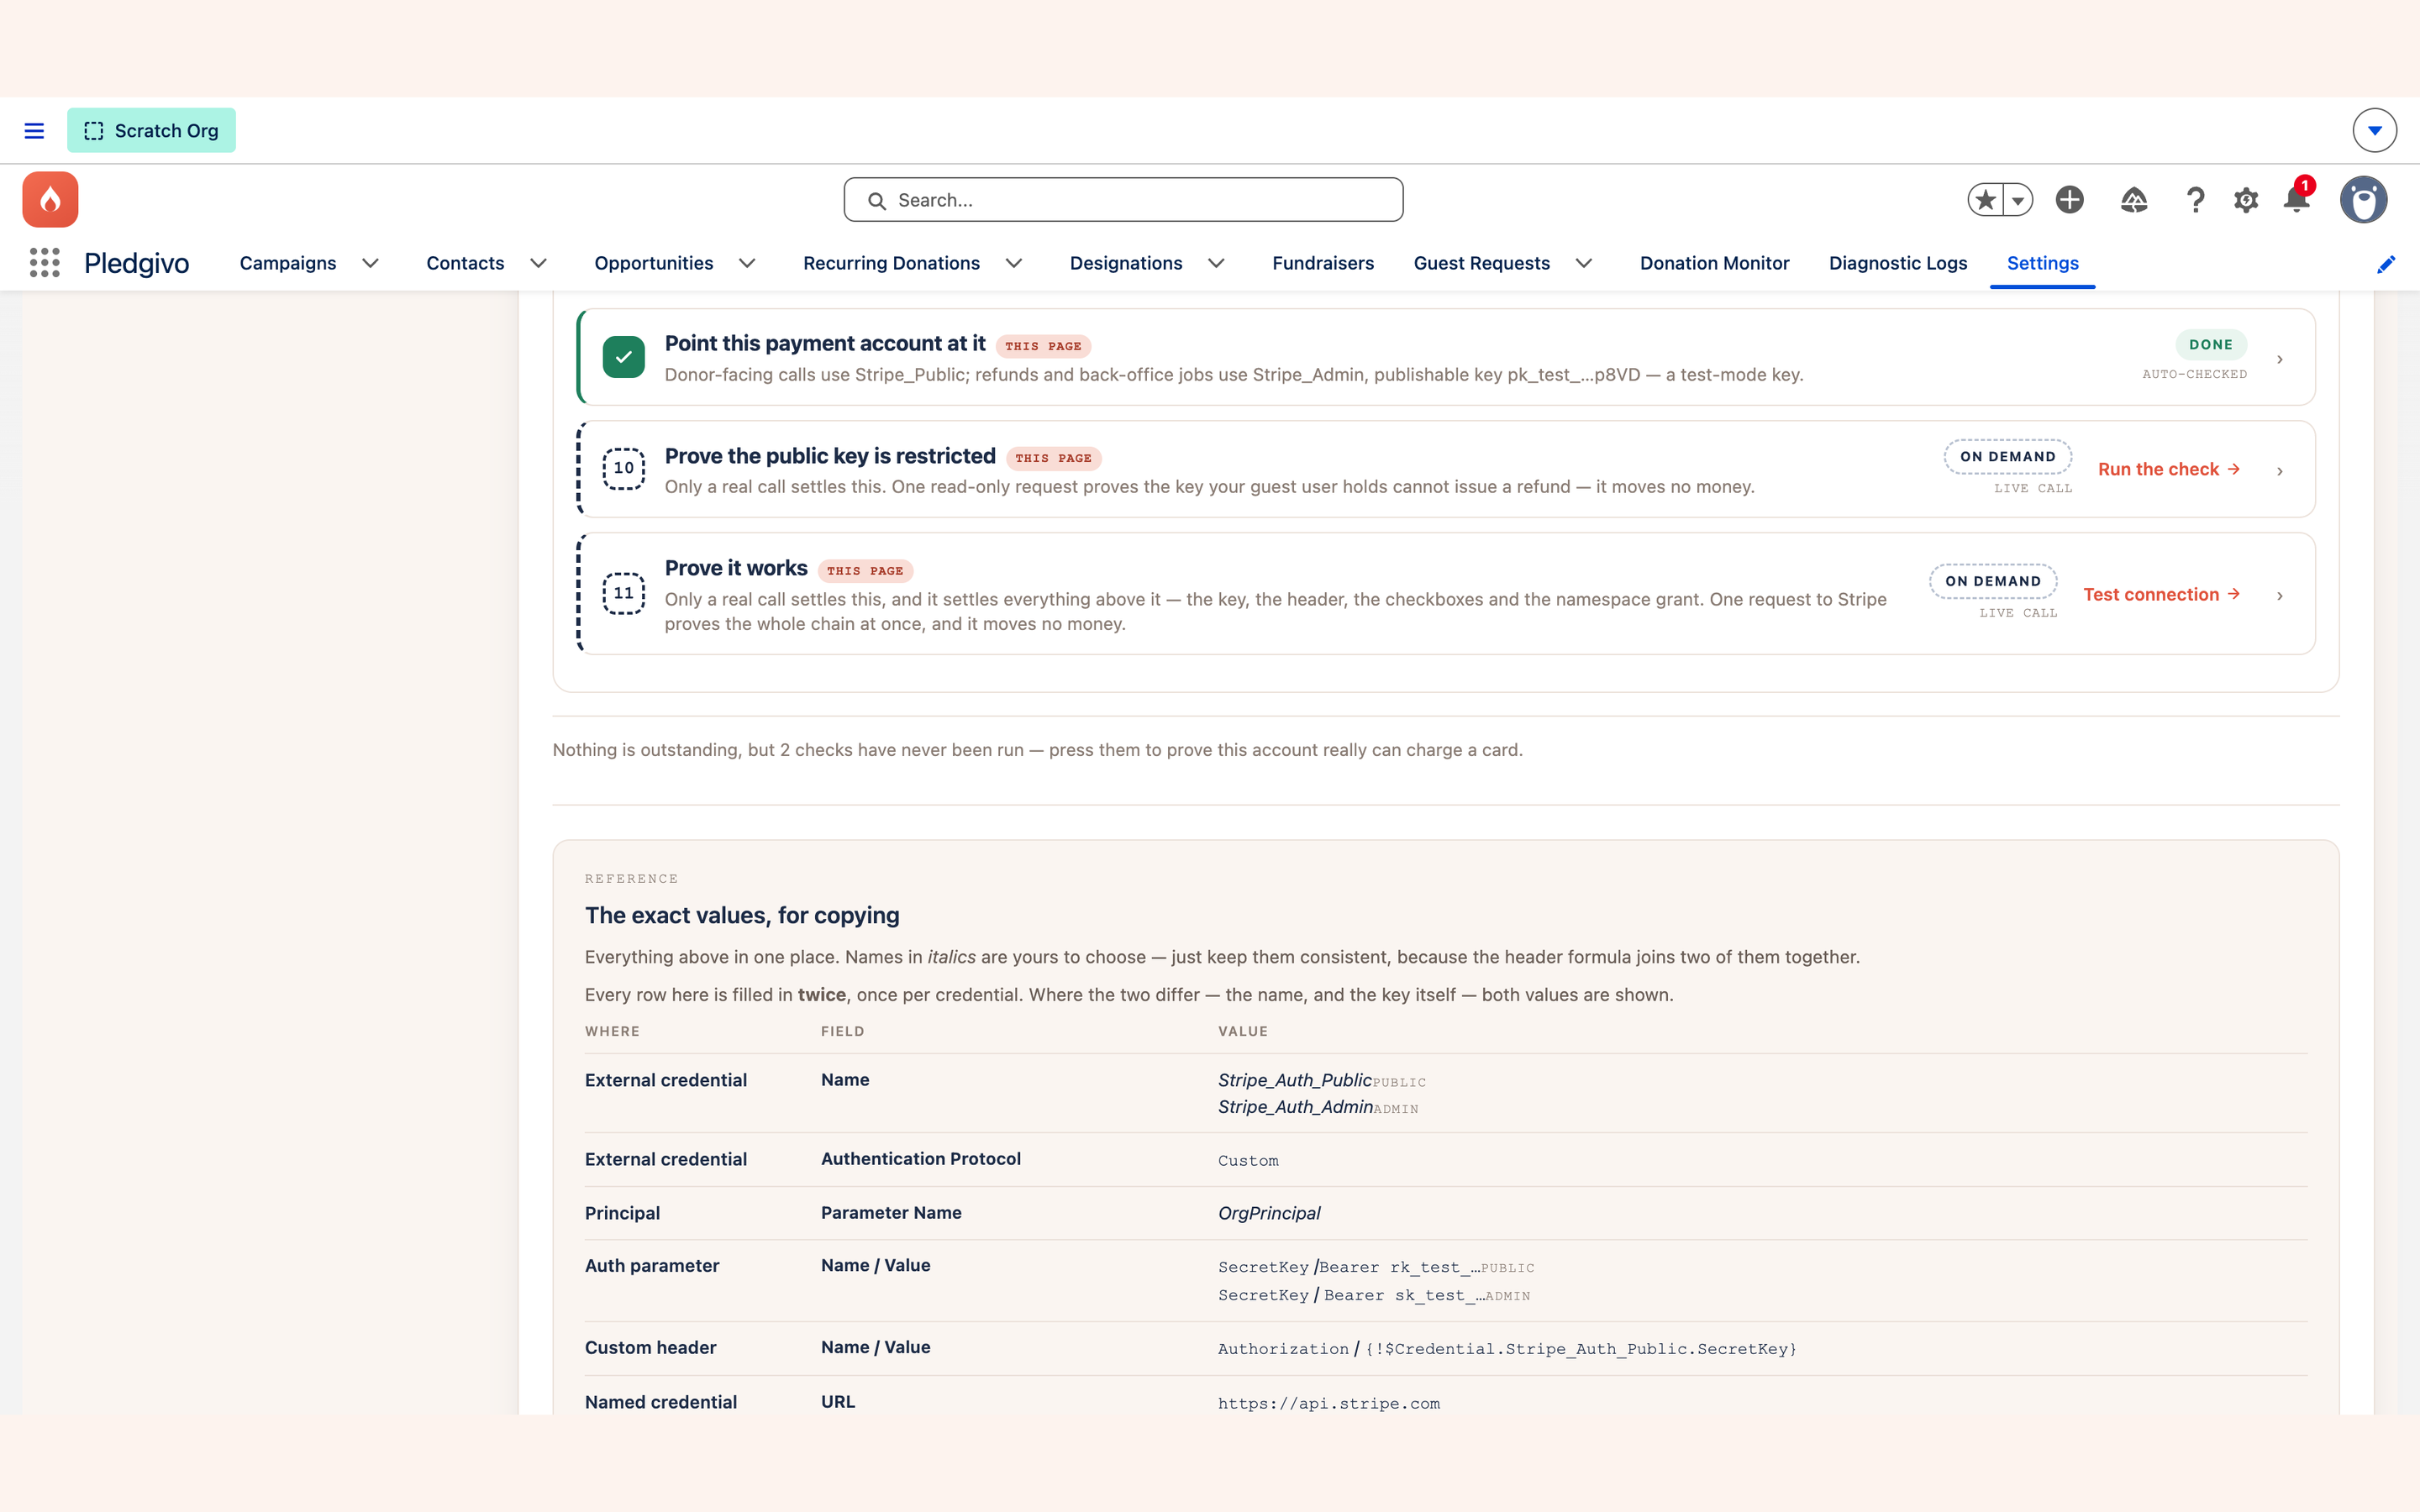
rk_test_…PUBLIC, {!$Credential.…SecretKey}, https://api.stripe.com — never a real key. The console has no way to display a secret, by design.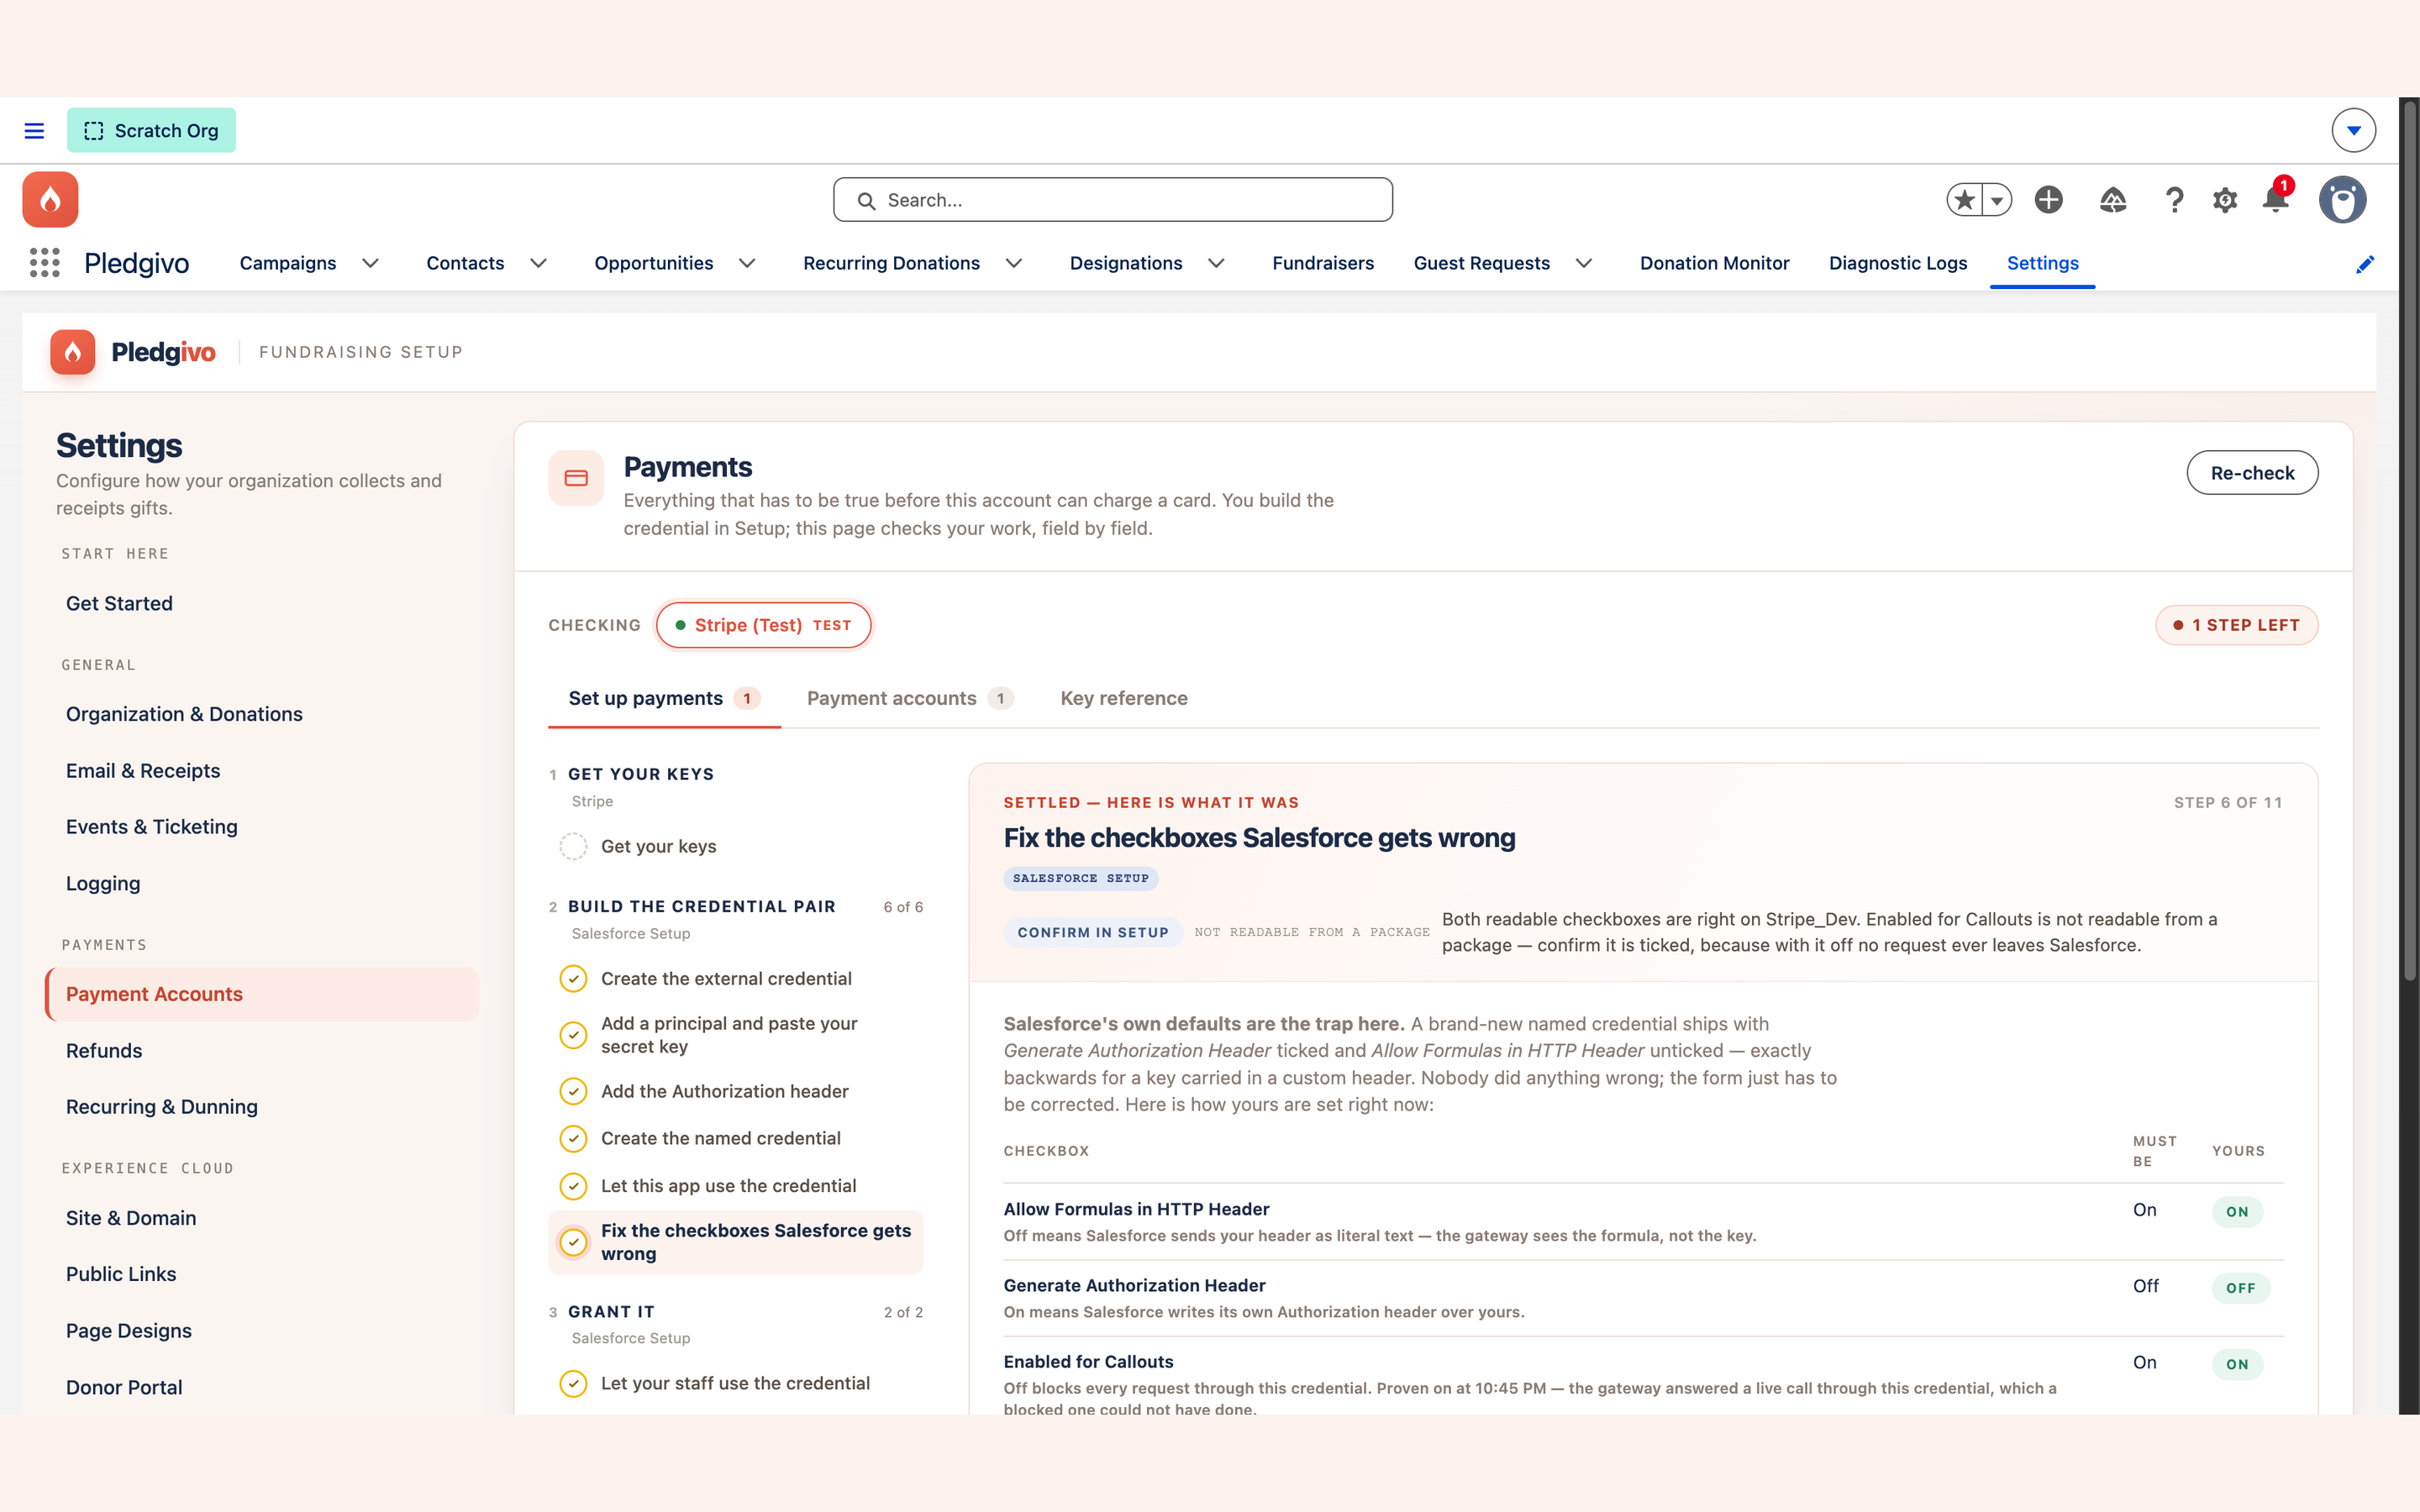
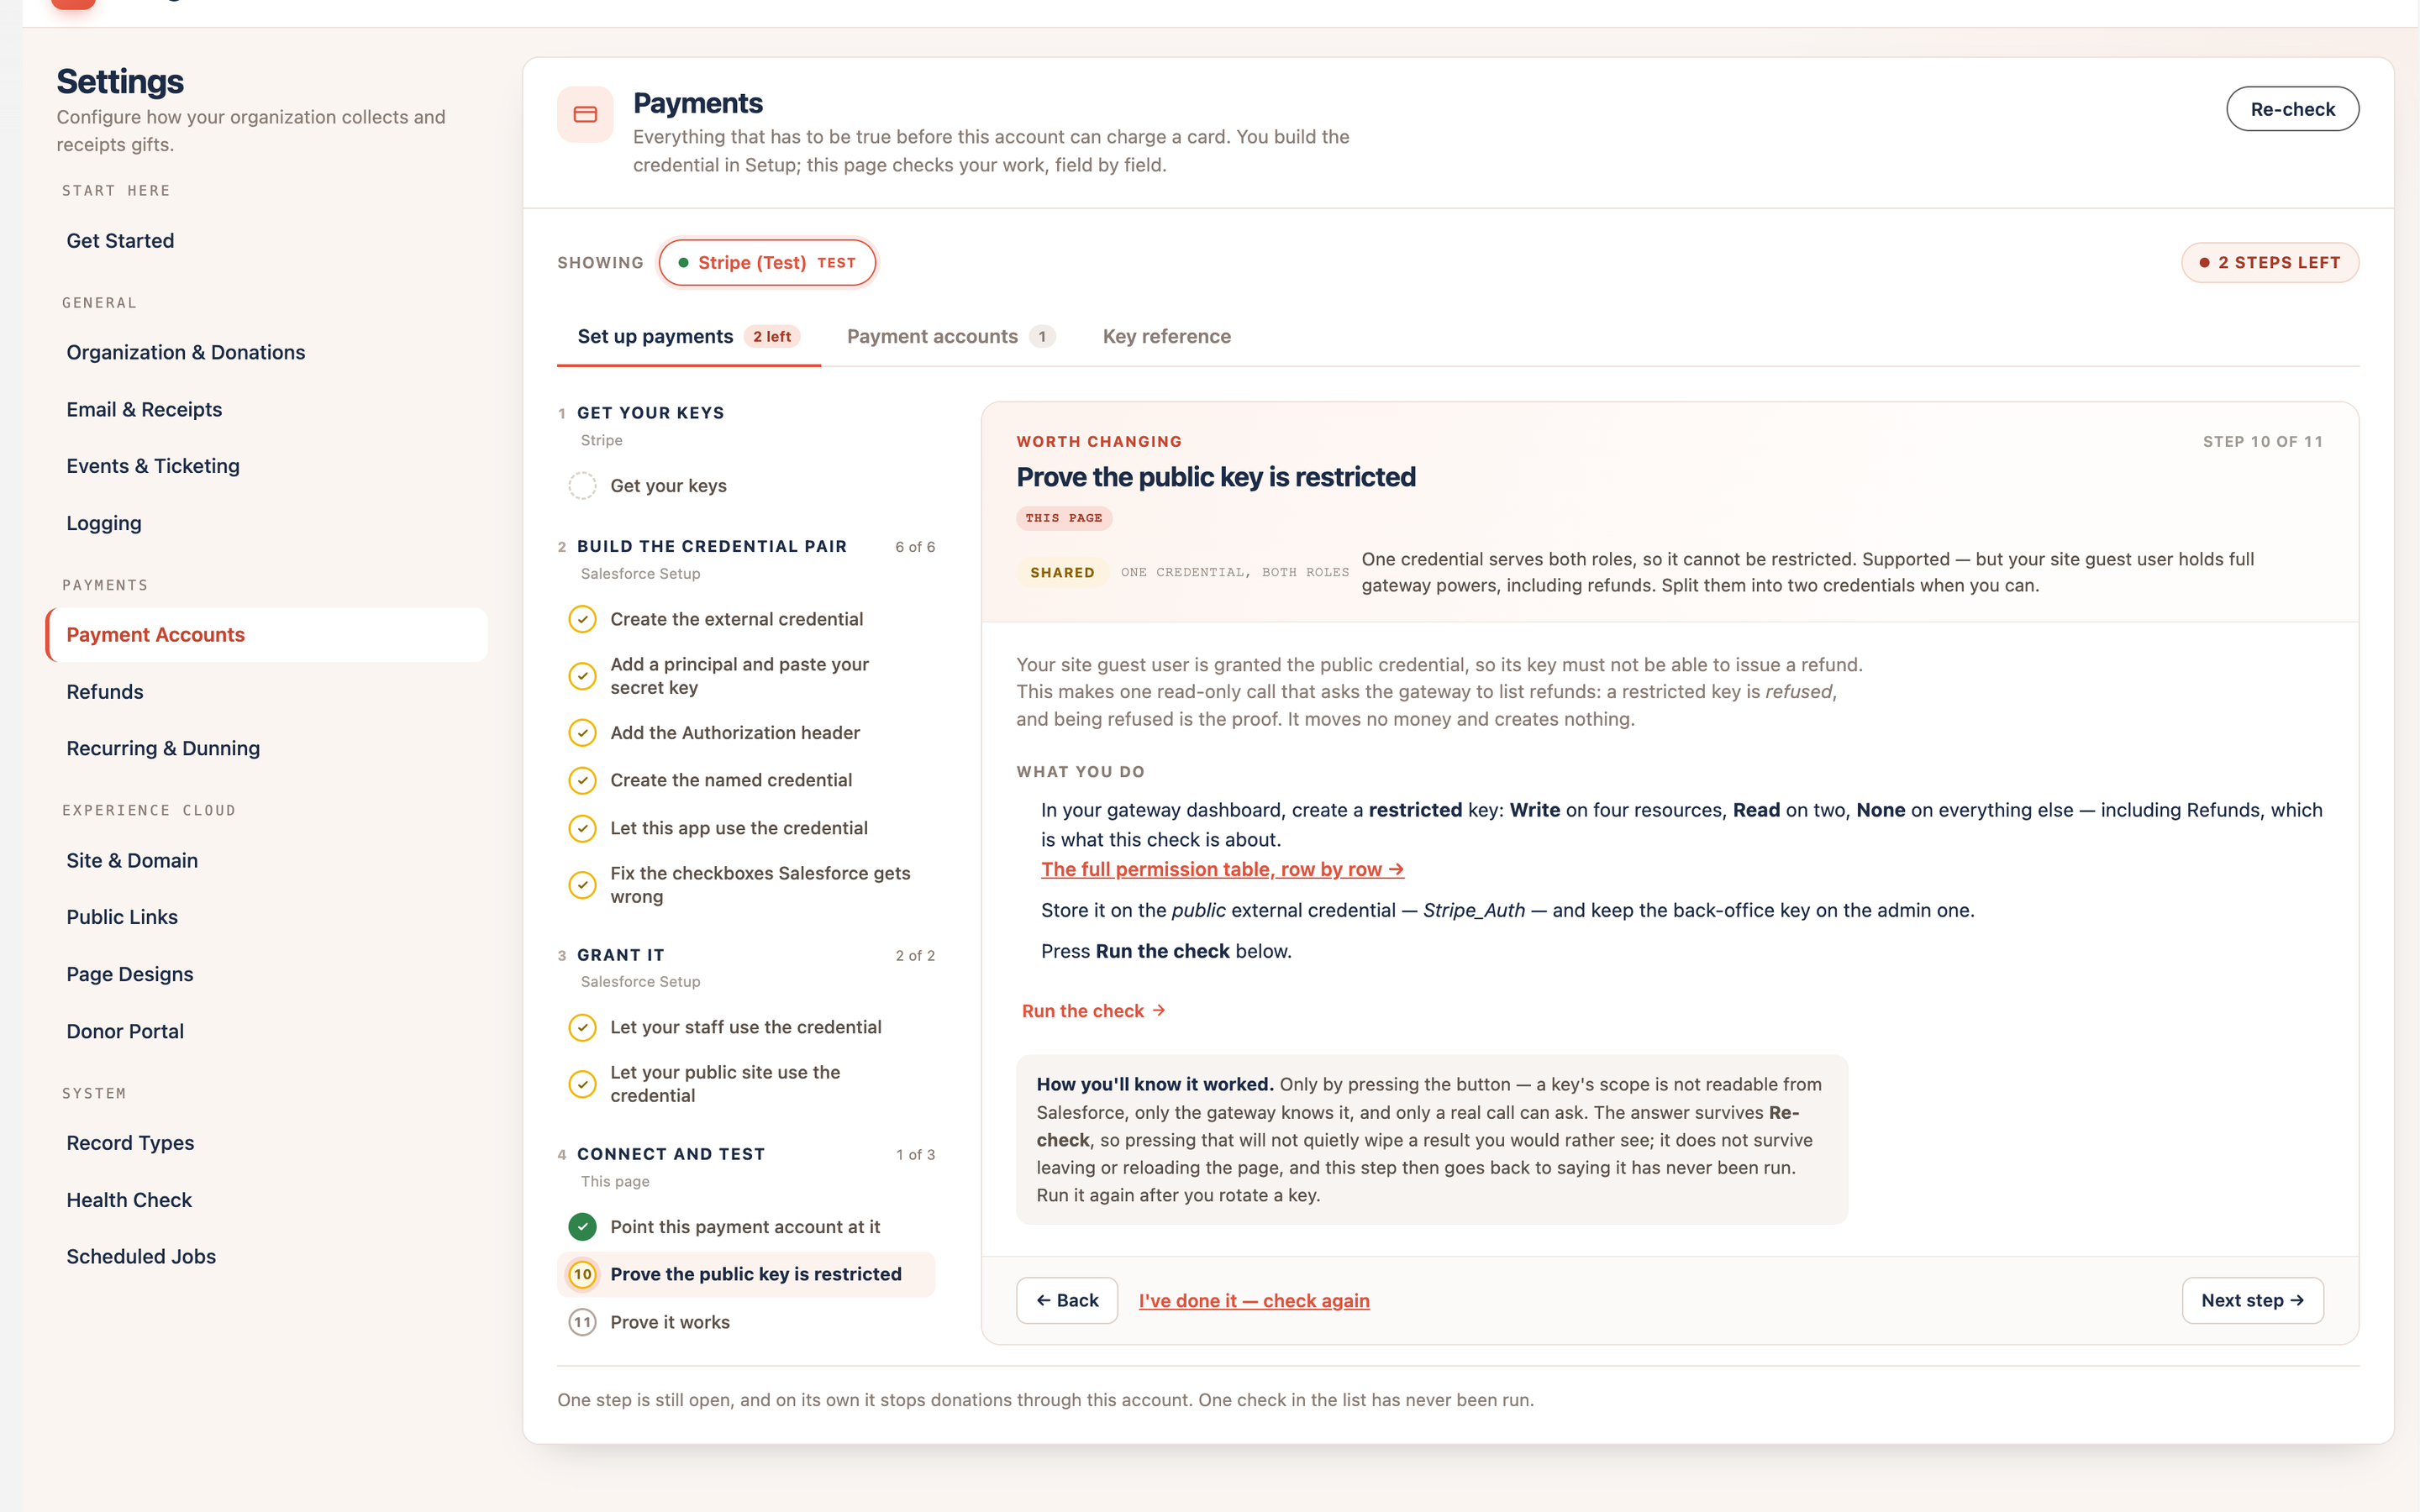
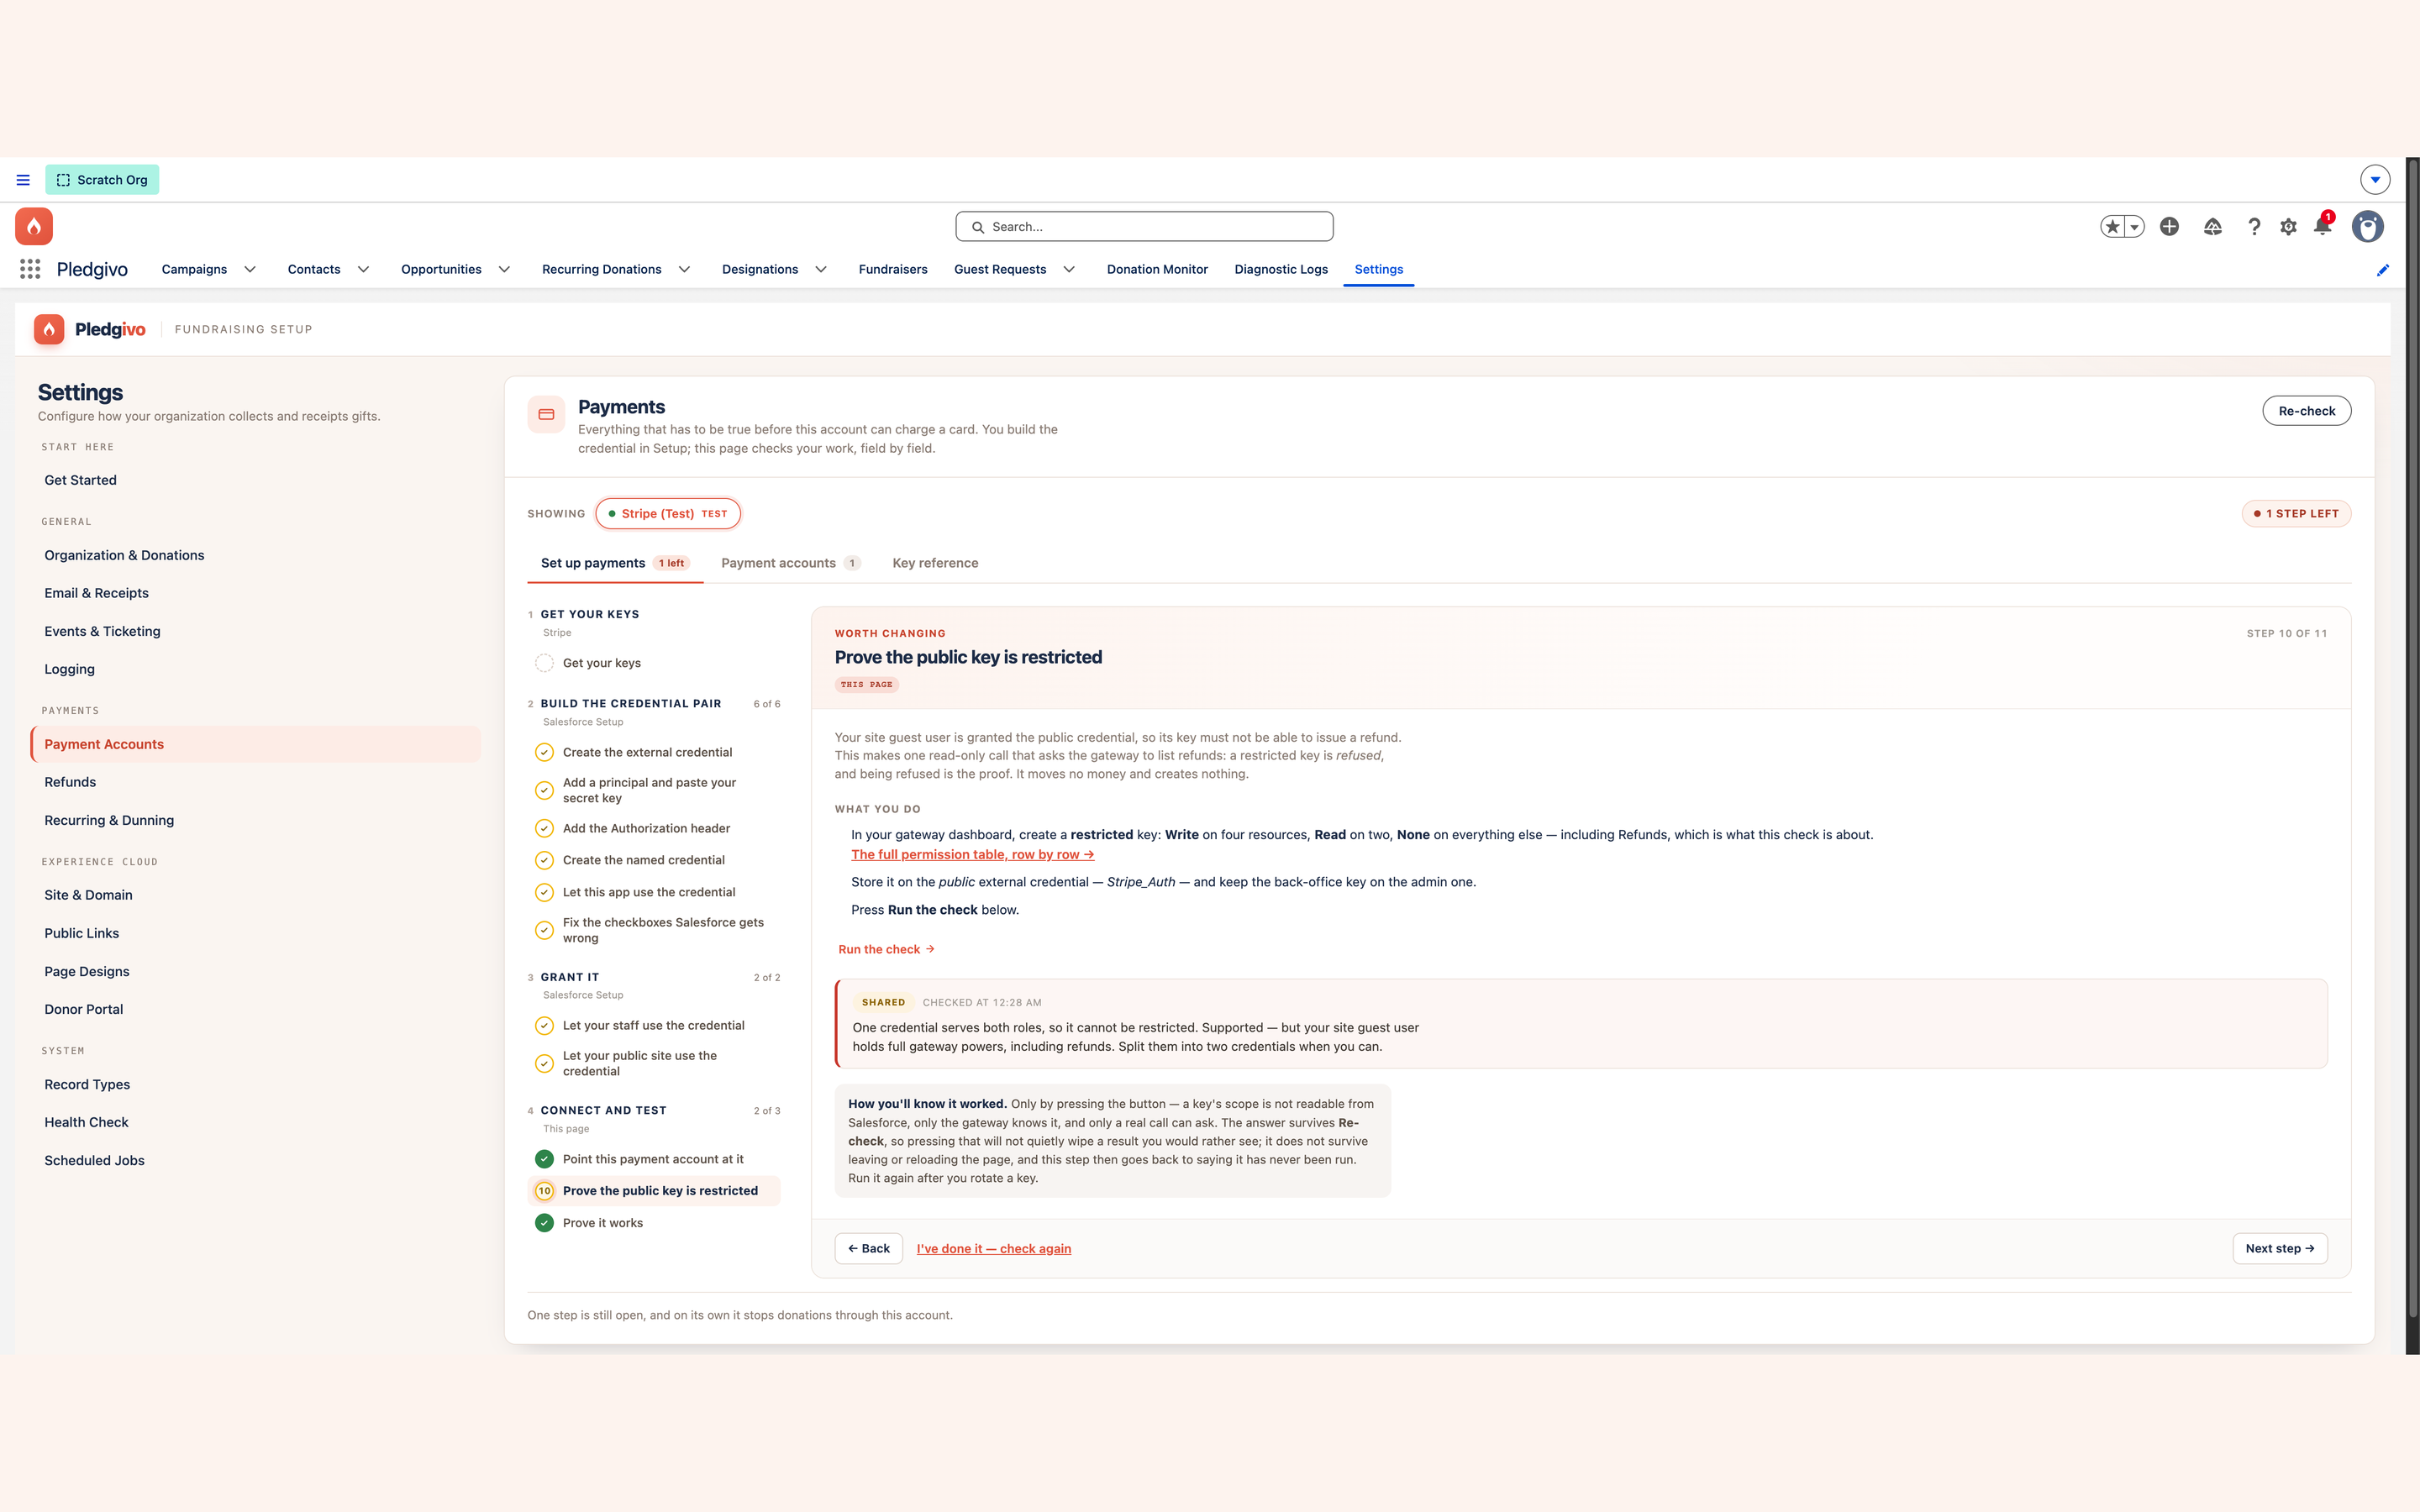
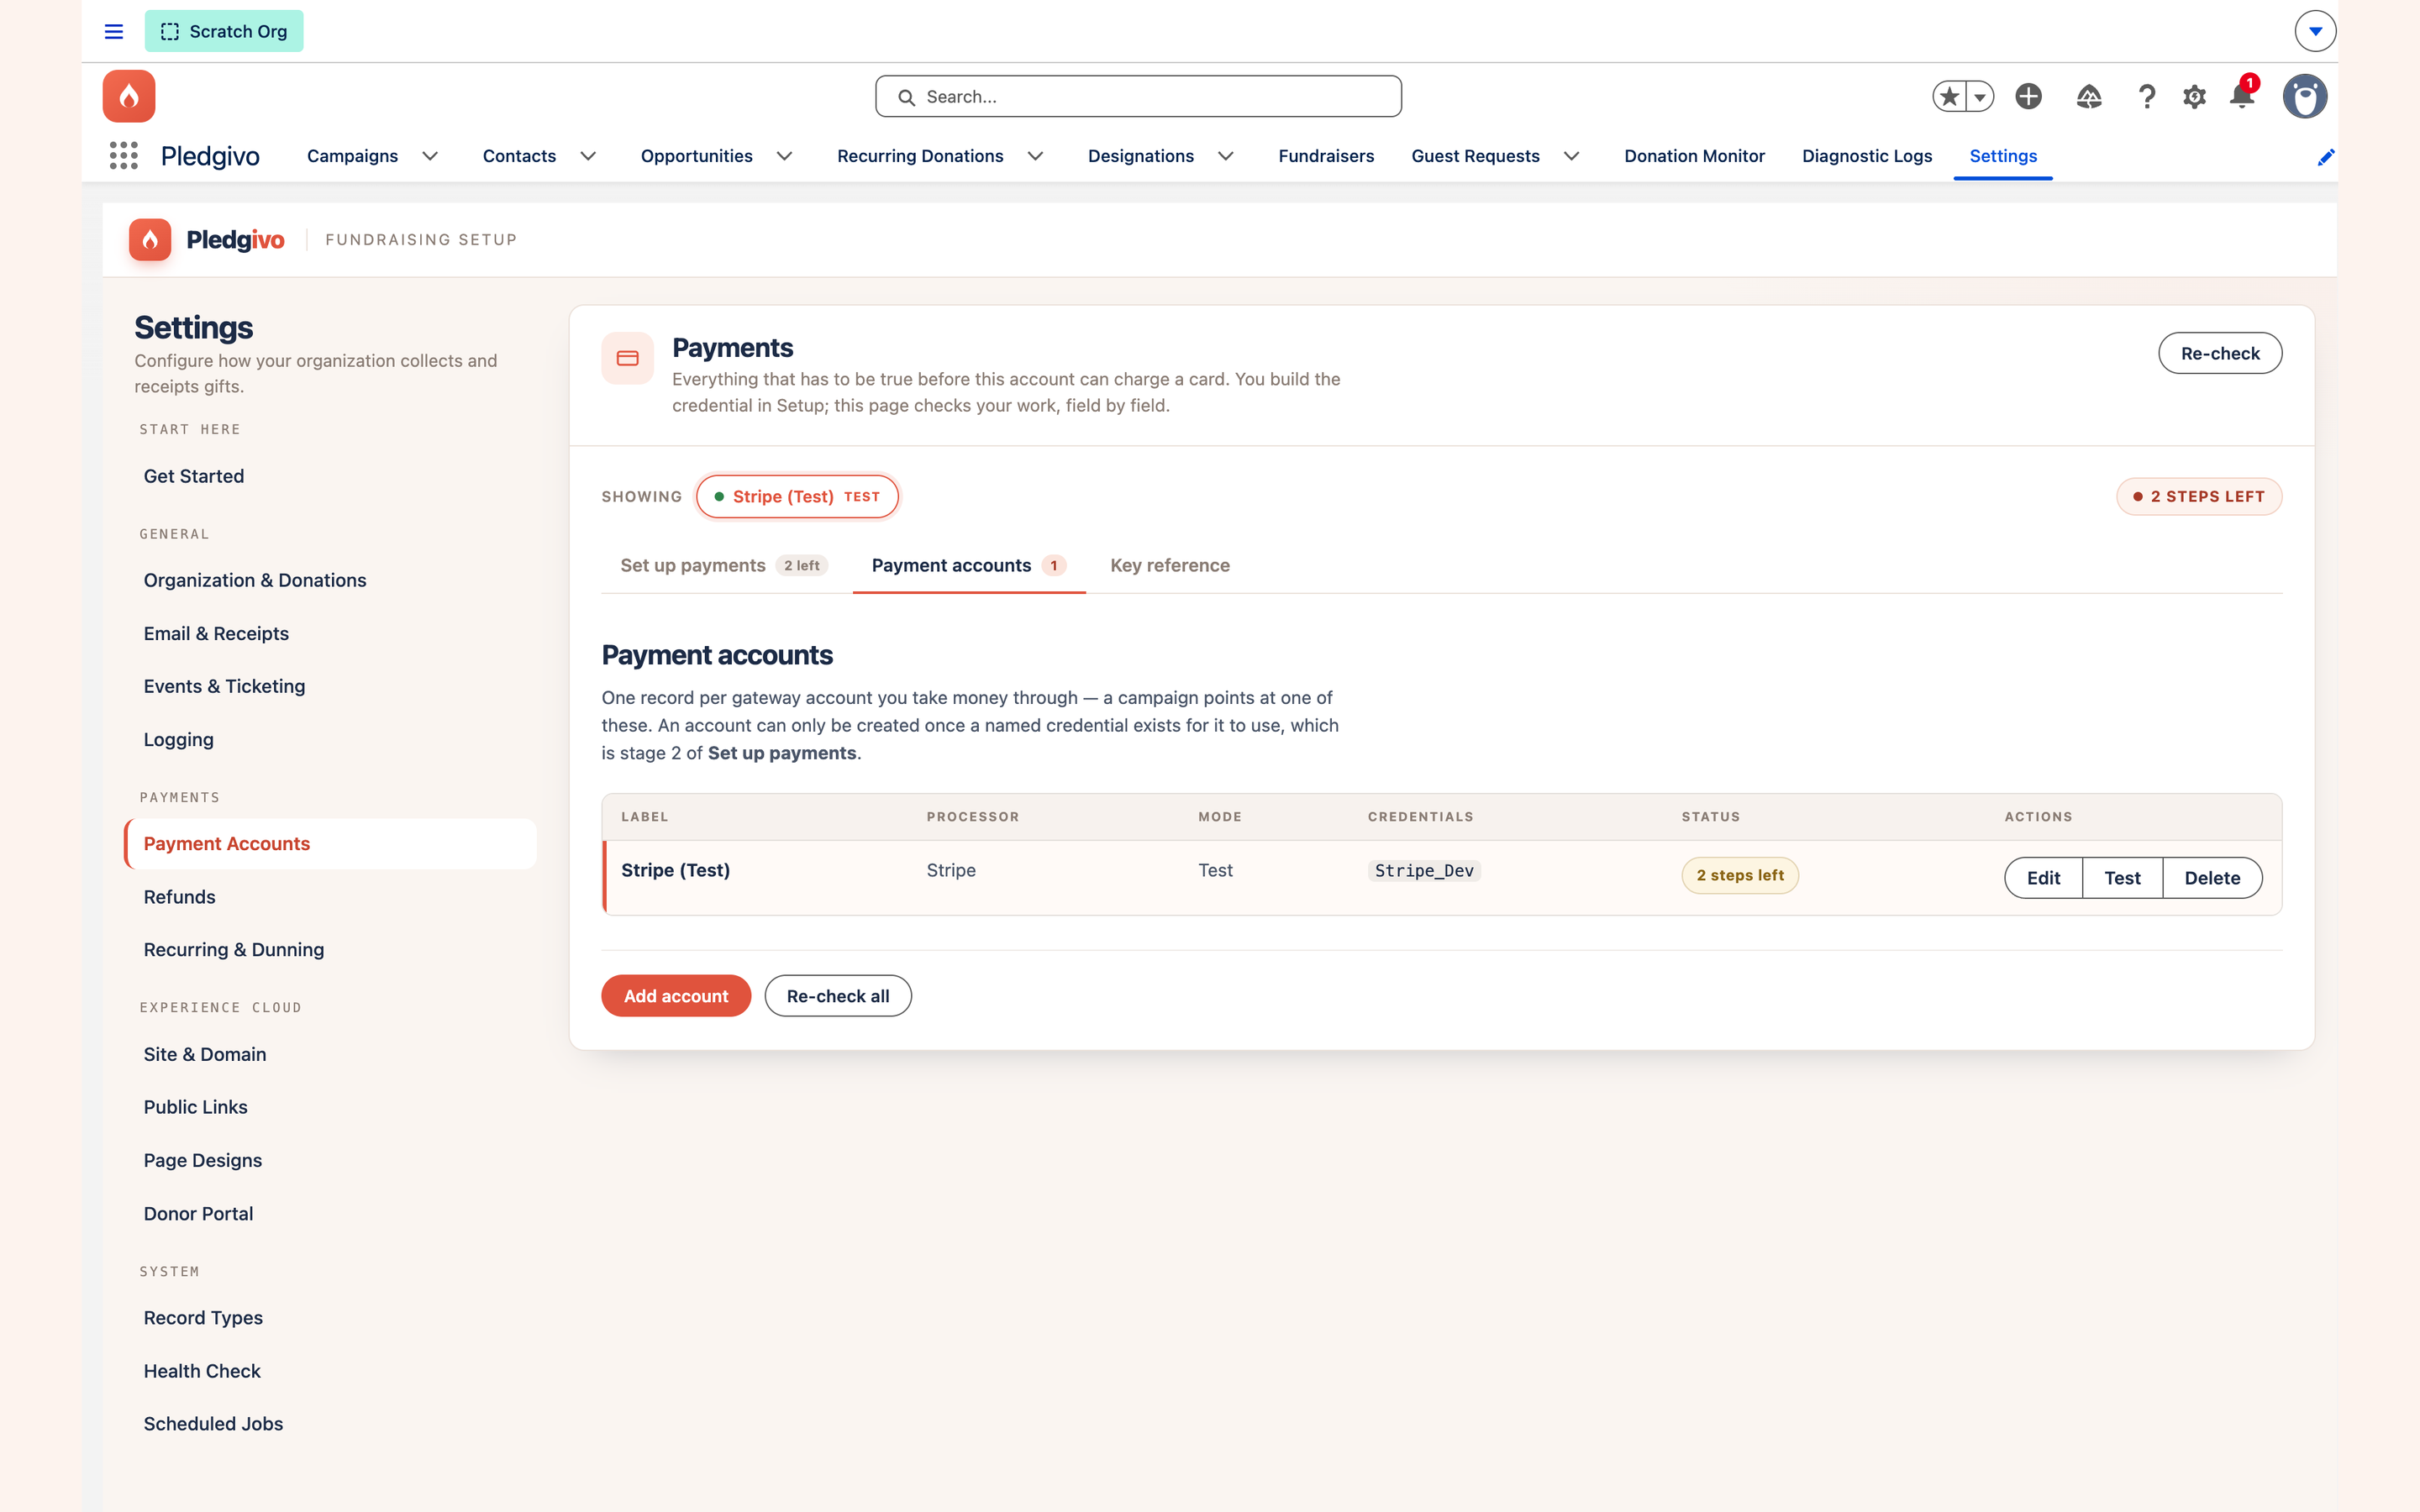
Full walkthrough: Connecting Stripe.
8. Background jobs#
Donations are finalized, payments swept, refunds reconciled, and campaign totals repaired by scheduled Apex — 24 cron entries on the settings a fresh install ships with. The install creates all 24, and the step still reports "24 of 24 background jobs are scheduled". Press the button anyway.
24 is the default, not a fixed number
Salesforce has no sub-hourly schedule, so a job that runs every five minutes is really twelve separate cron entries an hour apart in start time. Two of the families let you choose that cadence — see the table below — and the count moves with it: putting the finalizer on 15 minutes replaces its twelve entries with four, and the step then reports 16 of 16. The console always grades your org against the cadence you chose, never against 24.
This is the one step a fresh install does not finish for you
A scheduled job belongs to whoever scheduled it, and CronTrigger.OwnerId is stamped when the
job is created and never changes afterwards. The post-install script runs as a Salesforce
system user your org cannot reach — so the 24 jobs it creates are real cron entries owned by a
user that no longer resolves. They are scheduled, they sit at WAITING on the right cadence,
and every pass dies the moment it starts: an owner holding no permission set cannot see the
objects the jobs read, so the query the batch opens with throws before it reads a row. The
count is honest and reassuring and tells you nothing about the thing that matters.
Measured on a virgin org: all 24 jobs owned by an unreachable user, ten consecutive batch runs, zero successes, and the finalizer marker still empty half an hour later. Re-owned, the very next pass completed and stamped the marker. The failure is silent — the unhandled-exception notice goes to a mailbox that does not exist.
On a fresh install the step therefore reads amber, not green: "The background jobs have not completed a pass yet, and no gift is waiting on them." Amber rather than red because nothing is at risk yet — you have taken no gift — but the work is real, and it will not clear on its own. Press Restart the background jobs. It aborts each orphaned job and reschedules it under your own login, and the step turns green within a few minutes, once the finalizer has completed its first pass and stamped the marker the console reads.
The Scheduled Jobs health row is the thing to read, not the count. It resolves each job's owner and names the problem when an owner does not resolve. Saving any Settings panel performs the same repair in passing, so if you configured the console before you reached this step you may find the row already green — that is the reclaim having happened early, not the install having done it for you.
Do it before you share a donation link, not after.
Restart them as a user who can reach Stripe — order matters
Re-owning the jobs fixes who runs them. It does not, on its own, make them able to
authenticate. A named-principal callout runs as the owner of the job, so a job owned by
someone holding no permission set that grants the external credential's principal fails every
single time it fires — refunds and chargebacks never come back, recurring gifts never charge,
and a payment taken but not recorded is never swept up. Every cron row still reads WAITING,
on time, and the job count still reads 24 of 24.
So do step 6 before this one, and press Restart the background jobs while logged in as a user who holds that grant — the jobs are rescheduled under whoever presses it. The Scheduled Jobs health row checks this from that point on: it names the owner when the owner holds no such grant, and offers its own Fix button only when you hold one, because the repair is to take the jobs over.
One limit, stated plainly: a package cannot see which credential a given grant belongs to
(SetupEntityAccess names the permission set but its target is not queryable). So the row can
prove an owner holds no grant, and it can never prove the grant they hold is the right
one. When every owner is granted, the row keeps its colour and adds a sentence asking you to
confirm the grant is on the credential your payment account names.
Confirm this step is green before you share a donation link
The Finalizer-<m> family is what turns a confirmed card payment into an Opportunity, a
donor record and a receipt. With the finalizer stopped, a donor's card is still charged and
they still land on the thank-you page reading "your receipt is on its way" — but nothing is
created in Salesforce. The gift waits as a Donation Staging record and finalizes on the
next pass once the jobs are running again, so nothing is lost permanently. The danger is
the gap in between, when your reports show fewer gifts than your Stripe dashboard does.
Two different situations, and the form treats them differently on purpose.
No pass has ever completed in this org — the state a fresh install sits in until the jobs are re-owned, on this step or by the first Settings save. Nothing has ever demonstrated that a charged card becomes an Opportunity here, so the donation form and the ticket page refuse the payment outright. Instead of a card field the visitor sees: "Online giving is temporarily unavailable on this site. Its background jobs have not completed a pass yet…" — with the remedy named, because on a fresh install the person seeing that message is almost always you, testing your own page. It clears itself: the finalizer stamps its marker at the end of every pass whether or not there was anything to reconcile, so the form comes back on its own within one cadence of your pressing Restart the background jobs — there is nothing else to switch back on.
The pipeline was running and has stalled — a healthy org whose jobs paused. Here the form
deliberately keeps taking gifts. Refusing live donations over a job pause that recovers by
itself would be the larger outage, and nothing is lost: the gift waits as a staging record and
finalizes on the next pass. What happens instead is the alarm — every gift taken while the
pipeline is stopped writes a PIPELINE_STALE error to the Transaction Log, and both this
step and the Gifts Being Recorded health check turn red and name the number — "3 gifts
are charged but NOT recorded." That count is what separates red from the amber above: amber
means the jobs are not running and nothing is waiting on them; red means gifts are.
A green job count is not proof the jobs are running
"24 of 24 background jobs are scheduled" says the cron entries exist — a job that is scheduled but fails on every fire still counts. The console therefore reads a second signal: the finalizer stamps the time each time it completes a pass, and if that stamp is too old this step goes red regardless of the job count. That is the number to trust.
"Too old" tracks the cadence you chose rather than being a fixed clock — three missed passes, and never less than 30 minutes. On the default five-minute finalizer that is 30 minutes, six missed passes. On an hourly one it is three hours. A fixed threshold could not work here: 30 minutes is shorter than a single pass at the slowest cadence, so an org finalizing hourly would have reported itself broken for half of every hour while working perfectly. Slowing the finalizer therefore buys you slower detection as well as fewer jobs — that is the trade, and it is the reason the default is five minutes.
You need this step after a fresh install, if some jobs were aborted (a deployment that touched a scheduled class will do it), or if the post-install script did not complete. Settings console → Get Started, where the button reads Restart the background jobs when the jobs exist but are not running and Schedule the missing jobs when some are genuinely absent — the same button either way. Scheduled Jobs has the per-job breakdown and on-demand runs. Pressing it on a healthy org changes nothing: a job that exists and is running keeps its schedule, including a cadence you customized. A job whose owner no longer resolves is aborted and recreated under you.
To confirm a gift really landed, open Donation Monitor: it lists every staging record still
waiting, and warns at the top when the Finalizer family is not scheduled.
The families, and which cadences you can change#
| Family | Count | Cadence | Yours to change? |
|---|---|---|---|
Finalizer-<m> |
12 | Every 5 minutes | Yes — 5, 10, 15, 20, 30 or 60 |
ReconciliationHeartbeat-<m> |
4 | Every 15 minutes | Yes — same six choices |
Fundraising — Guest Request Sweep-<m> |
3 | Every 20 minutes | No |
| Recurring donations, retention purge | 2 | Daily | No |
StripePaymentSweep, RefundReconcile |
2 | Hourly | No |
CampaignRollup |
1 | Nightly | No |
Counts and cadences above are the defaults. Change the two settable ones in Settings → System → Scheduled Jobs, which shows what each cadence costs you in cron entries before you save it — Salesforce caps an org at 100 scheduled Apex jobs in total, and this app is not the only thing in your org competing for them.
The finalizer is the one to leave alone unless you have a reason
It is what turns a confirmed card payment into a donation record, so its cadence is the delay a donor's gift waits before it appears in Salesforce — and, as described above, it also sets how long a genuinely stopped pipeline stays quiet before the console says so. Widen it to free up cron slots, not to tidy the list.
9. Organization name and logo#
Your organization name and logo appear on the donation form, the receipt email, and the donor portal. The install seeds a placeholder logo so nothing renders broken on day one — it is not your logo.
The display name has no placeholder. Leave it blank and the public pages do not quietly borrow your Salesforce org name — the donation form's trust bar, the thank-you page, the event-ticket page and the donor portal simply head with no name at all, and the campaign gallery falls back to the literal word "Fundraising". The one page that does substitute your Salesforce org name is the internal receipt print view, because a tax receipt with an empty letterhead is not a receipt. So set this before you share a link, not after.
Settings → General → Organization & Donations holds the rest of your public-facing identity too: the footer line, terms and privacy links, and the social handles that render in the footer band of every public donation page. They live here rather than on a page design because they describe your organization, not a visual style — so changing a campaign's style never changes which privacy policy its donors are pointed at. Leave any of them blank and the footer omits it.
The same panel holds your gift rules: minimum and maximum amount, suggested amounts, processing-fee percentage and fixed portion, the donation page path, the three donor-portal sign-in windows (code expiry, idle timeout, session cap), and the default thank-you button. There is no mailing address field — receipts take their address from your Salesforce company information.
The Get Started step reads back what a donor will see: 'Public pages show "Acme Nonprofit"'. Set the display name before you send anyone a link.
Set the address donor email comes from#
Not a Get Started step — but do it before you take a real donation
Out of the box, every receipt, ticket confirmation and payment-failure notice is sent from whichever user or background job triggered it. On a live org that means a donor's tax receipt arrives from a scheduled-job address nobody monitors. Apex cannot invent a sender, so fixing this is a two-part job and the Salesforce half comes first.
- Setup → Organization-Wide Addresses → Add. Enter the address donors should see (e.g.
donations@your-org.org) and a display name. - Tick Allow All Profiles to Use this From Address. This is not optional: receipts are sent by the Experience Cloud guest user and by scheduled jobs, and an address restricted to selected profiles simply won't be used by either.
- Open the confirmation email Salesforce sends to that address and click through, so the record shows Verified.
- Back in Settings → General → Email & Receipts, put the same address in From email and save.
- Settings → System → Health Check → the Donor Email Sender row confirms it. That row is the only place the difference shows: a From email that matches no verified, all-profiles Org-Wide Email Address costs no donor a receipt — it just silently keeps sending from the triggering user, with no error anywhere.
Once a From email is in effect, the From name field stops being applied — Salesforce takes the display name from the Org-Wide Email Address record instead. Set the name you want on that record.
Full walkthrough: Brand your receipt and notification emails.
10. Publish and activate the site#
This is what finally closes Get Started step 3
Back to the one step the earlier sections left open. Two operations remain, they are different things, and they live on different screens.
Published is not the same as Live
Publish pushes your page changes to the site. Activate makes the site reachable by the public. A published site that has never been activated serves nothing to anyone. The Activate button is not in Experience Builder — it is in Workspaces → Administration → Settings, next to the status.
Get Started shows step 3 as Partly done until then, and quotes the status by its API name:
the Preview you see in Workspaces reads as UnderConstruction in the console. Same state,
two names.
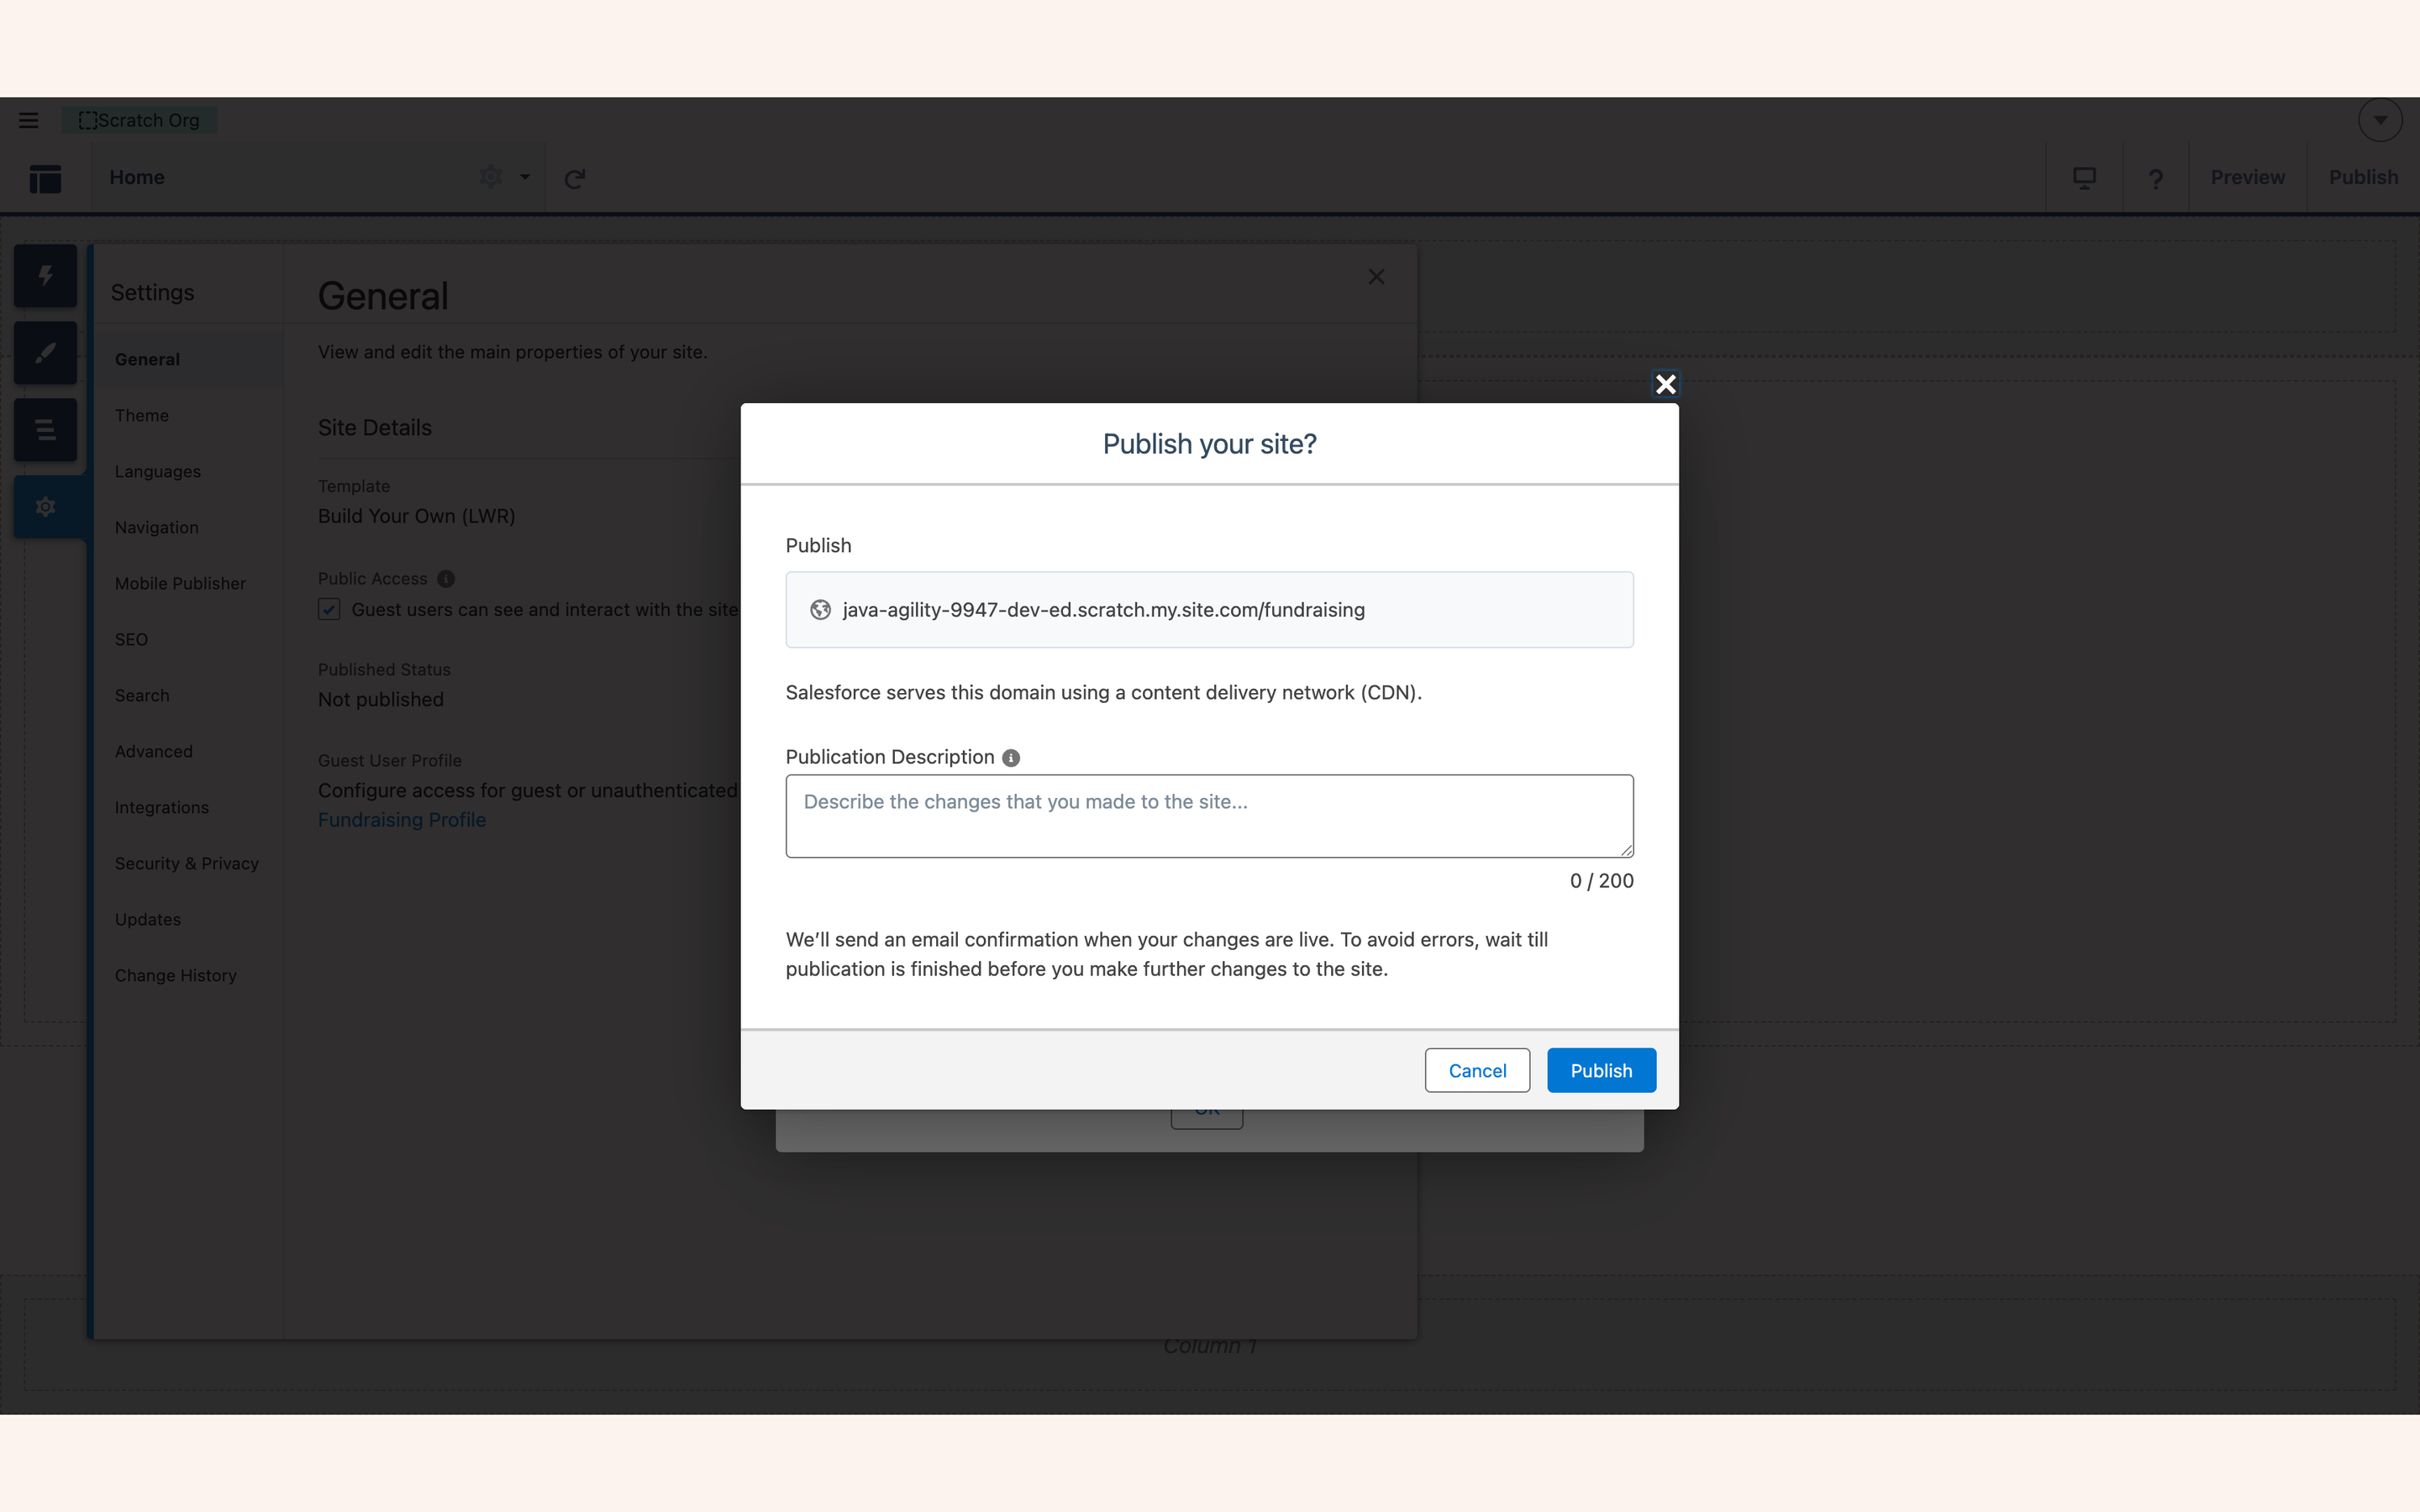
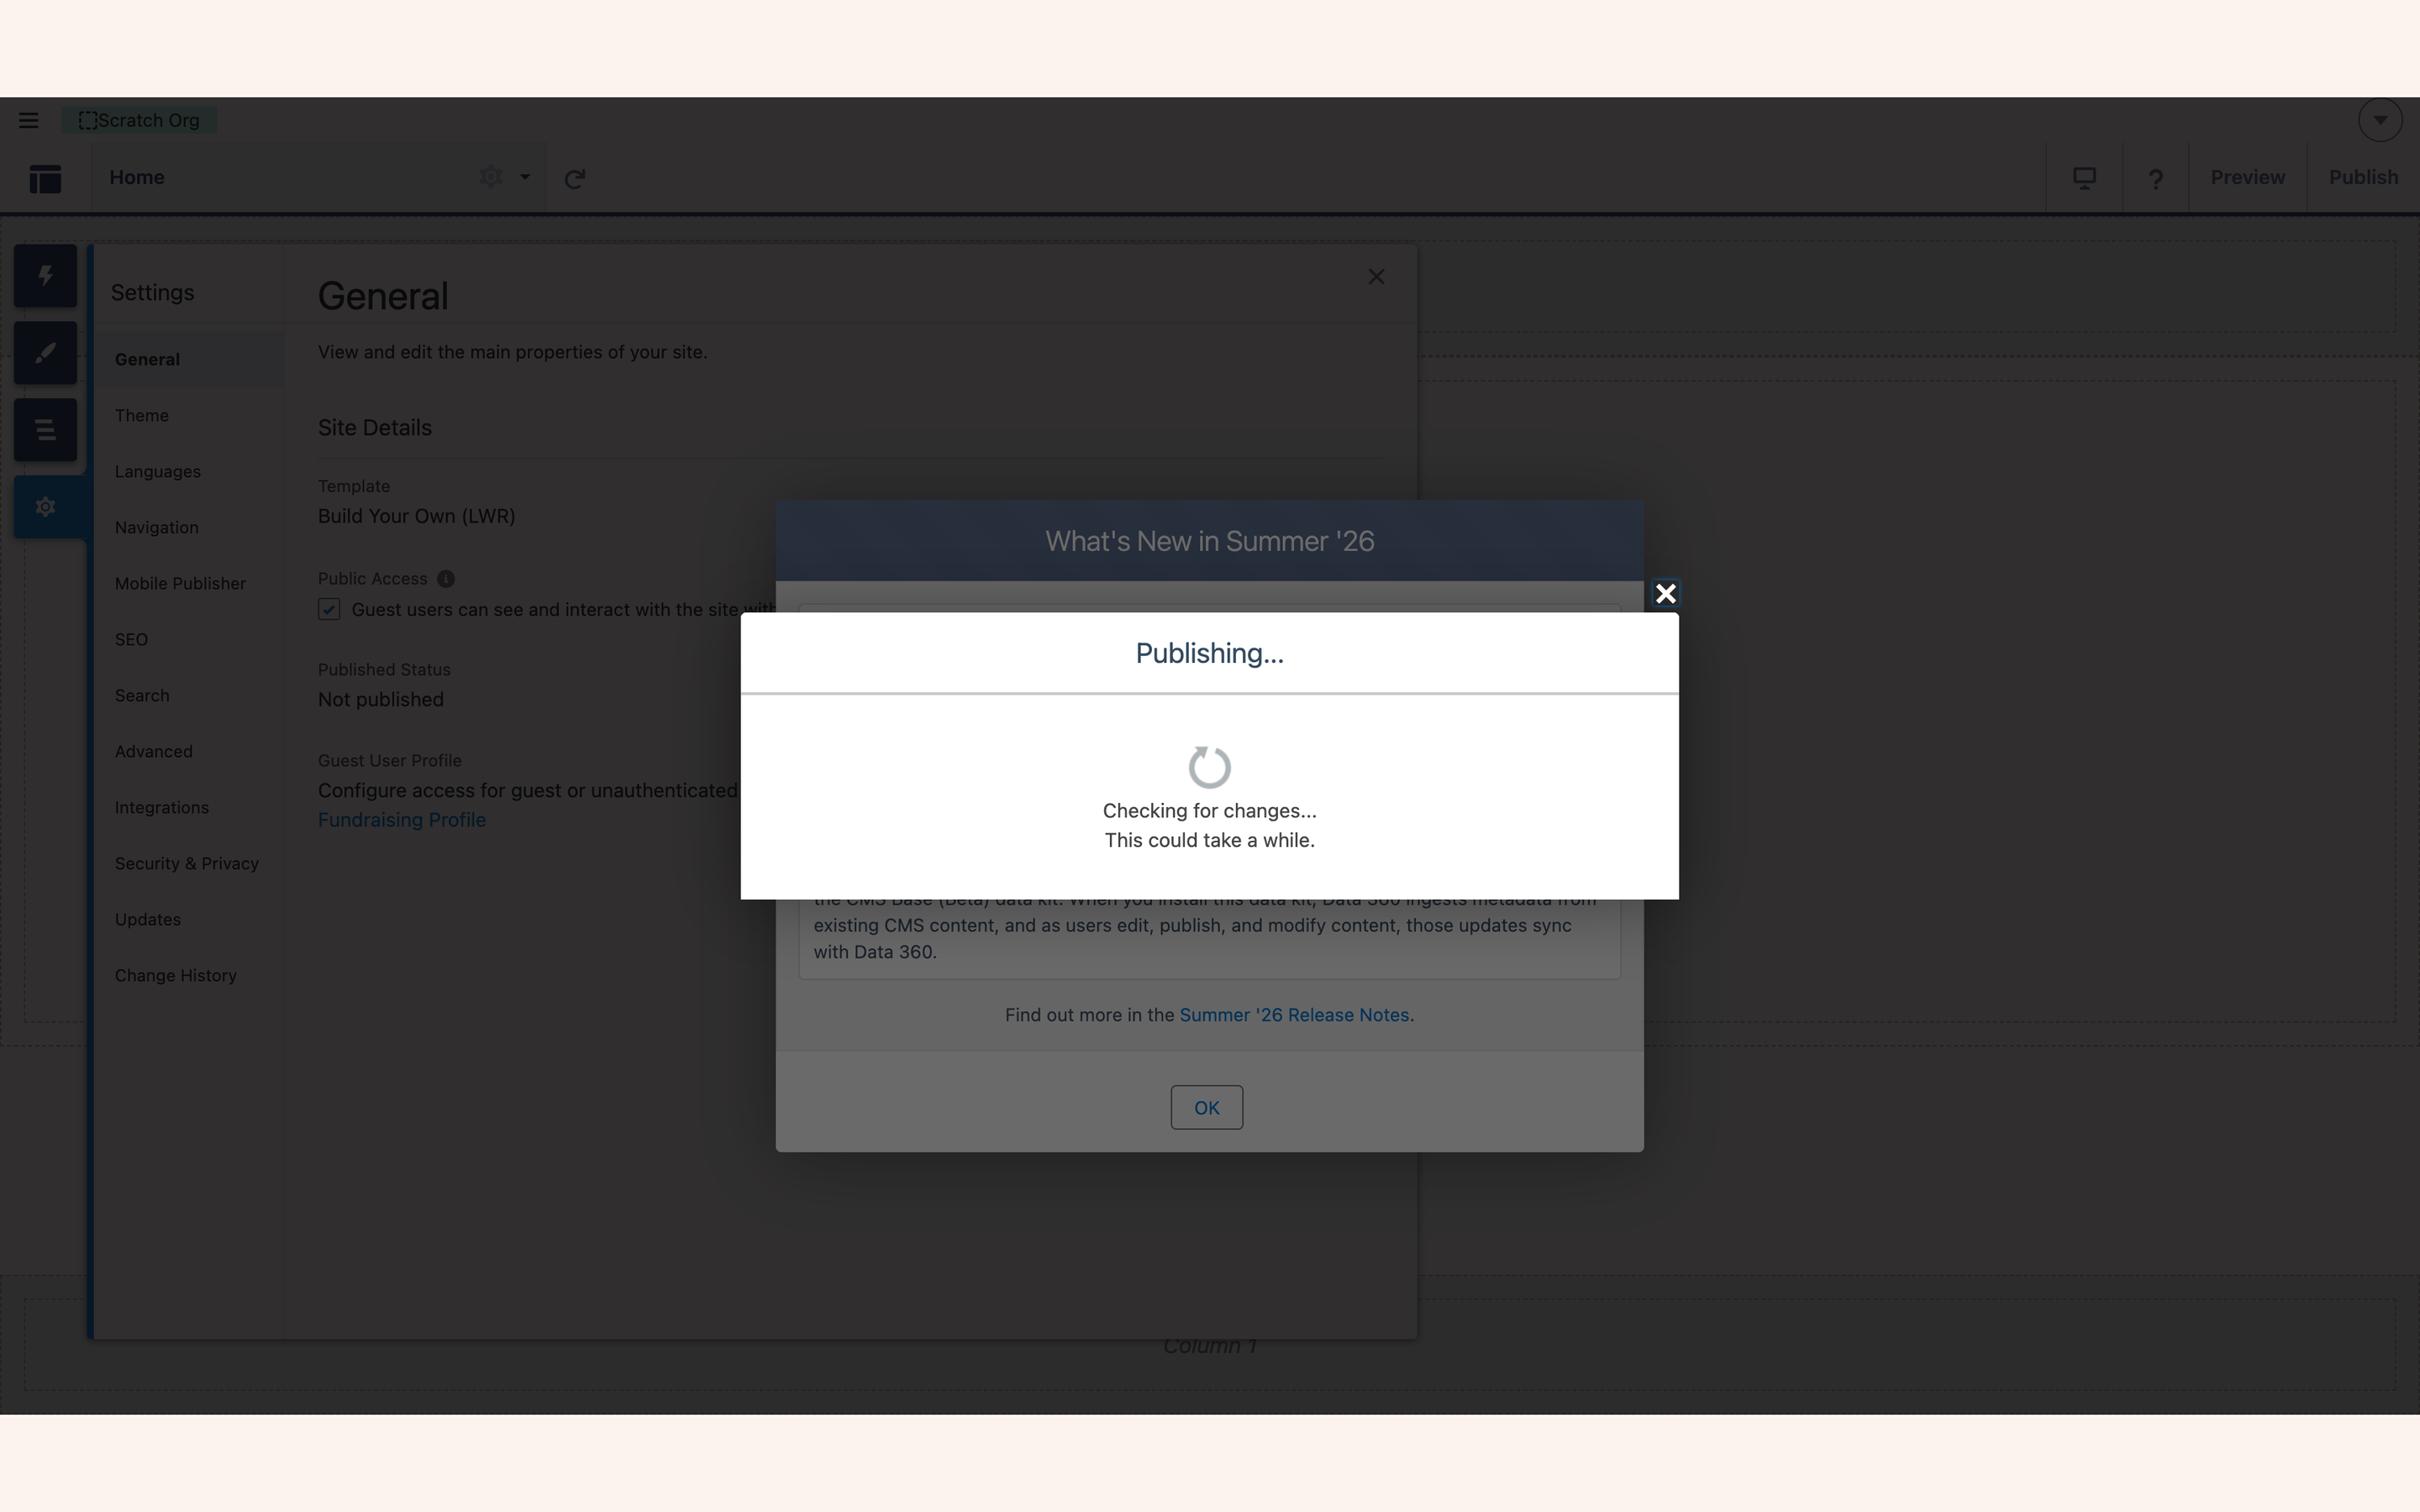
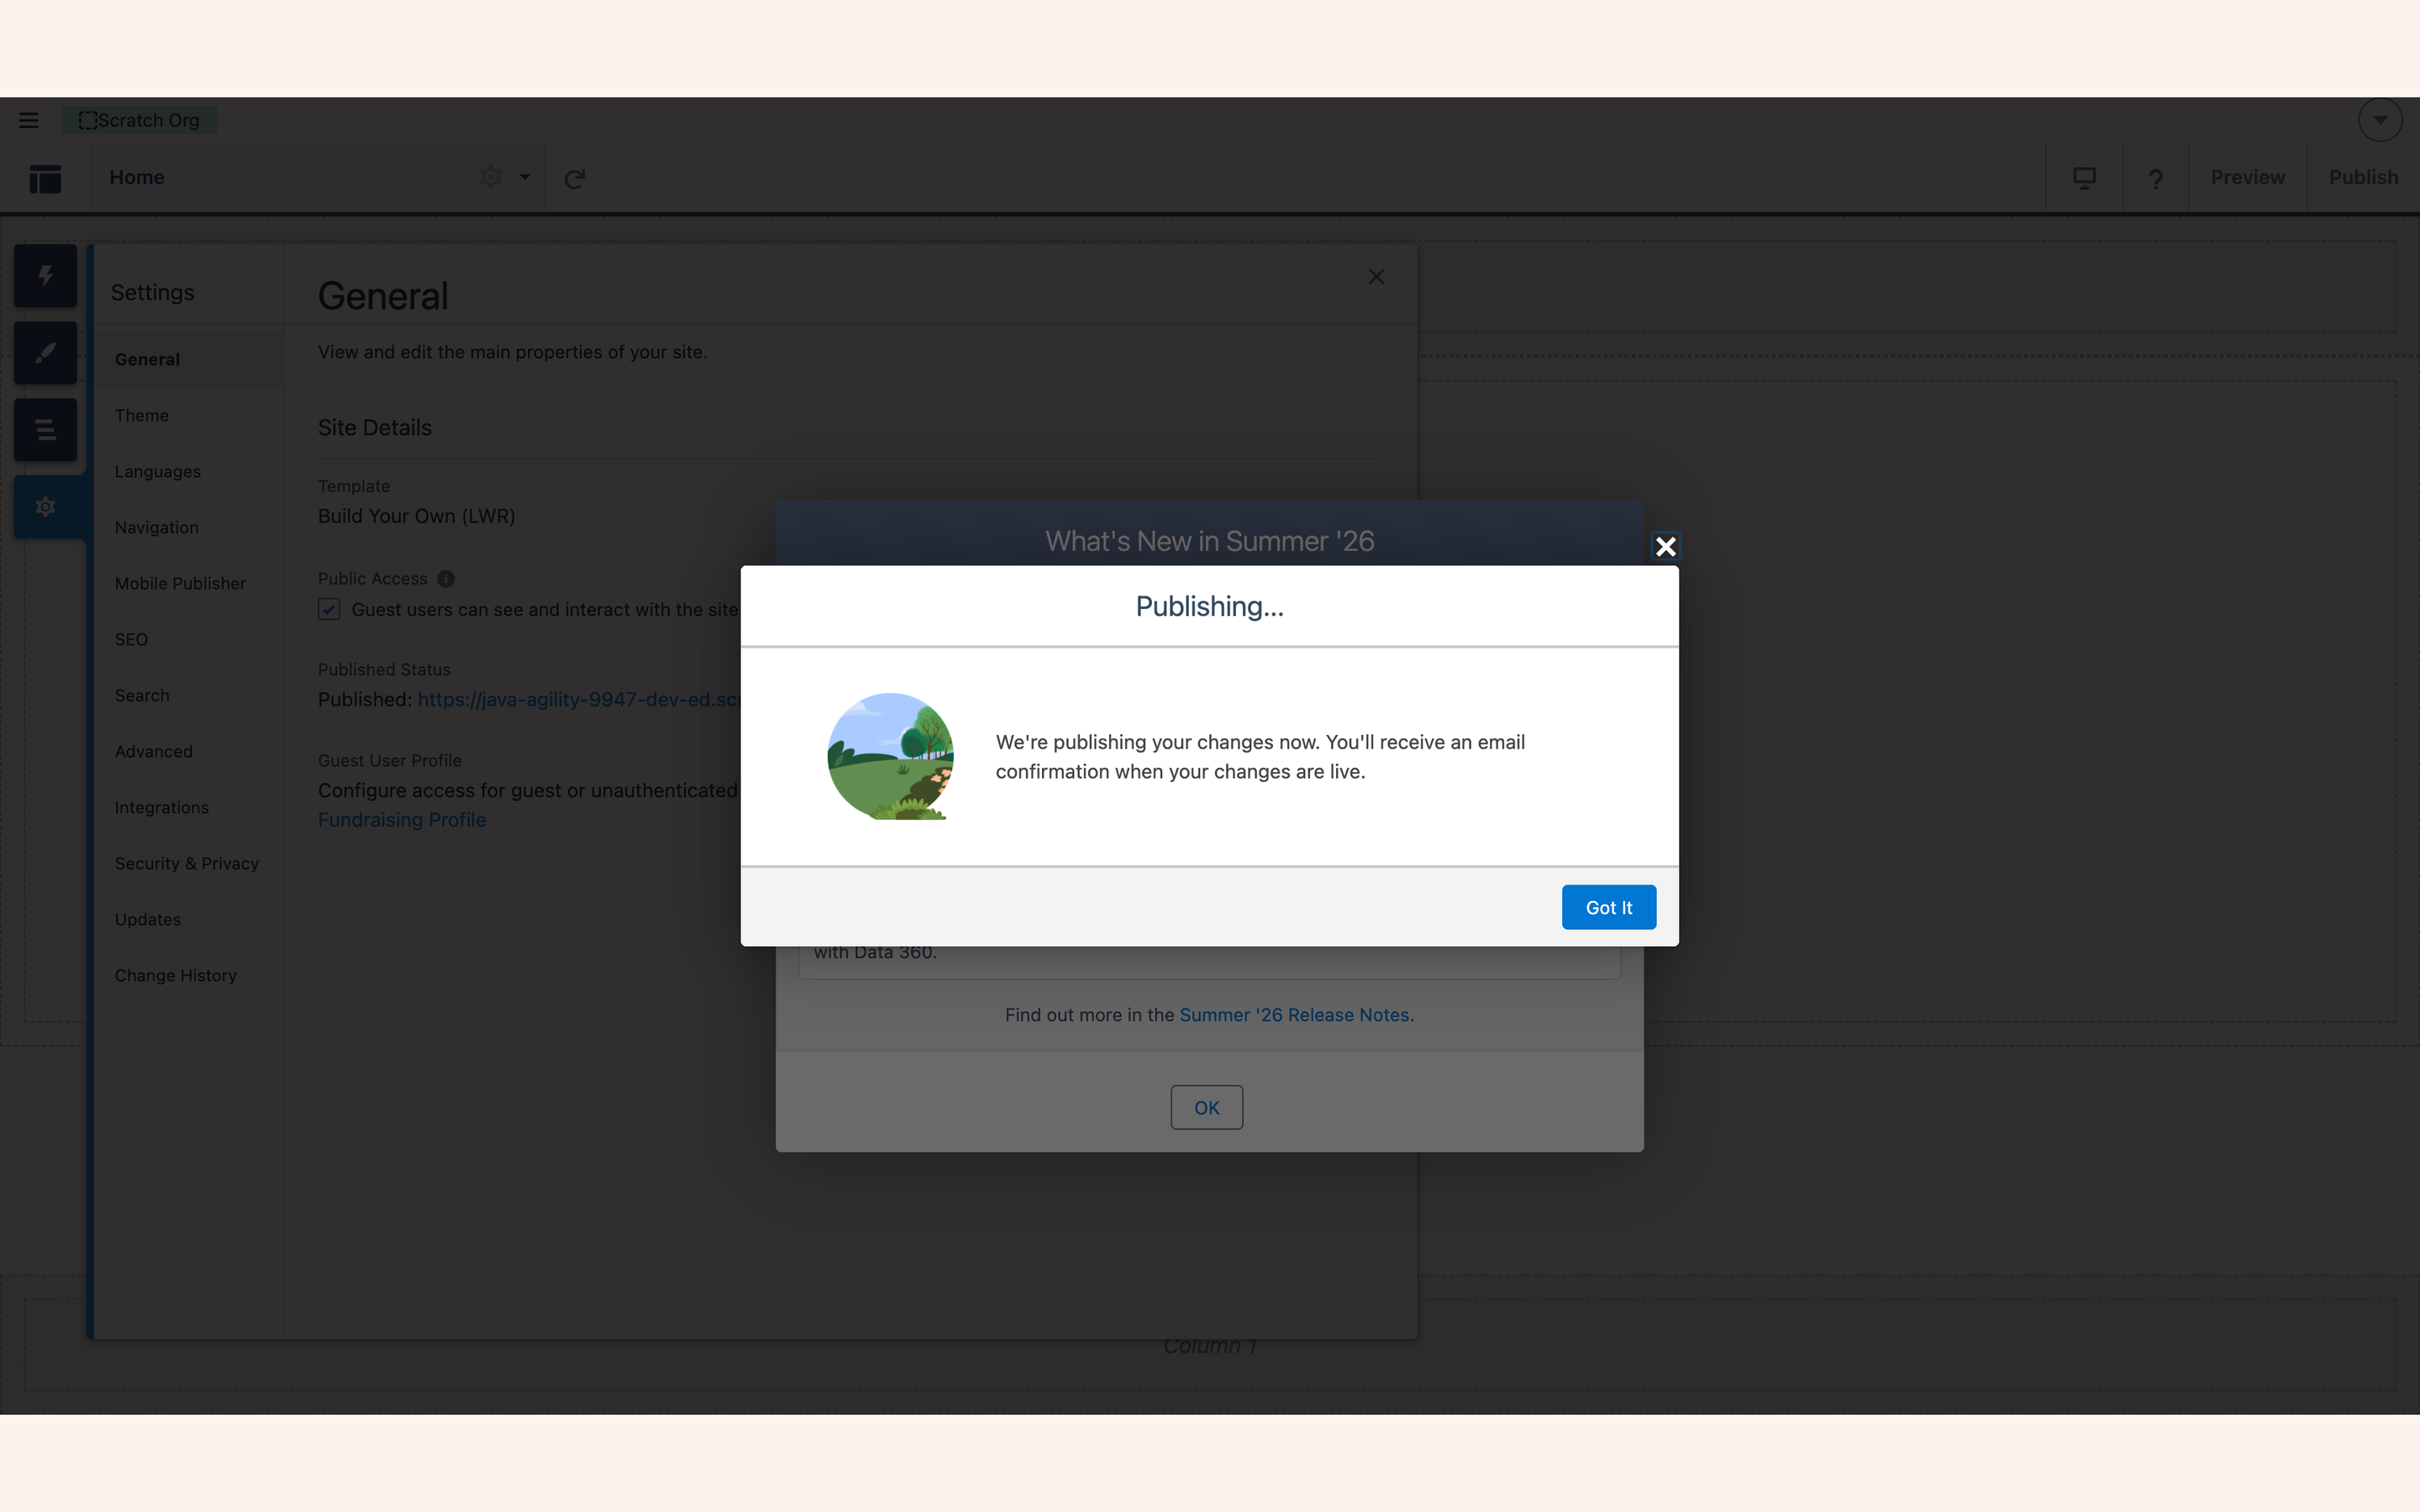
Then activate:
- Setup → Digital Experiences → All Sites → Workspaces beside your site.
- Administration → Settings.
- Activate, next to the status.
Salesforce warns that activating sends a welcome email to members; you can suppress that beforehand under Administration → Emails. Once the status reads Live, come back to Get Started, press Re-check, and the counter closes at 7 / 7 — your org is ready to take donations.
Third-party content#
Optional — nothing here is required
During the install Salesforce shows you an Approve Third-Party Access dialog listing every external domain the package wants your org to trust. This package lists Stripe and nothing else:
| Domain | Why |
|---|---|
js.stripe.com |
Loads Stripe.js, which collects the card details |
api.stripe.com |
The payment API the browser confirms against |
m.stripe.com, m.stripe.network |
Stripe's fraud-signal endpoints — payments fail without them |
hooks.stripe.com |
3-D Secure / bank authentication screens |
That is deliberate. A fundraising package asking to reach a list of unfamiliar domains reads as a warning rather than as a payment integration, so the optional features that use other hosts ship without their trusted sites. You add those yourself, only if you want the feature.
| Add this domain | Directive | Unlocks |
|---|---|---|
https://images.unsplash.com |
Image | Using an Unsplash photo as a campaign hero or social card |
https://www.youtube.com |
Frame | A YouTube video in a campaign page video block |
https://www.youtube-nocookie.com |
Frame | YouTube privacy-enhanced (no-cookie) embeds |
https://player.vimeo.com |
Frame | A Vimeo video in a campaign page video block |
To add one: Setup → Security → CSP Trusted Sites → New Trusted Site. Enter the URL exactly as written above, name it anything, tick the directive shown, leave Context as All, and save.
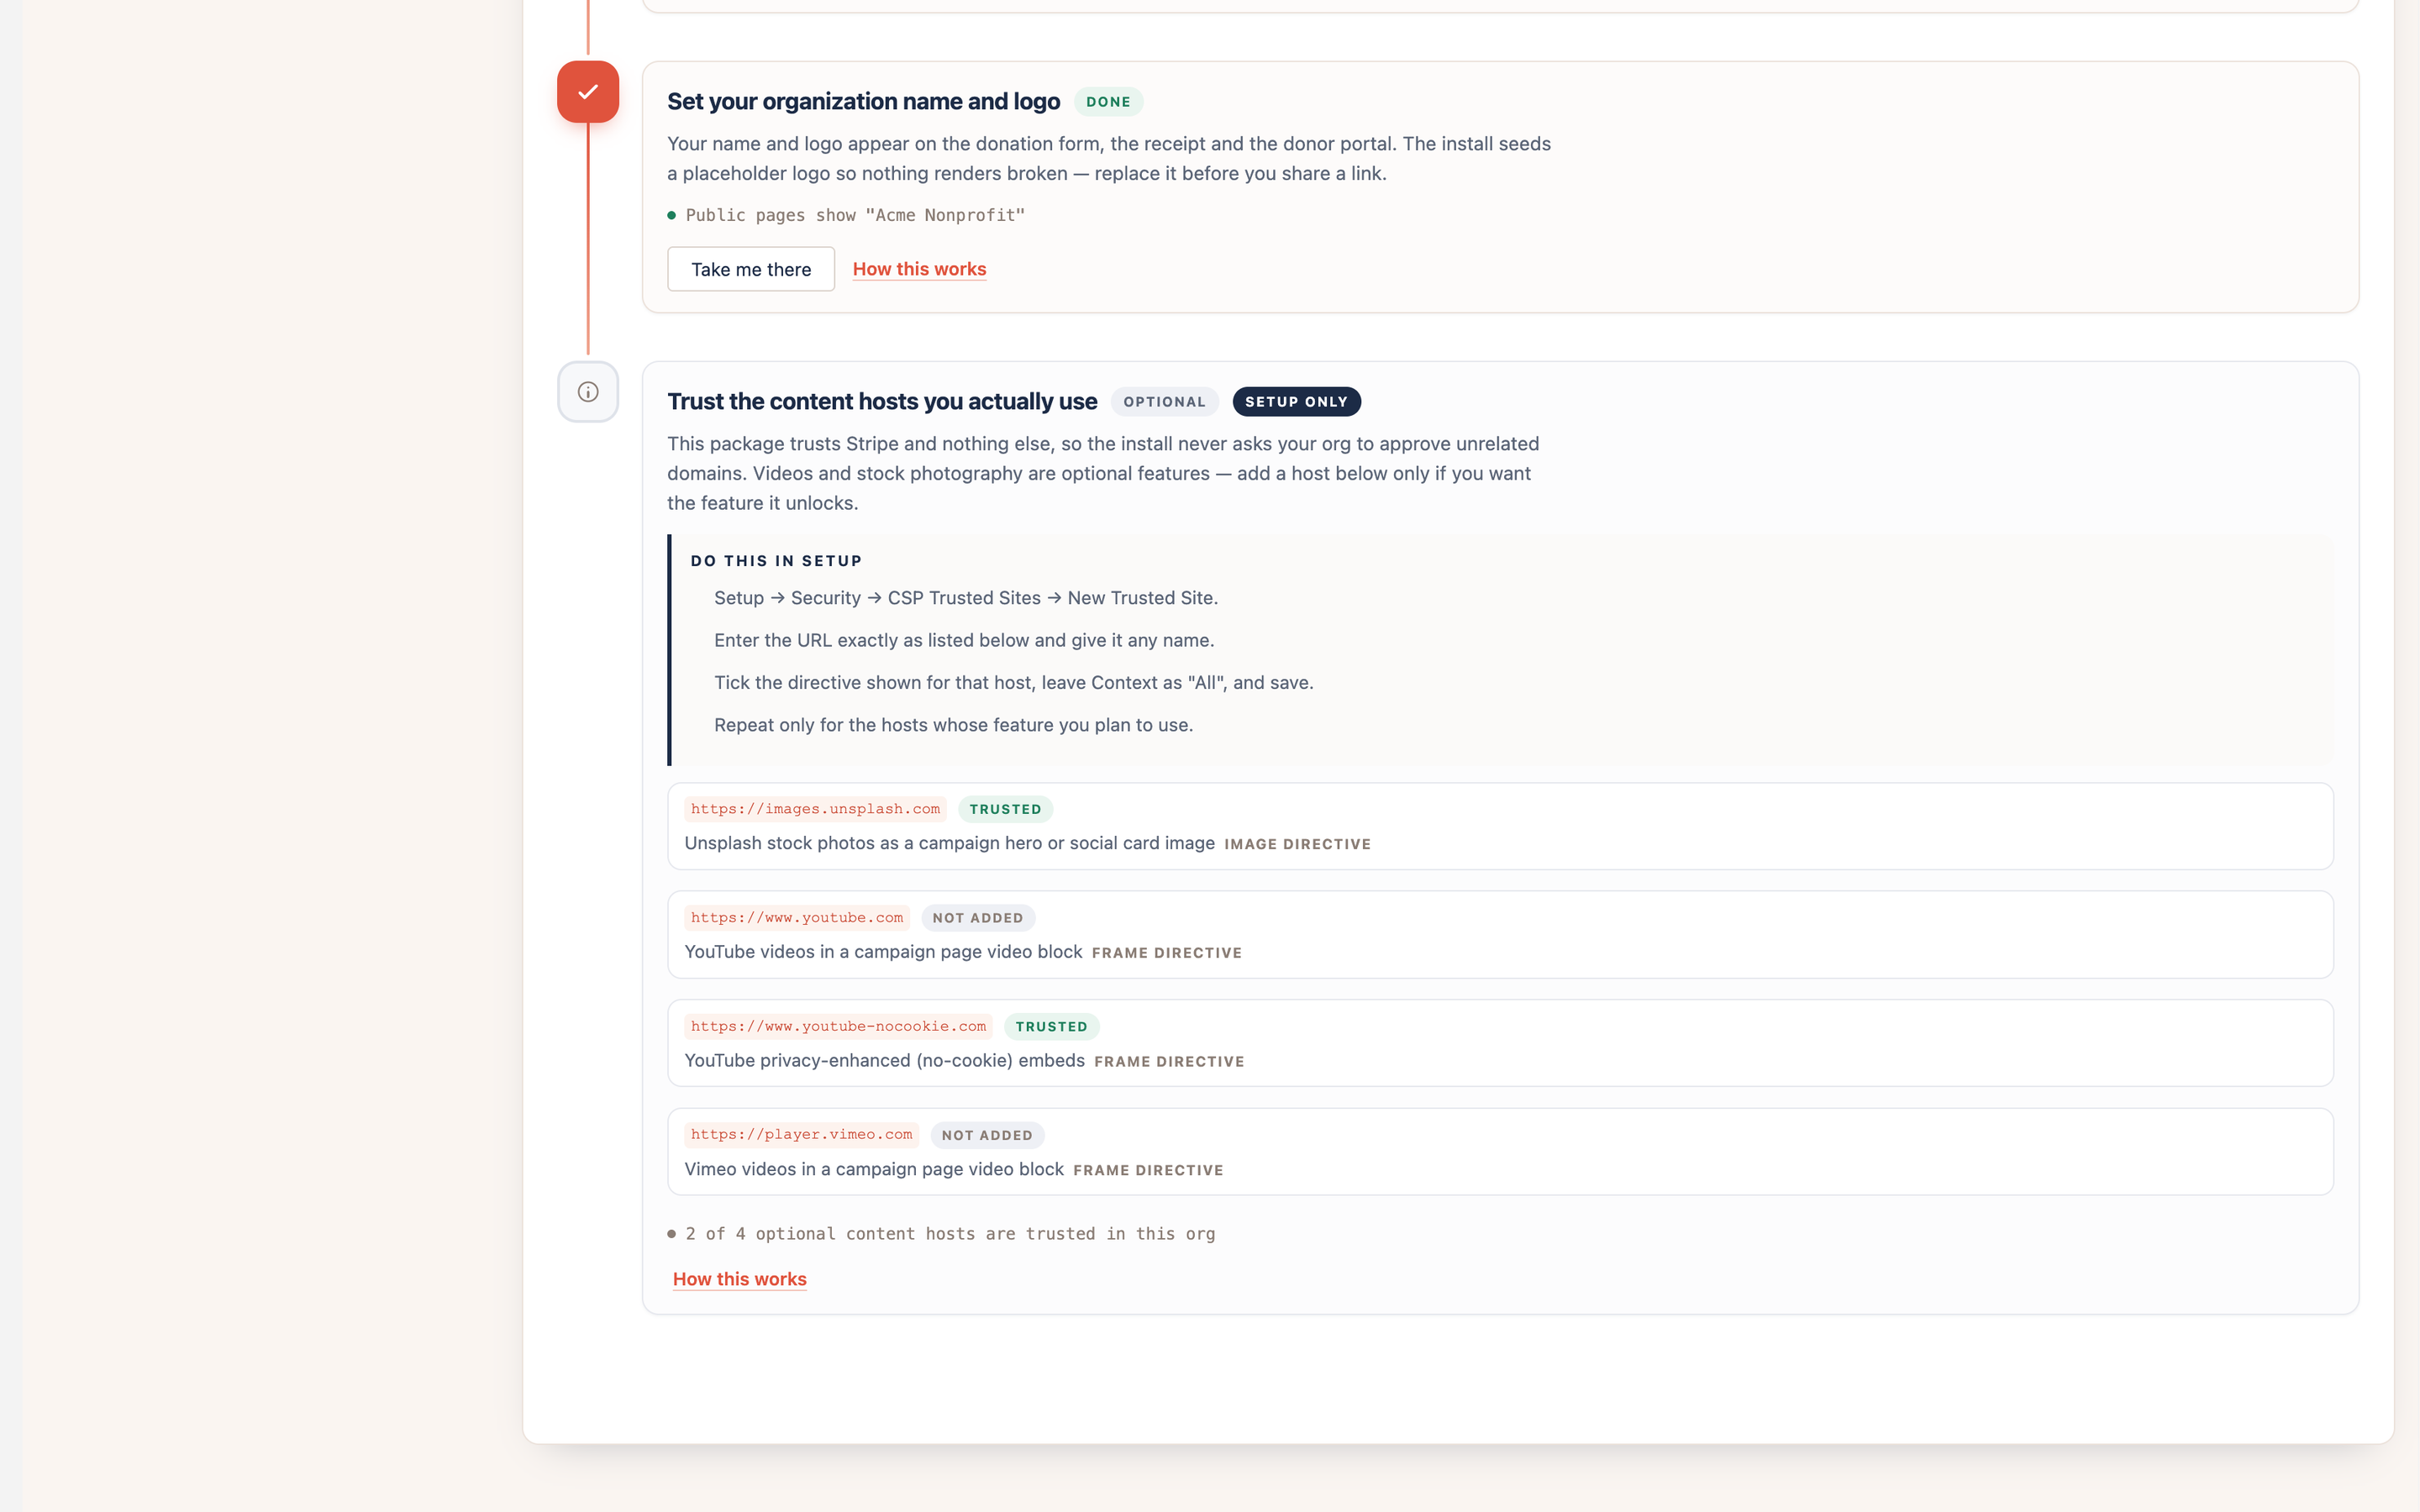
What it shows. The optional step, reading your org's trusted sites live: here images.unsplash.com and www.youtube-nocookie.com are TRUSTED and the other two are NOT ADDED — "2 of 4 optional content hosts are trusted in this org". It never counts against your seven steps and it never offers a fix button, because Salesforce does not let Apex create a trusted site. This one is yours.
A video in a campaign story is a narrower case
The story field's @[…](youtube:…) block only ever embeds https://www.youtube-nocookie.com,
and only when Play story videos on the page is switched on in Settings → General →
Organization & Donations → Story media. Left off — the default — a story video is a poster card that
links out to YouTube in a new tab and needs no trusted site at all.
If you do switch it on, the Organization panel prints the exact recipe: URL
https://www.youtube-nocookie.com, frame-src only, and Context Experience Builder Sites
(narrower than All, because a story only ever renders on a public site). See
Write a campaign story.
www.youtube.com and player.vimeo.com above are for the Page Canvas video block, which is
a different feature and accepts both hosts.
Your campaigns start with a packaged hero image, not a stock photo
The package ships its own artwork — a hero backdrop and a social share card, both drawn from the brand palette rather than licensed from a stock library — and publishes them into your org at install time. The six packaged page designs are stamped with the hero automatically and the share card resolves org-wide, so a campaign looks finished on day one. A design you create starts with an empty hero field and stays that way — a blank there is treated as your choice, not as something to fill in for you, and a campaign built on it shows a plain coloured hero unless the campaign supplies its own header image.
They are served from your own org's file domain, which browsers allow without a trusted site, so nothing on the list above is needed to see them. Replace the hero at any time by uploading your own image in Designs, or the share card in Organization & Donations; an image you have chosen is never overwritten by a package upgrade. To paste a URL from an outside host instead — Unsplash, your own CDN — that host needs a CSP trusted site first, per the table above.
An image from an untrusted host falls back to a packaged image
If a campaign's hero or an event banner points at a host your org does not trust, the browser blocks it. A page wearing one of the packaged themes then shows an abstract illustration packaged for that theme. A design you created tries its own default hero next, and then the generic packaged hero. The illustrations and the generic hero are part of the package itself, so they always load and need no trusted site. The donor sees a finished page, but not your picture.
The optional step above tells you when this is happening. After the count it lists every outside host that a published campaign or an active design takes its hero from and that no trusted site covers, for example "Campaign images come from 1 host this org does not trust, so donors see a fallback image instead: https://cdn.example.org". Add that host with the Image directive and the campaign's own picture comes back. Relative links and images stored in Salesforce are never listed, because the browser does not block them. A custom domain you set up for your Experience site is not recognised as Salesforce's own and can appear in the list. If you do not have access to read the org's trusted-site list, the step says it could not be checked instead of guessing, and shows Not checked against each optional host rather than a count.
When you're done#
The Get Started panel shows 7/7 and "Your org is ready to take donations." Setup is finished — but your org still has nothing to give to.
Everything you raise money with lives in the Fundraisers tab#
Campaigns and ticketed events are not created in Settings. Open the Fundraisers tab (App Launcher → Pledgivo → Fundraisers, or the Open Fundraisers button on the finished Get Started panel). It is the console your fundraising team works in day to day, and it is the only place a public donation page comes from.
| In the Fundraisers tab | What you get |
|---|---|
| New fundraiser wizard | A Campaign, step by step: goal and fund, designations, page design, and its public URL. |
| Ticket types | Turns a campaign into a ticketed event — tiers, prices, capacity, and the registration page. |
| The fundraiser list | Search, filter, publish, or deactivate anything already live. |
| A fundraiser's detail page | Its donations, registrations, attendees, questions, and FAQs in one place. |
The Settings console you just finished is for org-wide configuration — payments, receipts, branding, jobs. You will rarely go back to it. The Fundraisers tab is where the actual work happens.
Full walkthrough: Set up your first campaign, or Set up a ticketed event.
Put a donate button on your own website#
Your donation pages work as links, and they also work embedded. The Embedding block at the bottom of Site & Domain is where that is switched on and locked down.
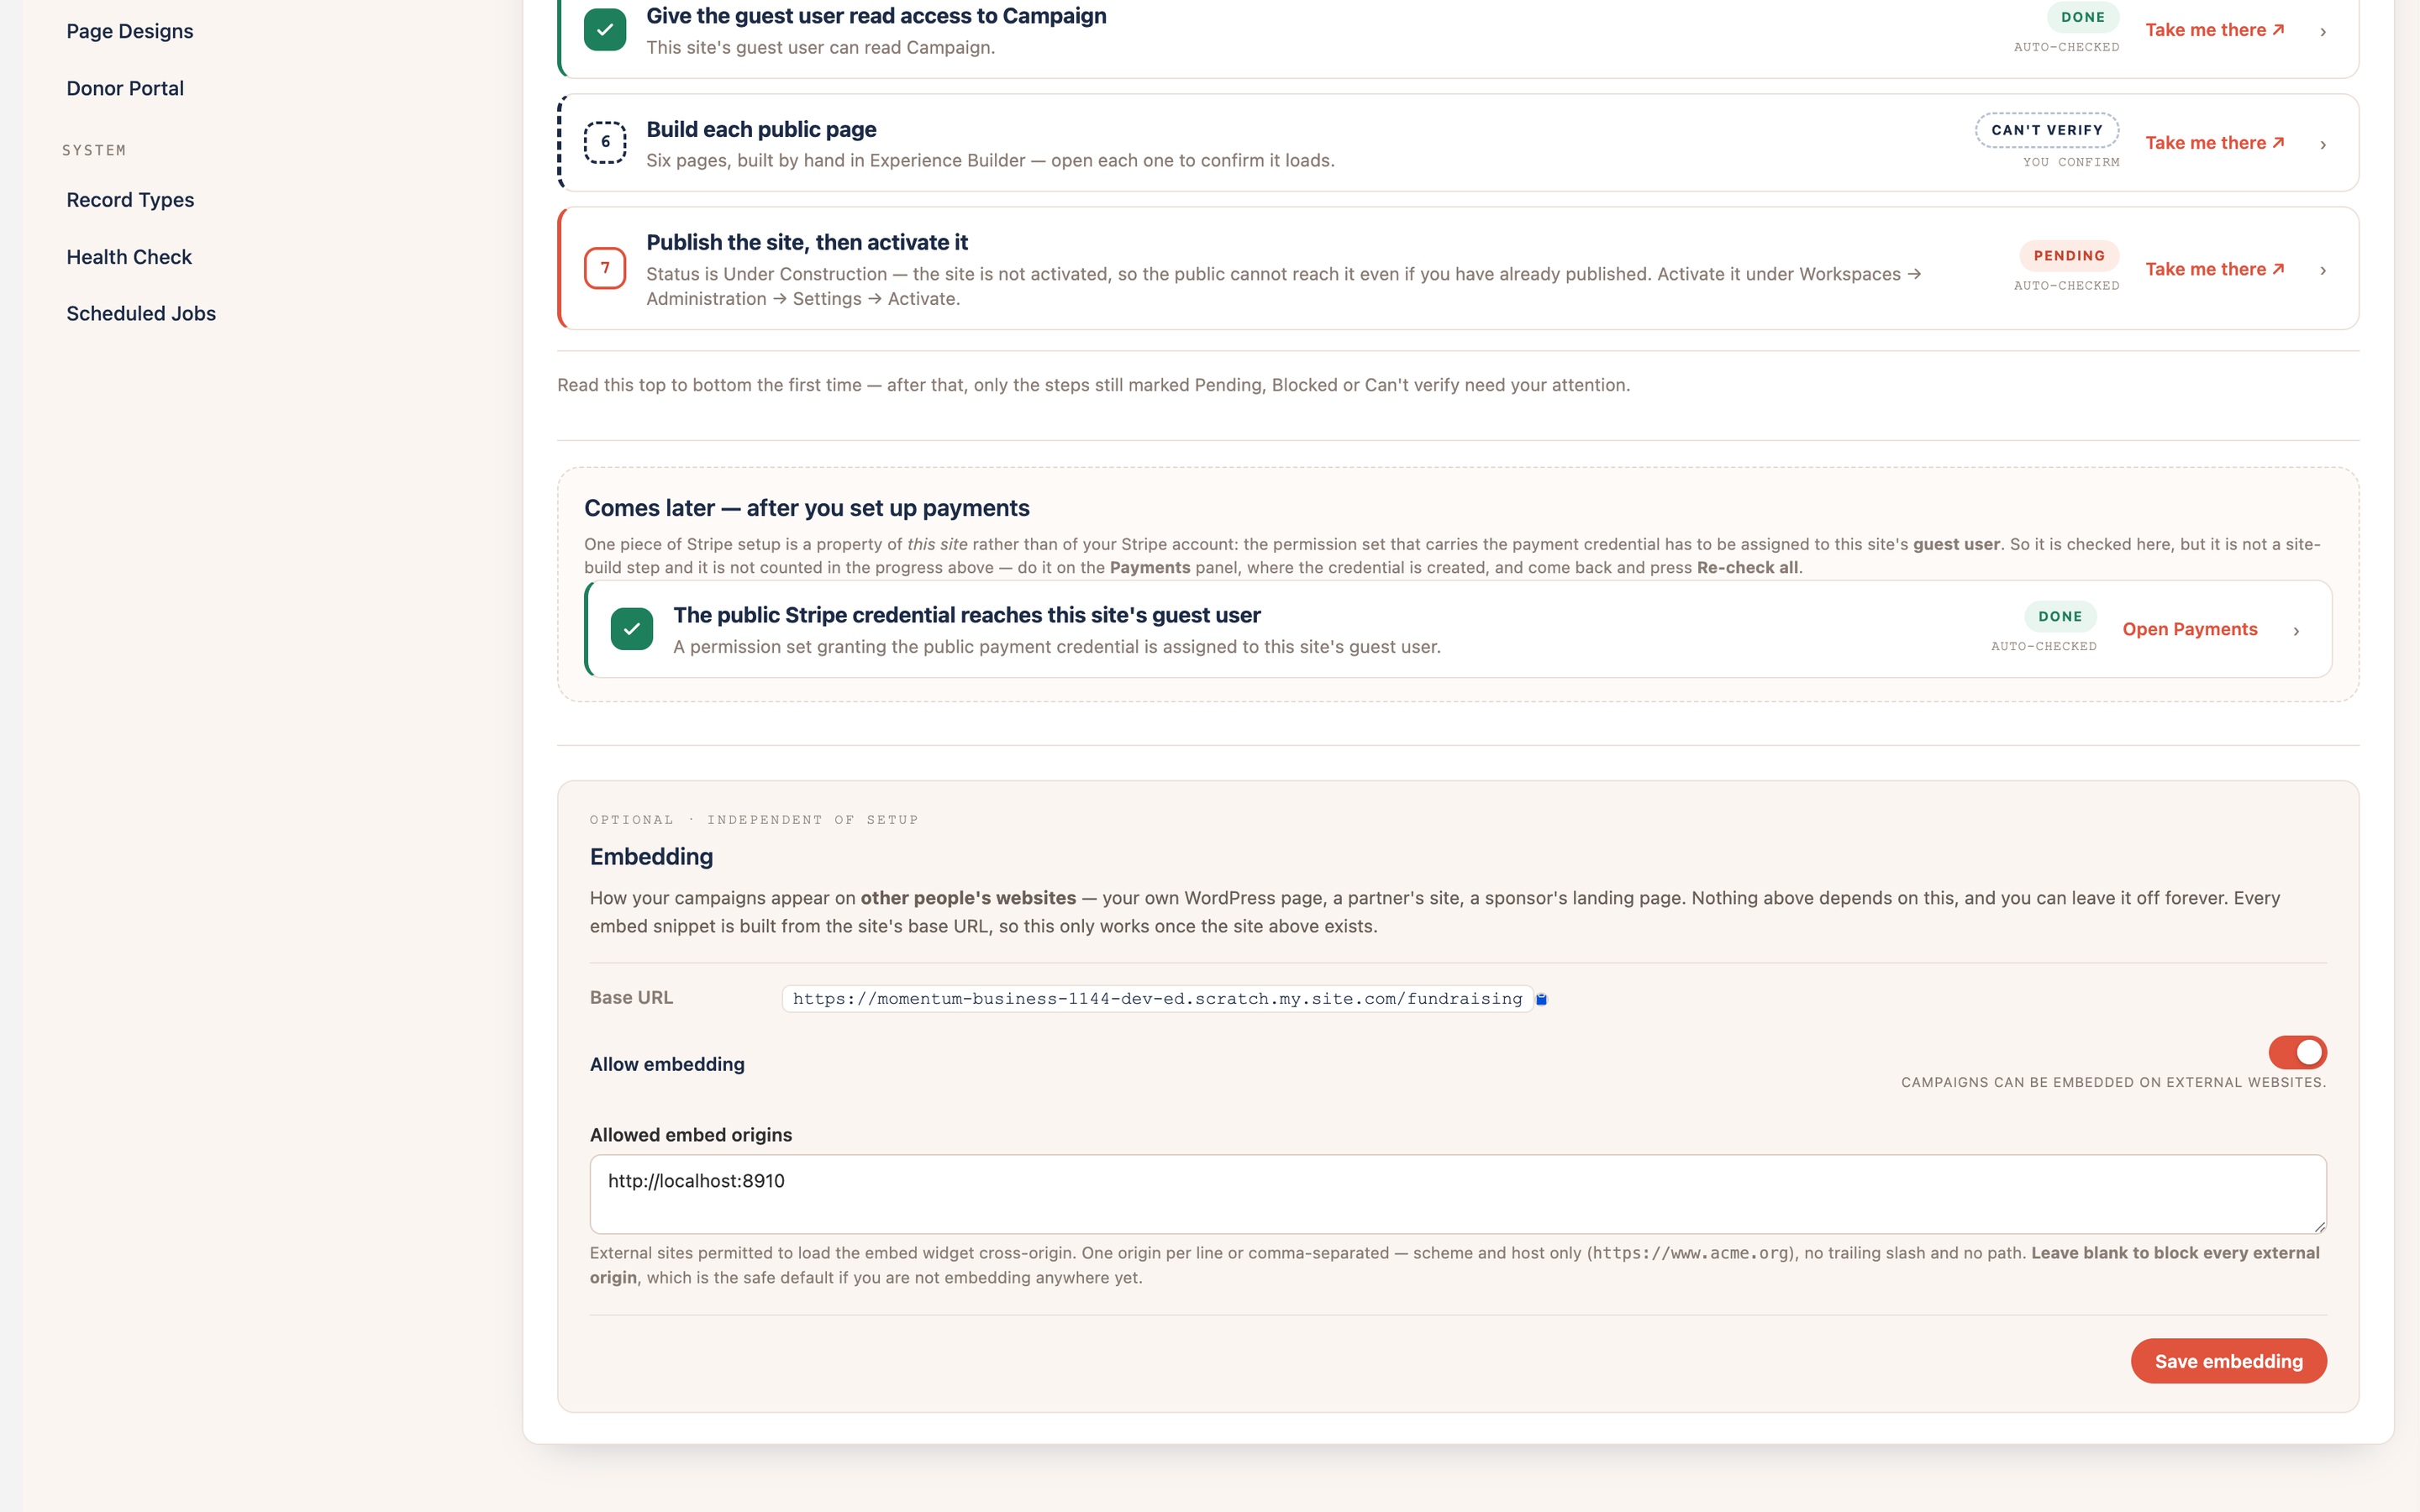
What it shows. Your site's Base URL — the real public path, the one the publish dialog printed — the Allow embedding master switch, and Allowed embed origins. That last list is an allowlist, not a formality: only the origins named there may host your widget, and it takes full origins (https://example.org), not bare domains. During development a local origin such as http://localhost:8910 belongs here and should come out again before you go live.
Full walkthrough: Embed a donate button on your website.
Then prove it end to end#
Once your first campaign is published, send yourself a real gift for the smallest amount Stripe allows and refund it. It is the only way to prove the whole path — form, payment, receipt, refund — works in your org.