Getting Started
Installation#
Pledgivo installs like any AppExchange managed package — a single package with no separate dependency to install first. It has one permission set to assign and one guest-user step for public donation pages.
Before you install#
| Requirement | Notes |
|---|---|
| Subscription | A 5-day free trial, then $49 a month (or $490 a year) per licensed fundraising admin, with a three-licence minimum — from $147 a month. Only the staff who run your fundraising need a licence; donors and event attendees never do, and the price is never a percentage of what you raise. See Pricing. |
| Edition | Enterprise, Unlimited, Performance, or Developer. Professional edition is supported for internal use only — Experience Cloud (required for public donation pages) is not available on Professional. |
| Experience Cloud | Required if you intend to accept donations from the public. Internal-only use (recording gifts staff take over the phone, for example) does not require it. See Set up your Experience Cloud site — creating the site and its pages is a manual step this package doesn't automate. |
| Stripe account | You'll need one to accept payments — it can be connected after install (see Connecting Stripe). |
No separate FFLib install
Pledgivo's Apex layer is built on the FFLib Apex Enterprise Patterns library, but it's vendored directly inside the package — there's nothing to install separately or manage as a dependency. Installing Pledgivo is all you need.
Upgrading from a pre-release pledgivo_test build
Builds before 2026-09-01 were packaged under a throwaway pledgivo_test namespace. A
managed package is permanently bound to its namespace, so there is no upgrade path from one
of those builds to this one — Salesforce treats them as unrelated packages. If Setup →
Installed Packages shows a namespace of pledgivo_test, uninstall it before installing this
version, and expect to re-enter your configuration. Current builds carry pledgivo, so
every packaged API name reads pledgivo__Donation__c and the Settings tab is
pledgivo__Settings — exactly as this documentation writes them.
Upgrading an existing install#
An upgrade keeps your data and settings. Most versions need nothing from you beyond clicking Upgrade, and the release notes say when one does.
Before upgrading from 1.1.0 or earlier to 1.1.1 or later#
Version 1.1.1 changes how a monthly or annual renewal identifies itself to Stripe, so that a Retry now after a decline really is a new attempt. A schedule caught mid-way through that change could be charged twice for one period. That can only happen when a gift's last renewal attempt before the upgrade got no clear answer from Stripe, for example a timeout. It is rare, but check before you upgrade:
-
In Setup → Developer Console → Query Editor, run:
-
Look only at rows whose Last Error begins with Indeterminate charge outcome. Most orgs have none, and then there is nothing more to do.
- For each of those rows, open the donor's payments in the Stripe Dashboard and look for a charge
on the date of the last attempt.
- No successful charge: nothing to do. The next renewal after the upgrade retries it normally.
- The charge succeeded: Pause the gift before you upgrade. After upgrading, record that period's gift by hand, set Next Payment Date to the following period, and Resume.
After upgrading to 1.1.1 or later#
From 1.1.1 the Fundraisers console checks that the user may edit the campaign before it saves anything. Salesforce grants campaign create and edit only when a user has both the Marketing User checkbox on their user record and Create and Edit on the Campaign object. Staff, System Administrators included, who could change fundraisers before the upgrade but are missing either half will see "You don't have edit access to this campaign." Tick Marketing User for them (Setup → Users → Users → Edit). Staff on the Standard User profile, which only reads campaigns, also need a permission set of your own that grants Campaign Read, Create and Edit (why).
Install steps#
Salesforce sends you to the checklist automatically
When the install finishes, Salesforce redirects you to After you install — the written version of the same seven steps, with the two that can only be done in Salesforce Setup spelled out. The in-app Settings → Get Started panel checks each of them against your org live.
- Install Pledgivo from its AppExchange listing (or a package version link, for a sandbox/pilot install). Choose "Install for Admins Only" so you control the permission set rollout in the next step. Salesforce will ask you to approve third-party access — the list is Stripe's five payment domains and nothing else. See Third-party content for what each one does and for the optional hosts (video, stock photos) you can add later if you want them.
- Assign the
Fundraising_Adminpermission set to the user who will complete setup. This grants full CRUD on every Pledgivo object plus access to the Settings console — nothing in setup is reachable without it. Also assign that user a package licence under Setup → Installed Packages → Manage Licenses (next to the package, click Manage Licenses and add them). A permission set opens the doors; the licence is the seat — a staff user with the permission set but no seat sees a "this tab needs a fundraising licence" notice on the console tabs instead of their content. Repeat both steps together for every staff user you add later; donors and event attendees never need a licence. Once you are in, Settings → General → Licence & Seats shows how many seats the org has, how many are taken and when the licence renews, with a Manage subscription link for adding seats — so you never have to guess whether there is a seat left before you add someone. Staff who will create or change fundraisers also need two things the packaged sets cannot give: the Marketing User checkbox ticked on their user record (Setup → Users → Edit), and Campaign Read, Create and Edit from their profile or a permission set of your own. Salesforce requires both before it lets anyone create or edit a campaign, and the Standard User profile only reads campaigns. Without them the Fundraisers console refuses every save (why). Staff who will publish campaign documents also need the Salesforce permission Create Public Links. The Standard User and System Administrator profiles already include it; a user on Minimum Access needs it added through their profile or a permission set of your own (who can publish a file). - Open the Pledgivo app. App Launcher → Pledgivo. The app lands on Donation
Monitor, the tab you will live in once gifts start arriving; the Settings tab at the
far right (visible to
Fundraising_Adminusers only) is where the rest of setup happens. - Work through Settings → Get Started. The console opens on it. Each of its seven steps is checked against your org rather than ticked by hand, and several fix themselves in one click. See After you install for the written walkthrough, and Setup assistant for a tour of the panels behind it.
- If you're publishing public donation pages, create your Experience Cloud site. Salesforce doesn't provision this for you on install — see Set up your Experience Cloud site for the full walkthrough: creating the site, building the Donate page and its supporting pages, and publishing. Two things in that walkthrough are easy to skip and both reach donors: delete the LWR template's stock "Start Building Your Page" HTML Editor from Home via Experience Builder's Page Structure rail before publishing, or it publishes above your campaign gallery; and publish and activate are separate actions — if Experience Workspaces or the All Sites pane won't load in your org, the guide gives a Metadata API route to activation.
- Grant the guest user permission set — and Campaign read through a set of your own. Assign
Fundraising_GuestDonorto your Experience Cloud site's guest user — not its profile; permission sets attach to users. Reach that user through Experience Builder → the settings gear → General → the Guest User Profile link → View Users; it is not listed under Setup → Users, and Administration → Members does not reach it (the Experience Cloud guide spells the route out). Without this assignment, guest donors can view campaign pages but the donation form cannot submit. Then build one permission set of your own — Guest Campaign Read is the name the screenshots use; the name is yours to choose — that grants Read on the standard Campaign object, Read and nothing else, and assign it to that same guest user. A managed package is not allowed to ship standard-object permissions, so this one grant is always yours to make. Without it every public campaign, donation and ticket page fails to load. The Settings console's Site & Domain panel checks both against your org — steps 4 and 5. -
Authorize the Stripe external credential — in a permission set you create. Salesforce won't let a managed permission set grant access to an external credential principal, so the package cannot ship this and neither packaged set can be edited to add it. Create your own permission set in your org, give it External Credential Principal Access to the Stripe credential's principal (
OrgPrincipalis only the suggested name — yours is whatever you typed), and assign it to your fundraising users and your site's guest user. Until that's done, every Stripe callout fails with an authorization error even though the secret key is stored correctly. See Grant the Stripe credential. -
Create your first campaign. Setup is org-wide configuration; the things donors give to are made in the Fundraisers tab. See Set up your first campaign.
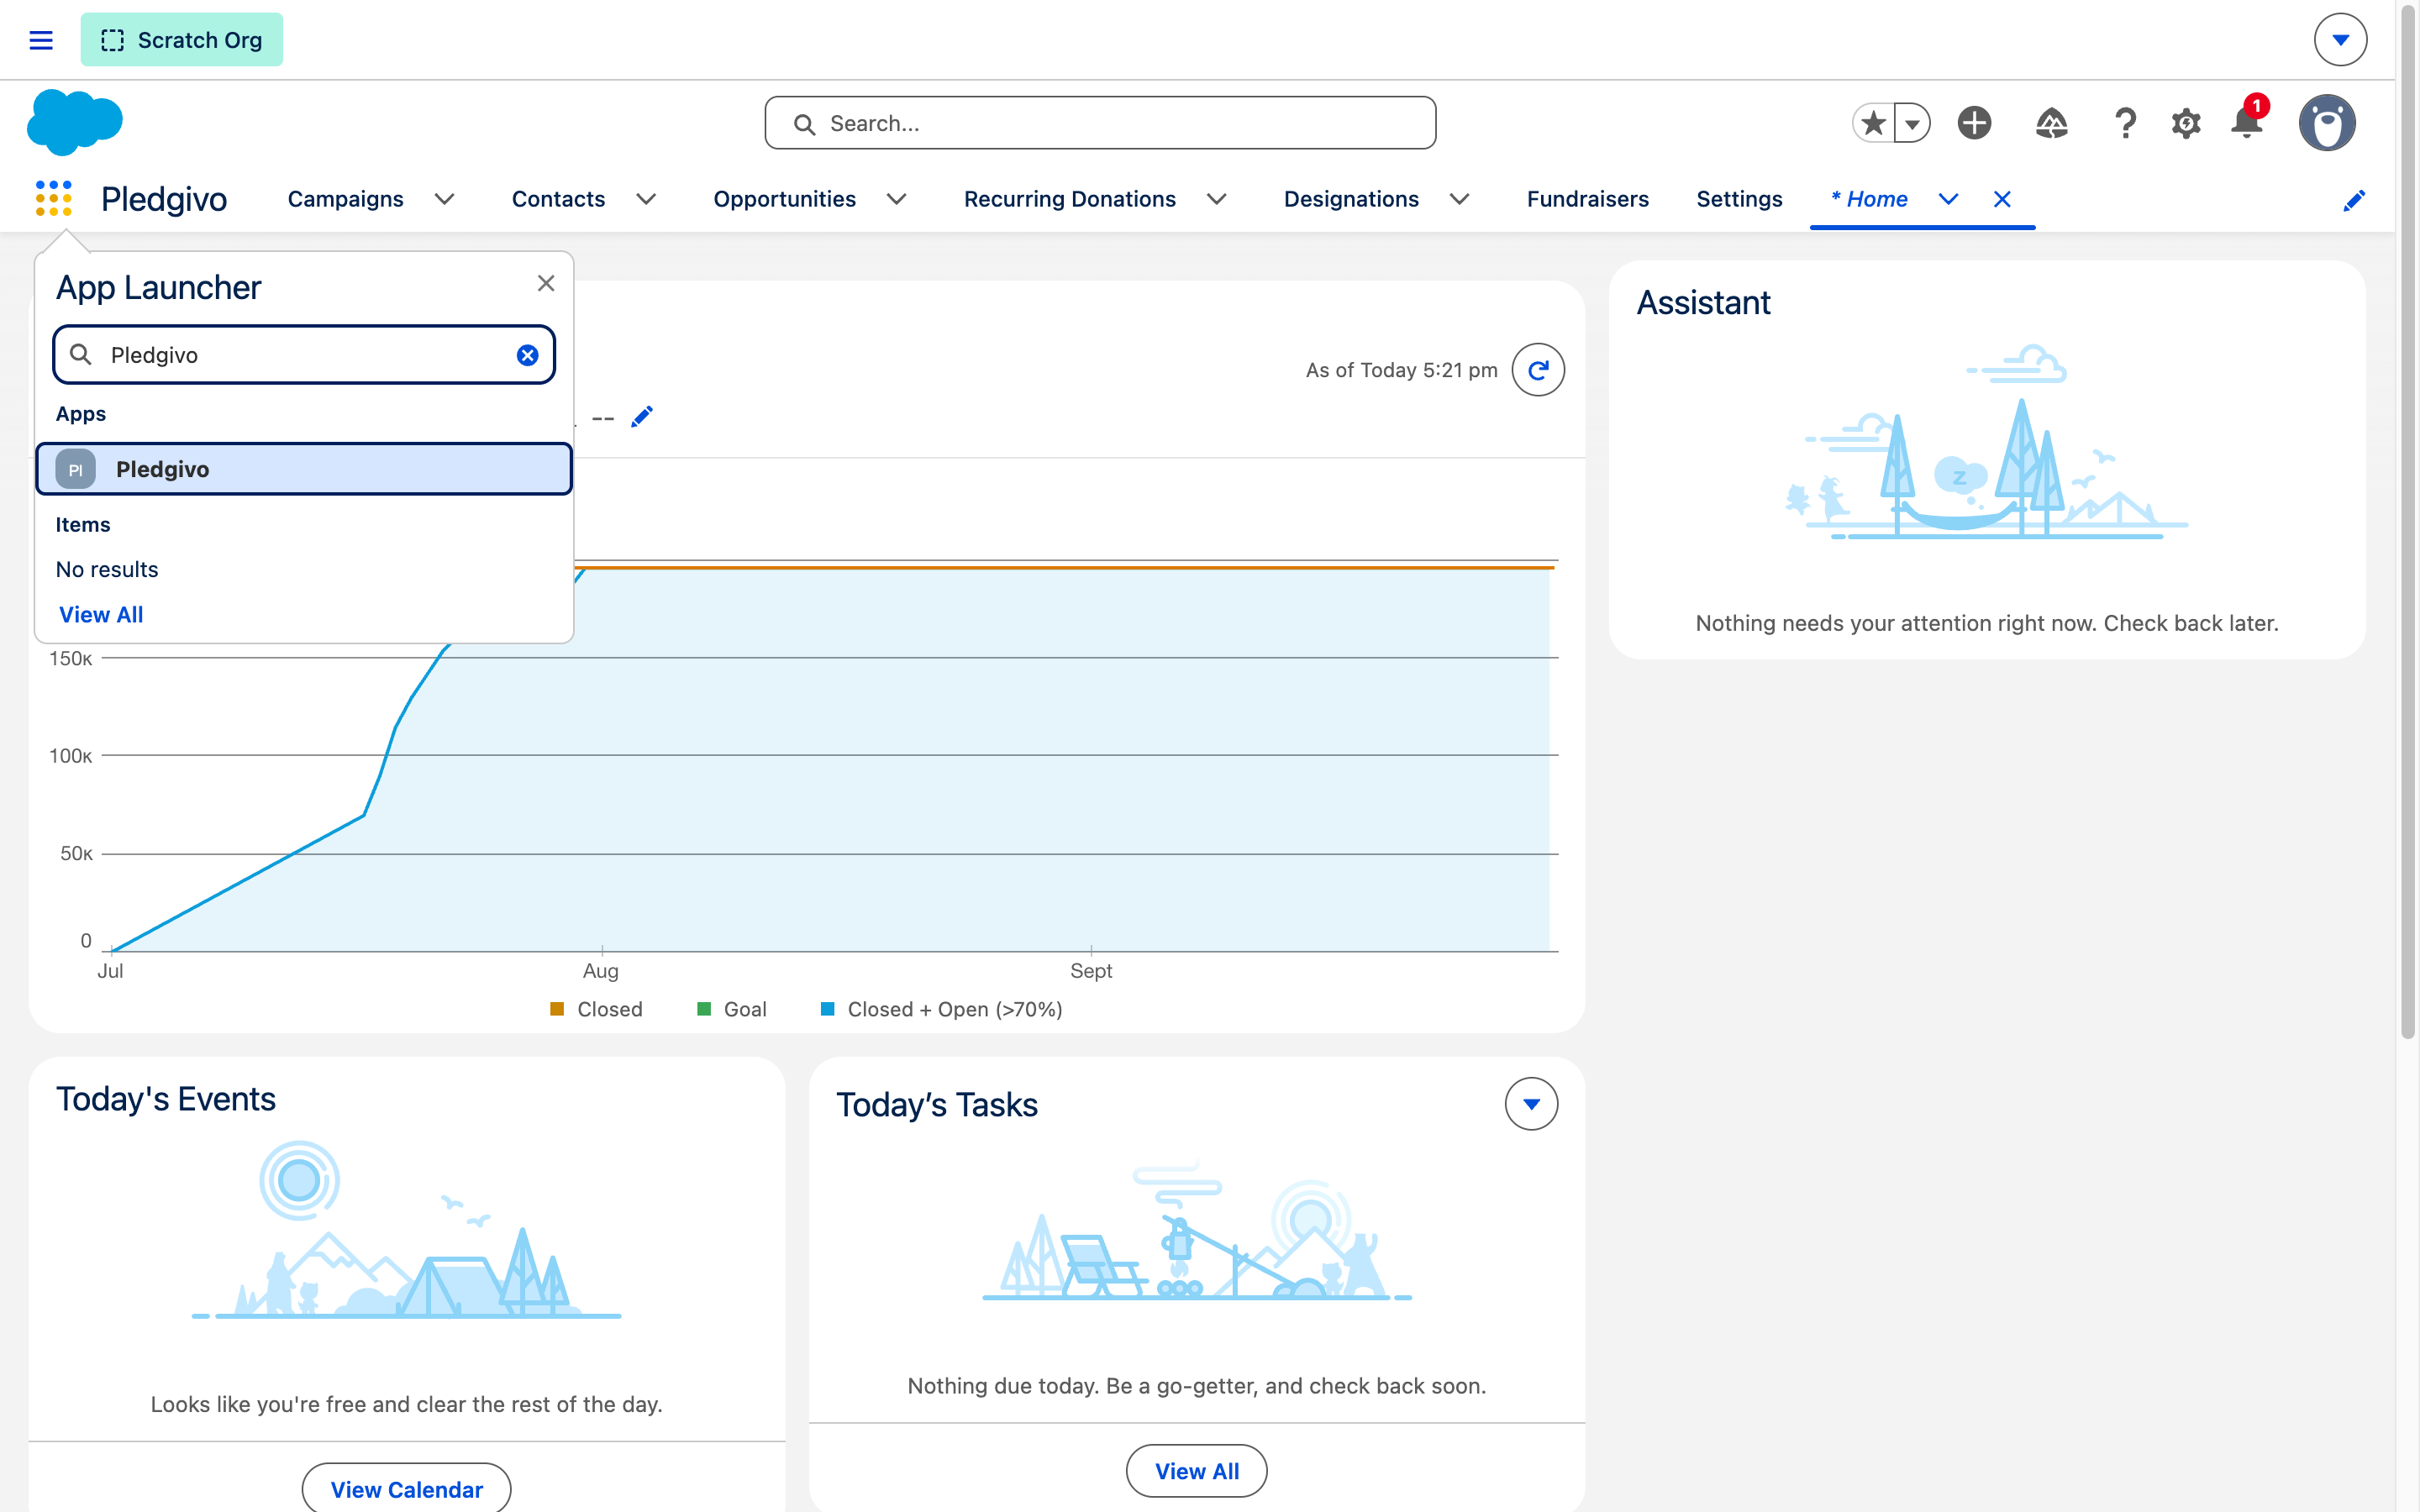
**What it shows.** The App Launcher with the Pledgivo app tile, and the app's navigation bar behind it. The bar runs left to right by how often you touch each tab: the two consoles you work in daily (Donation Monitor, Fundraisers), then the records a gift moves through (Campaigns, Opportunities, Recurring Donations, Contacts, Designations), then Guest Requests, and finally the two admin tabs (Diagnostic Logs, Settings).
No webhook to register
Some fundraising platforms require you to copy a webhook URL into a payment provider's dashboard as part of setup. Pledgivo has no inbound webhook at all — Salesforce confirms every payment by asking Stripe directly, so there's no public endpoint to secure or webhook secret to store. See Donations & payments for how that works.
Watch the guest-user steps#
The three guest-user steps, done by hand on a real org. The last one — granting Campaign read by hand — is the step the package cannot ship for you, and until it is done the fifty-eight packaged Campaign field grants do nothing.
What gets installed#
| Component | Purpose |
|---|---|
| Custom objects | Recurring Donation, Designation, Payment Method, Payment Account, and others |
| Fields on standard objects | Opportunity, Campaign, Contact, and Account each gain Pledgivo-specific fields (payment status, campaign design, donor totals) |
The Pledgivo Lightning app |
The one branded component in the package — everything else uses functional naming |
| Four permission sets | Fundraising_Admin, Fundraising_User, Fundraising_ReadOnly (staff, scoped by role); Fundraising_GuestDonor (site guest — donation pages) |
| …but not standard object access | Salesforce does not allow a managed package to ship permissions on standard objects, so none of the four sets grants Campaign, Opportunity, Contact, Account or Product2 itself. Staff on a standard Salesforce profile already have that access; the site guest user does not, which is why step 6 above grants it by hand |
| Email templates | Donation receipt, recurring confirmation, failed-payment alert, dunning |
| Reports & dashboards | Campaign performance, donor retention, top donors, recurring donation health, and more |
Editions and Experience Cloud#
Public-facing donation pages, the donor self-service portal, and event ticket pages are all built on Experience Cloud (Enhanced LWR). If your org is on Professional edition, or you haven't provisioned an Experience Cloud site yet, Pledgivo still installs and works for internally-recorded gifts — you just won't be able to publish a public donation page until a site exists. See Set up your Experience Cloud site once you're ready.
Next steps#
-
Run through setup
Organization defaults, record types, and org-feature detection.
-
Create your Experience Cloud site
Build the site, its pages, and grant guest access — required for public donation pages.
-
Connect a payment account
Add a Stripe account and route campaigns to it.
-
Launch your first campaign
Create a Campaign, design its donation page, and publish it.